Have you ever wished you could add someone to a photo, whether it's for a special occasion or just to complete a group shot? Perhaps you wanted to add someone to a group photo they missed or create a fun composite image. This guide will equip you with the skills to add people to photos like a pro, exploring both professional software and accessible apps.
The Power of Digital Compositing: Understanding the Fundamentals
Digital compositing, the art of combining multiple images into a single, cohesive one, has become increasingly sophisticated. At its core, it's about creating an illusion of reality where elements from different sources appear to belong together. For desktop editing, Adobe Photoshop reigns supreme, offering a vast array of powerful tools for seamlessly integrating people into images.
Mastering Photoshop's Essential Tools
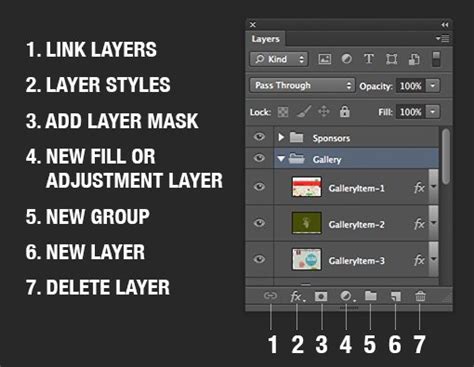
Photoshop's Layers panel is crucial for organizing and manipulating image elements. We can stack multiple layers, each containing different parts of our composite image. To add a new layer, we click the "New Layer" icon at the bottom of the panel. We can group related layers by selecting them and pressing Ctrl+G (Cmd+G on Mac) for better organization.
When it comes to isolating subjects, several tools are indispensable. The Quick Selection tool allows us to quickly select areas by brushing over them. For more precise control, we use the Lasso tool to manually draw selections. The Pen tool offers the most accuracy for creating paths around subjects, particularly for intricate shapes. The Magic Wand selects areas of similar color, useful for relatively uniform backgrounds. Once a subject is isolated, the Eraser tool removes unwanted parts of layers. For more advanced touch-ups or background extensions, the Clone Stamp tool copies areas of an image.
To ensure a natural blend, adjustment layers let us modify color and tone non-destructively. This means you can always go back and tweak these changes without permanently altering the original pixels. The Brush tool, combined with layer masks, is invaluable for softening edges and seamlessly blending subjects into their new environments.
Preparing Your Image for Seamless Integration
Proper image preparation is crucial for seamlessly photoshopping someone into a picture. For desktop editing, Photoshop's Quick Selection tool is often the most effective starting point for isolating subjects. Another option for simpler backgrounds is using the Magic Eraser tool. For complex backgrounds, creating a mask layer provides non-destructive control over the cutout. For fine details like wisps of hair, the Refine Edge brush is invaluable, allowing you to intelligently blend intricate edges. We can also use the Quick Mask mode for intricate selections, painting areas to be selected or deselected.
Advanced Compositing Techniques for Realistic Results
Advanced compositing techniques allow us to seamlessly blend elements into images, making the final composition look as natural as possible. To add someone to a picture, we start by selecting the person from their original image. Next, we refine the edges to ensure a clean cutout, free from distracting background artifacts.
Once the subject is isolated, we scale and position them to fit naturally within the scene. This involves considering perspective, relative size, and placement within the overall composition. For shadows, which are critical for grounding a subject, we create a new layer set to a Multiply blend mode. This mode simulates how shadows interact with light. To further enhance realism, we add a drop shadow beneath the person's feet, mimicking how they would cast a shadow in the real world.
Achieving Naturalism: The Devil is in the Details
Achieving natural-looking results when adding someone to a picture requires meticulous attention to detail and the application of proper techniques. Adjust the brightness, contrast, and saturation of the inserted image to seamlessly blend with the original photo's characteristics. Pay close attention to edges; feathering the selection slightly can avoid harsh lines and create a softer transition. Meanwhile, utilize layer masks for precise control over blending, allowing for localized adjustments.
Consider perspective and scale. Resize the added person proportionally to match the existing subjects in the scene. Apply matching grain or noise to the inserted element for cohesiveness, ensuring it doesn't look unnaturally smooth compared to the rest of the image. Match skin tones by sampling colors from other people in the image or from the surrounding environment.
Ensure consistent lighting direction and intensity. Add highlights and shadows to the inserted person that align with the light sources in the original photo. Match the depth of field; if the background is blurred, apply a similar blur to the edges of the added person to simulate focus. Replicate any environmental effects present in the original, such as rain, snow, or lens flare, to further integrate the subject. Lastly, fine-tune clothing textures and hair details to match the style and quality of the original image.
Alternative Tools: Apps and Online Editors
For those without Photoshop or seeking more accessible options, several powerful apps and free online tools excel at adding people to photos through digital manipulation.
Mobile and Online Solutions
YouCam Perfect is one of the best free apps for adding people to photos, offering a user-friendly interface for mobile editing. YouCam Perfect and Photoshop Express are popular apps for photoshopping someone into a picture, providing convenient ways to achieve impressive results on the go. For iPhone users, Photoshop Express offers an effective method to cut and paste people into photos.
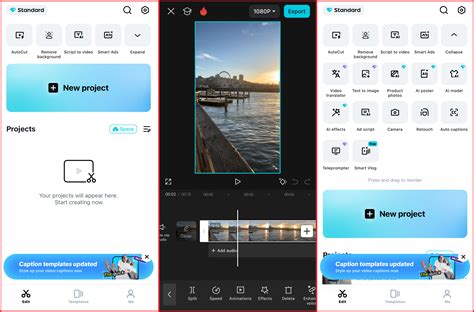
Several free apps allow you to add people to photos. MyEdit is an ultimate mobile app that lets you seamlessly insert people into pictures with just a few taps. Looking for the easiest way to add someone to a photo? MyEdit is the answer. You can import your portrait or selfie by tapping "Background Changer," then uploading the portrait you want to add to the photo from your gallery. Completing group photos is made easy; if you forgot to include someone in a family or team picture, these apps can help.
Yes, several online tools offer free options for adding people to photos. Pixlr X and Photopea are browser-based editors that provide similar functionality to desktop software like Photoshop, including layer support and blending modes for combining multiple images. PhotoScissors provides an easy way to remove backgrounds from images of people, a crucial first step in compositing. Snapseed, while primarily for mobile, has selective adjustment tools to help inserted elements match the original image.
AI-Powered Assistance
AI-powered tools are emerging to simplify the process of adding people to photos. Some apps use machine learning algorithms to automatically detect and cut out subjects, significantly speeding up the workflow. These tools can analyze images and identify people, offering a quick way to isolate them for further manipulation.
Practical Steps for Adding a Person to an Existing Photo
Adding a person to an existing image requires careful editing to create a seamless result. To begin, we need to open our chosen editing software or app and select our images. Next, we'll use the selection tools to cut out the person from their original background. The Pen Tool or Quick Selection Tool work well for this task. Once selected, we'll copy the person and paste them into the background image as a new layer.
With the person added, we'll use the Free Transform tool to adjust their size and orientation to match the background. To match the lighting, we'll adjust the brightness and contrast of the added person. Color correction is essential for a realistic composite. Finally, we'll add shadows to ground the person in the scene, ensuring they appear naturally integrated.
Step-by-Step Mobile Integration (MyEdit Example)
- Import Your Main Image: Open the MyEdit app and select the background photo you want to add someone to.
- Add the New Person: Use the âAdd a Photoâ feature to insert the portrait of the person you wish to add from your gallery.
- Remove Background: Utilize the AI Cutout tool to precisely remove the background from the inserted person's image.
- Adjust Placement and Size: Use the Free Transform tool to adjust the size, position, and orientation of the inserted person to blend naturally within the scene.
- Refine Lighting and Color: Adjust the brightness, contrast, and color balance of the inserted person to match the lighting and color palette of the main image.
- Add Shadows: Create shadows to ground the person in the scene, enhancing the illusion of depth and realism.
How To Add Someone Into a Photo On Android!
Optimizing Your Final Image
When photoshopping someone into a picture, optimizing the final image for various media formats is crucial. For web use, it's recommended to reduce file sizes to improve loading speeds. For print, higher resolutions are necessary; we typically use 300 PPI for most print applications. Color profiles also differ between web and print.
File Formats and Resolution Considerations
We choose JPEG for photographs and complex images with many colors. It offers good compression and smaller file sizes, ideal for faster web loading. PNG is our go-to for images requiring transparency or those with text and sharp edges. It uses lossless compression, maintaining image quality but resulting in larger file sizes. Understanding these formats ensures your composite image looks its best, whether online or in print.