The Graduated filter in Adobe Lightroom is a powerful yet often underutilized tool that allows for selective adjustments within an image. Unlike global adjustments that affect the entire photograph, the Graduated filter enables photographers to apply edits to a specific portion of a scene, creating a seamless transition between the adjusted and unadjusted areas. This tutorial will delve into the intricacies of this tool, explaining how it works, its various applications, and providing step-by-step guidance for achieving optimal results, drawing from extensive user-provided insights.
Understanding the Graduated Filter's Mechanism
At its core, the Graduated filter operates on a principle of gradual intensity. When you apply a Graduated filter, Lightroom creates a gradient that transitions from an effect at 0% intensity at one edge to 100% intensity at the other. This means the adjustment doesn't abruptly start or stop but rather fades smoothly across the selected area. This subtle transition is key to its effectiveness, allowing for natural-looking edits that enhance, rather than overpower, the original image.
The "effect" of the Graduated filter isn't singular; it's a versatile tool capable of applying a wide array of edits. This flexibility makes it indispensable for photographers seeking to fine-tune specific elements within their composition without altering the entire scene.

When and Why to Use the Graduated Filter
The Graduated filter shines in situations where a particular part of an image requires attention, but the rest of the scene should remain untouched. This is particularly common in landscape photography, where adjusting the sky is a frequent necessity. By applying a Graduated filter to the sky, photographers can enhance its detail, contrast, and drama without impacting the foreground or midground.
However, the utility of the Graduated filter extends far beyond landscape photography. Portrait photographers also find value in its selective editing capabilities. The key takeaway is to avoid restricting the tool to predefined uses. Understanding its fundamental operation and then experimenting with its various applications can unlock new creative possibilities.
Step-by-Step Guide to Applying the Graduated Filter
Getting started with the Graduated filter in Lightroom Classic is straightforward.
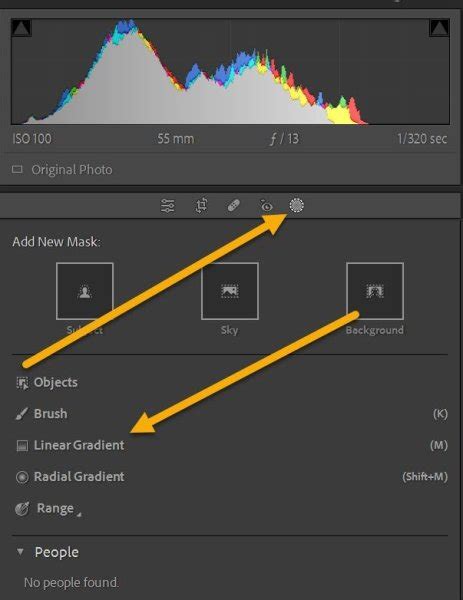
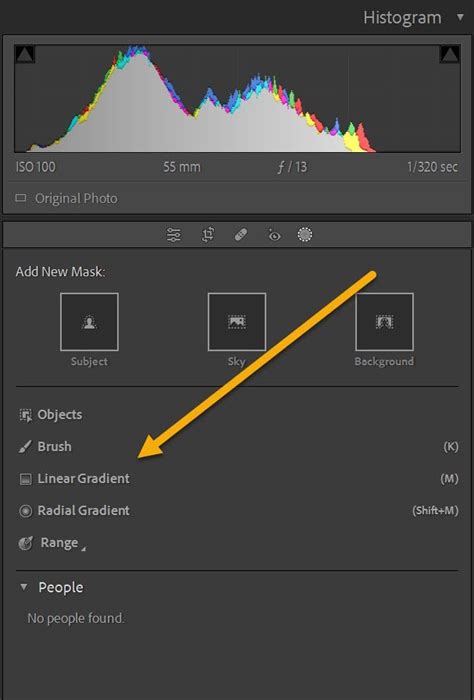
Locate the Tool: Navigate to the Develop module in Lightroom Classic. Just below the Histogram and on the right-hand side, you will find a row of icons. The fourth icon from the left represents the Graduated Filter. The keyboard shortcut to activate it is 'M'.
Applying the Filter: Once the Graduated filter is selected, hover your cursor over the image. Click on your image and then drag to define the area where the filter mask will be applied. You will observe a series of lines appearing, with a red overlay indicating the areas affected by the adjustment.
Positioning and Adjusting the Filter: After initially applying the filter, you can reposition it. Click and drag the center handle to move the entire filter around the scene. You can also make adjustments to the filter's shape. The filter is defined by three parallel lines: the center line indicates the point of 50% effect, and the outer lines indicate the extent of the feathering or transition zone. You can drag these lines to alter the filter's position and the spread of its effect.
Making Edits: With the filter positioned, you can now apply your desired edits. A panel of sliders will appear, mirroring those found in the Basic editing panel. These include sliders for Highlights, Shadows, Exposure, Contrast, Clarity, Temperature, Tint, Hue, and Saturation, among others. You can adjust these sliders by dragging them left or right, or by typing in specific numeric values on the right-hand side.
Using the Mask Overlay: To better visualize the filter's effect, you can turn on the Mask feature by pressing 'O'. This red overlay helps you see where the Graduated filter is thinning out. You can even change the color of the mask overlay by pressing 'Shift + O' to cycle through different options, which can be helpful for visibility against different image tones.
Adding Multiple Filters: A single Graduated filter can create a nice effect, but often, better results can be achieved by layering multiple filters. To add a new Graduated filter, click the "NEW" button. Each new filter adds a pin, which is fully editable by clicking on it. Ensure "Show Edit Pins" is set to "Always" in the bottom-left panel for easy access.
Fine-Tuning and Resetting: If the results of an adjustment are too strong, you can reduce the filter's overall strength by lowering the "Amount" slider. Double-clicking on the "Effect" slider will reset all sliders to their default value of 0. Alternatively, double-clicking a specific slider will reset only that individual slider.
Using the Brush Tool: Within the Graduated filter tool, there's a brush icon that, when selected, allows you to further refine the mask. This "Brush" tool, appearing just below the main filter icon, allows you to brush in or brush out specific areas of the mask, offering even more granular control over your edits.
Completing the Edit: Once you are satisfied with your adjustments and the positioning of your Graduated filters, click "Done" in the bottom-right of the image panel to return to the main editing panels.
Advanced Techniques and Creative Applications
While the Graduated filter is excellent for straightforward sky adjustments, its potential goes much further.
1. Enhancing Skies
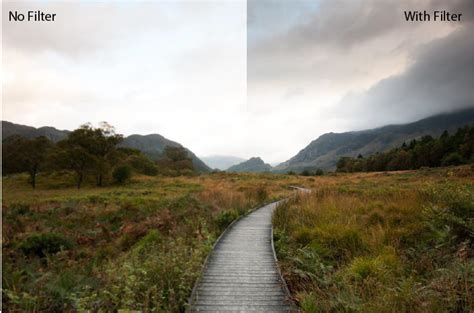
The most common use for a Graduated filter is to darken an overly bright sky. This edit can introduce much-needed contrast, detail, and a sense of drama to an otherwise flat sky. It's important to note that the Graduated filter cannot salvage a completely blown-out sky; in such cases, the detail is irretrievably lost.
For skies that benefit from subtle enhancement, consider applying a second, smaller Graduated filter just above the first. This can involve creating a second, less-feathered gradient and further dropping the Exposure slider to refine the effect.
2. Balancing Foreground and Sky
Graduated filters are also effective for adjusting the foreground of an image. By dragging a Graduated filter over the foreground and then manipulating the sliders, you can enhance details. Boosting the exposure can help create a better balance between the land and the sky. Adding contrast and clarity can also help the foreground feel more three-dimensional and integrated into the overall image.
3. Creating Subtle Vignettes
While most photographers use Lightroom's Effects panel or a Radial filter for vignettes, a Graduated filter can achieve a similar, often more nuanced, effect. Drag a heavily feathered Graduated filter across the side of the image and use it to subtly decrease the exposure. By duplicating and carefully positioning multiple Graduated filters along the edges of the subject, you can create a sophisticated vignette that draws the viewer's eye towards the center of the image.
4. Mimicking Atmospheric Light
This technique is particularly effective for shots taken during the golden hours of early morning or late afternoon. The goal is to replicate the effect of hazy, atmospheric light bleeding into the scene.
Start by creating a Graduated filter and positioning it carefully in the area closest to the light source. Open the "Color" option and select a color that closely matches the hue of the natural light. For an added layer of atmosphere, try reducing the "Dehaze" slider. It's crucial to avoid overdoing this effect. Adjust the "Effect" slider as needed and ensure your color choice is not too unnatural.
5. Selective Color Adjustments
Beyond exposure and contrast, the Graduated filter allows for precise color adjustments. You can alter the Temperature and Tint to introduce warmer or cooler tones, or shift the Hue and Saturation of specific areas. This is invaluable for correcting color casts or for creative color grading within a particular region of your image.
6. Feathering and Transition Control
The "Feather" slider within the Graduated filter's adjustment panel is critical for controlling the transition between the edited and unedited areas. A higher feather value creates a softer, more gradual blend, while a lower value results in a more defined edge. Experimenting with this slider is key to achieving natural-looking results. You can also adjust the filter's shape and the spread of its effect by dragging the three parallel lines that define the gradient.
7. Working with Multiple Masks
Lightroom allows for the creation of multiple Graduated filters, each with its own set of adjustments. This is incredibly powerful for complex edits. For instance, you might use one filter to darken the sky, another to brighten the foreground, and perhaps a third to subtly enhance a specific element within the scene. Each filter is represented by a pin, allowing for individual adjustment and refinement.
Troubleshooting Common Issues
Occasionally, users might encounter issues where the Graduated filter and other adjustment icons are not visible in Lightroom Classic. If you don't see these options directly below the Histogram, they might have been inadvertently hidden. In most versions of Lightroom, these tools are integral to the Develop module's interface. If you suspect an issue, ensure your Lightroom software is up-to-date, or consult Lightroom's help documentation for specific version troubleshooting.
Conclusion: Experimentation is Key
The Graduated filter in Lightroom is a versatile tool that empowers photographers to make precise, localized adjustments to their images. From enhancing skies and balancing foregrounds to creating subtle vignettes and mimicking atmospheric light, its applications are vast. The provided information, including insights from past training materials compatible with Lightroom updates through 2020, underscores the importance of practice and experimentation. By understanding the underlying mechanism of the Graduated filter and exploring its various features, you can significantly elevate the quality and impact of your photographs. So, pick your favorite image, head over to Lightroom, and start testing your Graduated filter skills. See what you can produce and discover how this powerful tool can transform your workflow.