Procreate offers a vast universe of digital art possibilities, and at its heart lies the power to customize and control its brushes. Whether you're a seasoned digital artist or just beginning your journey, understanding the intricate properties of Procreate brushes can unlock new levels of creativity and refine your artistic workflow. This tutorial delves into the "dark, hidden secrets of bending Procreate brushes to your will," exploring the most useful properties that dictate brush behavior and offering practical tips for both default and custom brushes.
The Foundation: Understanding Brush Properties and Best Practices
The Procreate Brush Studio is your central hub for brush customization. Before diving into specific settings, it's crucial to establish a good habit: always create a backup of a brush before making modifications. This can be done by opening the brush panel, swiping left on the brush thumbnail, and selecting ‘Duplicate’. This simple step ensures you can always revert to the original if your modifications don't yield the desired results.
The theme of a Procreate brush pack can significantly influence your work, pushing your creativity into uncharted territories. While you might already have a favorite default brush, exploring the customization options can reveal even more potential. The following sections will guide you through the key properties that control brush behavior, from basic size adjustments to advanced taper and blend settings.
Fine-Tuning Your Strokes: Size, Streamline, and Shape
Adjusting Brush Size Limits
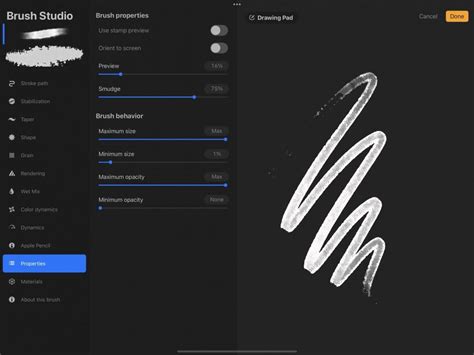
The most fundamental aspect of brush control is its size. Changing your brush size is a simple matter of adjusting the slider on the left side of your screen. However, the behavior of a brush can change dramatically with scale. For instance, a grain texture might behave differently when painting a large background compared to a small detail. To fine-tune this, access the Brush Studio and navigate to the ‘Properties’ tab. Here, you can increase or decrease your ‘Maximum’ and ‘Minimum’ size ranges, ensuring your brush performs optimally at any scale. This is particularly useful when you need to edit a liner brush to produce finer detailed lines.
Mastering Smoothness with StreamLine
Wobbly lines can be a common frustration, especially when aiming for precision. The ‘StreamLine’ settings are designed to correct your curves by reducing any wobble in your strokes, making them particularly useful for precision drawing. You can access these settings within the ‘Stabilization’ menu in the Brush Studio. Increasing the ‘StreamLine’ value will result in a smoother stroke. Conversely, you can reduce or remove ‘StreamLine’ altogether if you prefer a more natural, less corrected line.
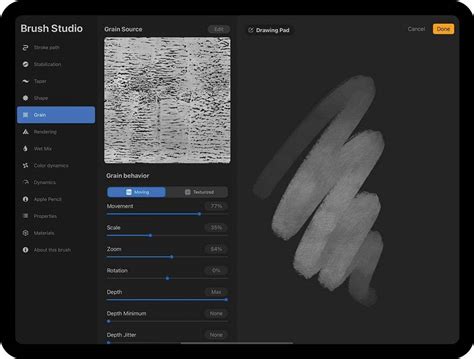
The Essence of the Brush Tip: Shape and Grain
The ‘Shape’ and ‘Grain’ settings define the fundamental appearance of your brush. The ‘Shape’ acts as the container for the ‘Grain’, meaning whatever texture you set for the ‘Grain’ will be stamped within the Procreate brush’s shape source. Think of the ‘Shape’ as the brush tip itself - some tips are blunt and rectangular, while others are soft and round.
The ‘Grain’ source, on the other hand, functions like a paint roller, defining the texture that is applied. You can access these image sources under the ‘Shape’ and ‘Grain’ tabs within the Brush Studio, respectively. The same steps apply for editing both your ‘Shape’ and ‘Grain’ images. Remember that in these image sources, 100% black translates to transparency, and 100% white appears as solid. If you’ve made changes to a shape or grain image and decide you don’t like the result, you can always reset the brush to its default state, especially if you forgot to create a backup beforehand.
Advanced Brush Dynamics: Pressure, Tilt, and Taper
The Nuances of Pressure Sensitivity: Pressure Curve
The ‘Pressure Curve’ is a powerful preference that allows you to control how pressure applied to your Apple Pencil affects the brush. You can edit these settings within an individual brush or globally within your Apple Pencil preferences. Using a sketching brush when tweaking these values is often easiest, as they typically exhibit a clear opacity change with pressure. The standard ‘Technical Pencil’ that comes with Procreate is a good example for experimentation.
To edit the ‘Pressure Curve’, open the Actions Panel (wrench icon), navigate to the ‘Preferences’ tab, and tap ‘Pressure & Smoothing’. Here, you’ll find a pressure graph. By making light and then darker strokes on your canvas, you can analyze the resulting output. If you find yourself needing to press very hard to achieve visible strokes, you can increase the start of the curve to a sharper upward angle, making the brush more responsive to lighter touches.
Responding to Your Hand: Tilt Settings
The ‘Tilt’ settings, found under the ‘Apple Pencil’ tab within the Brush Studio, allow your brush to react to the angle at which you hold your Apple Pencil. The ‘Angle’ slider determines when the pencil’s tilt begins to affect the stroke. You can also modify the ‘Opacity’ settings for Pencil Tilt. If the value is set to ‘None’, tilt will not impact the brush’s opacity. ‘Gradation’ creates a gradient effect from the tip of the pencil’s contact with the screen to a fade at the base. ‘Bleed’ affects the detail of the stroke, and ‘Size’ controls the brush size for a tilted stroke. Experimenting with the ‘Size Compression’ toggle can also yield interesting results.
Sculpting the Stroke Ends: Brush Taper
‘Brush Taper’ refers to the reduction in brush size at the beginning or end of a stroke, offering a way to add realism and stylistic flair. You’ll find these settings under the ‘Taper’ tab in the Brush Studio. There are two main controls: ‘Pressure Taper’ (for Apple Pencil) and ‘Touch Taper’ (for finger input).
For ‘Pressure Taper’, you’ll typically see two sliders beneath a line. The first slider controls the amount of taper at the start of the stroke, and the second controls the taper at the end. You’ll need to have some percentage assigned to the ‘Size’ slider for these taper effects to be visible. The ‘Size’ control dictates the overall amount of taper applied, while the ‘Opacity’ slider adjusts changes to the stroke’s opacity where tapering occurs. The ‘Tip’ slider defines the shape of the tapered endings; a ‘Sharp’ setting (all the way to the left) will create a very pointed end. When ‘Tip Animation’ is set to ‘Off’, the taper is applied as you lift your pencil from the canvas. While taper settings don’t suit every brush, they can significantly enhance realism in the right context.
Create Taper Brush in PROCREATE
Beyond Static Marks: Wet Mix and Blending
The Art of Blending: Wet Mix Brushes
Unlike normal brushes that simply lay down color, a ‘Blend’ brush interacts with existing colors on the canvas, mixing and dragging them around. The ‘Smudge Tool’ offers a similar effect, but with significantly less variety and control. To create or modify a blend brush, navigate to the ‘Wet Mix’ tab in the Brush Studio.
A blender brush works with the paint already on the canvas rather than adding more. The ‘Dilution’ slider is the primary control for the amount of paint affected; for creating your own blending brush, ‘Dilution’ should generally be set to ‘Max’. The ‘Charge’ value influences the amount of paint applied to the brush itself, while ‘Attack’ is specifically designed for use with the Apple Pencil. The ‘Pull’ slider works in tandem with ‘Dilution’, allowing for fine-tuned control over how colors are mixed. Experimenting with these sliders is key to discovering your preferred blending effects.
Mimicking Traditional Media: Alcohol Markers in Procreate
Digital alcohol markers offer a fantastic way to achieve realistic blending and ink flow effects within Procreate. The ability to work on layers and undo mistakes makes this a forgiving and powerful technique. The key to mimicking alcohol markers lies in how the "ink" flow depends on pressure, allowing for creative blending.
To paint with alcohol markers in Procreate:
- Create Your Design: Start with a solid line drawing. For example, the ‘Smooth Inker’ brush at 10% size with black color can be used for outlines.
- Add Layers and Color: Create a new layer for each color shade you plan to use. This allows for precise control and blending. Organize your layers, perhaps with the main outline on one layer and details on another. Rename layers descriptively, such as ‘Painting Body’.
- Build Up Color: Begin with the lightest shade of your chosen color. Apply strokes with varying pressure to mimic the ink flow of real markers. Use brushes like ‘Rad Brush Tip’ with adjusted size and opacity. For instance, an 80% brush size and 100% opacity can be a good starting point. Don't worry about going outside the lines initially; you can clean up edges later with the eraser using the same brush.
- Add Shading: Create new layers above your base color for each subsequent shade. Use short, light strokes along the inner edges of your design to add medium and dark shading.
- Blend Colors: This is a crucial step. After applying darker shades, create new layers to blend. Use lighter colors with slightly longer strokes, following the direction of your previous strokes. This process might require multiple layers and careful application.
- Smooth Out Blends: While digital markers blend well, a dedicated blender brush can refine the transitions. Use a blender brush on a new layer with reduced opacity (around 20%) to gently smooth out areas that need more cohesion.
- Final Details: Add final details like stripes, markings, or blush on separate layers using appropriate colors and brushes. For instance, the ‘Rad Round Marker’ can be used for stripes, and brushes like ‘Spray 1’ can add texture.
Create Taper Brush in PROCREATE
Organizing Your Digital Toolkit: Brush Libraries and Management
Procreate's brush system is deeply integrated with the iPad's Files app, offering robust management capabilities. Brush libraries, sets, and individual brushes are now treated as files and folders.
Accessing and Importing Brushes
You can access your brush libraries in two primary ways: through the Files app on your iPad (On My iPad → Procreate → Brushes) or via iCloud Drive (iCloud Drive → Procreate Brushes), provided you have iCloud sync enabled. Importing brushes is as simple as bringing .brush, .brushset, or .brushlibrary files into a brush set folder within the Files app. When you import a single brush this way, Procreate creates a new set named ‘Imported’.
Renaming and Deleting Brushes
Renaming brushes and brush sets can be done directly within Procreate or through the Files app. In Procreate, you can rename a brush set by tapping it twice (or tap and hold) and selecting ‘Rename’. For brushes, this option is available in the Brush Studio under ‘About this Brush’. Renaming through the Files app is straightforward: navigate to your Procreate brushes folder and rename the files or folders as you would any other.
Deleting a brush or brush set is a permanent action and removes it from both Procreate and the Files app. Always ensure you have backups before deleting. If you accidentally delete a brush, set, or library, check the ‘Recently Deleted’ folder within the Files app.
Organizing and Backing Up
Procreate offers intuitive ways to organize your brushes. You can move brushes and entire brush sets between libraries by tapping and holding an item to ‘lift’ it, then dragging it to its new location. To move multiple items, lift the first one, then use another finger to tap additional items to create a stack. A number will appear on the icon indicating how many items are in your stack.
Sharing and backing up your brushes is also streamlined. You can share individual brushes or entire custom brush sets by swiping left on them and selecting ‘Share’. For backups, consider saving your brushes and sets to an external hard drive compatible with your iPad or a dedicated cloud storage service.
Understanding Brush Sets
Procreate offers a diverse range of pre-installed brush sets, each designed for specific artistic purposes. These include:
- General Brushes: For clean, simple, and mostly rounded strokes.
- Ink Brushes: Ideal for comic or manga styles, featuring inks and halftones.
- Technical Brushes: Purpose-built for projects requiring a more precise, technical approach.
- Sketching Brushes: Designed for practical drawing, planning, and quick studies.
- Painting Brushes: A range of brushes for artistic rendering.
- Artistic Brushes: Including sumi-e and ink-centric styles for cleaning up artwork.
- Digital Painting Brushes: Encompassing realistic and digital painting effects.
- Texture Brushes: Focused on creating rich textures, from acrylic to stucco to oil effects.
- Water Brushes: Offering effects from watery to clumpy, often with Streamline enabled for smooth calligraphic forms.
- Lettering Brushes: Specifically designed with Streamline enabled for smooth, even calligraphic lettering.
- Texture Brushes (Classic Digital Art): Laying down large areas of texture quickly.
- Playful Brushes: Demonstrating unique capabilities like color-changing, smoky effects, and chaotic shapes.
- Material Brushes: Featuring metallics and roughness for 3D painting.
- Grunge Brushes: Adding realistic grunge textures.
- Organic Brushes: Mimicking natural elements like grass, leaves, and bark, as well as handmade mediums.
- Watercolor Brushes: Realistic watercolor effects.
Experimenting with these diverse brush sets is the best way to discover their unique capabilities and explore what's possible within Procreate. As Procreate continues to evolve, the Brush Studio offers increasingly limitless combinations for creating and editing brushes, empowering artists to tailor their tools precisely to their vision. By understanding and utilizing these properties, you can elevate your digital art and truly master the art of Procreate brush customization.