Banding, the unwelcome appearance of distinct stripes or bands of color where a smooth, seamless graduation is expected, is a common frustration for digital artists and photographers. This phenomenon is most frequently observed in areas with subtle color transitions, such as expansive blue skies or smooth backgrounds. Initially, many might dismiss banding as an inherent limitation of digital imaging, an issue too complex to rectify. However, as images are increasingly displayed at larger scales, whether through printing or high-resolution displays, banding becomes glaringly obvious and detrimental to the visual integrity of the artwork. It draws the viewer's eye away from the intended subject, effectively ruining the image. While some foundational knowledge regarding file preparation, particularly the benefits of working in 16-bit or even 24-bit color depth, can mitigate the occurrence of banding, it is not always a foolproof solution. This article delves into the nature of banding, its causes, and provides a comprehensive guide to its removal and prevention within Adobe Photoshop, offering a range of techniques suitable for various scenarios.
Understanding Banding: The Root of the Problem
Banding is an artifact that manifests when an image's gradient transition from one color to another is not smooth but rather breaks up into discrete blocks or stripes of color. The primary culprit behind this visual disruption is digital compression, which inherently reduces the bit depth and the nuanced color information present in an original file. When the available tonal range is limited, areas within an image that feature gradients-such as landscapes, skies, and backgrounds with solid, dark, or neutral colors like black or grey-become highly susceptible to displaying these conspicuous bands.
It's important to note that banding isn't always an undesirable effect. In some creative contexts, it can be intentionally employed as a stylistic choice known as posterization. This technique mimics the aesthetic of mass-produced posters from earlier eras, which often utilized limited ink palettes for printing, resulting in abrupt transitions between colors.
When working with RAW files, banding might not be immediately apparent to the naked eye or even within the camera's preview. It typically emerges during the post-processing and editing stages, particularly after extensive adjustments to exposure, color grading, and other image processing tasks. Furthermore, JPEG images, due to their inherent lossy compression, are also prone to banding issues. Even the act of uploading images to social media platforms can exacerbate banding, as these services often apply further compression to optimize file sizes for web display.
The Crucial Role of Bit Depth: 8-bit vs. 16-bit Editing
A fundamental understanding of bit depth is essential when addressing banding. The terms 8-bit and 16-bit refer to the number of possible color shades available within each color channel (Red, Green, Blue) of an image file.
In an 8-bit image, there are 256 shades for each of the Red, Green, and Blue channels. This results in a total of approximately 16.8 million possible colors (256 x 256 x 256). While this number seems vast, it can be insufficient to represent smooth transitions in areas with subtle color changes. When these transitions are compressed or manipulated, the limited number of available shades can lead to visible steps or bands.
In contrast, a 16-bit image offers 65,536 shades for each color channel, leading to an astronomical number of possible colors-billions upon billions. This vastly increased color information allows for significantly smoother gradients and a greater capacity to handle subtle tonal shifts without introducing banding.
The key takeaway here is the importance of starting with as much color information as possible. Shooting in RAW format is paramount, as RAW files capture data directly from the camera sensor and retain a much wider dynamic range and color depth, typically allowing for editing in 16-bit mode. JPEGs, on the other hand, are almost always 8-bit files by the time they reach the editing stage. While it's possible to convert an 8-bit JPEG to 16-bit in Photoshop, this process cannot magically create color information that was never captured. Therefore, converting an already 8-bit JPEG to 16-bit is largely ineffective for combating banding that originates from insufficient color data.
For those who wish to delve deeper into the technicalities of bit depth, a thorough exploration of the "8-bit vs. 16-bit" debate provides valuable insights into the "what, why, and how" of this critical aspect of digital imaging.

Photoshop Techniques for Banding Removal
Even when adhering to best practices like shooting in RAW and working in 16-bit, banding can still appear. Fortunately, Photoshop offers a suite of tools and techniques to address this issue. Here are several effective methods:
Method 1: Convert to 16-bit (If Not Already)
This is the first line of defense and should be attempted before employing more complex techniques, provided you are working with a RAW or other lossless file format.
- Import your image into Photoshop.
- Navigate to Image > Mode and select 16-bit if it is not already the active setting.
Remember, this step is only beneficial if your source file has the potential for 16-bit data. Attempting to convert a JPEG to 16-bit will not add the necessary color information.
Method 2: Introduce Subtle Noise
Paradoxically, sometimes adding a small amount of controlled "noise" can help break up the harsh, uniform transitions of banding, making them less apparent. Noise can introduce subtle variations that mimic the natural imperfections of a continuous tone, effectively masking the banding.
- Import your photo and duplicate the background layer (Ctrl/Cmd + J).
- Change the blending mode of the duplicated layer to Overlay. This will blend the noise into the underlying image in a way that enhances detail and can soften banding.
- Go to Filter > Noise > Add Noise.
- Adjust the Amount slider to a very low value. A subtle amount is key; you want to introduce just enough variation to mask the banding without making the image appear grainy or noisy overall. Experiment with different distribution settings (Uniform or Gaussian) and the Monochromatic option to achieve the desired effect.
- Alternatively, you can create a new layer, fill it with a neutral color (e.g., 50% gray), set its blending mode to Overlay, and then apply the Add Noise filter to this new layer. This offers more control over the noise application.
2 Quick Ways to Fix Banding in Photoshop!
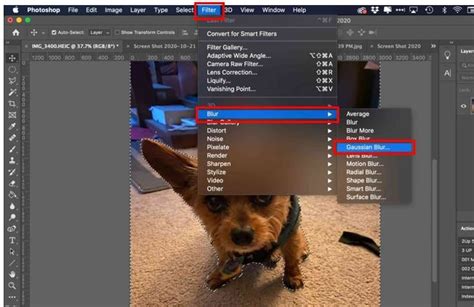
Method 3: Gentle Gaussian Blur with Masking
Gaussian Blur can soften the hard edges of the bands, but applying it indiscriminately will blur the entire image. The key is to use a layer mask to confine the blur effect only to the areas suffering from banding.
- Import your photo.
- Duplicate the background layer (Ctrl/Cmd + J).
- Use a selection tool (such as the Lasso Tool or Quick Selection Tool) to draw a mask around the specific area exhibiting banding. Feather the selection slightly (Select > Modify > Feather) to ensure a smoother transition between the blurred and non-blurred areas.
- With the selection active, go to Filter > Blur > Gaussian Blur.
- Adjust the Radius slider until the banding in the selected area is significantly reduced or eliminated. Be cautious not to over-blur, which can lead to a loss of detail.
- To refine the effect, you can further edit the layer mask. Select the mask thumbnail, then use a soft, low-opacity brush (typically black to hide the blur or white to reveal it) to paint over areas where the blur is too strong or too weak, creating a more natural transition.
Method 4: Texture Overlay for Concealment
Adding a subtle texture overlay can help to break up the uniformity of the bands by introducing fine detail that distracts the eye from the underlying color transitions. This method is particularly effective in images where a subtle texture would be a natural addition.
- Import the photo with banding and a separate texture image into Photoshop. Ensure they are in different tabs.
- Copy the texture image (Ctrl/Cmd + C) and paste it as a new layer above your main photo (Ctrl/Cmd + V).
- Resize the texture layer to cover the entire image if necessary.
- In the Layers panel, select the texture layer and reduce its Opacity to a level where it subtly blends with the image without overpowering it.
- To ensure the texture is only applied where needed, add a layer mask to the texture layer by clicking the "Add Layer Mask" button at the bottom of the Layers panel.
- Select the mask thumbnail, choose the Brush Tool, set the foreground color to black, and paint over the areas where you do not want the texture to appear (e.g., sharp details, subjects). Use white to restore the texture if you accidentally paint over an area. Adjust brush size, hardness, and opacity for precise control.
Method 5: Leveraging Third-Party Plugins - Optics DeBand
For a more targeted and often more effective solution, specialized plugins can be invaluable. Boris FX's Optics suite, for instance, includes a powerful filter called "DeBand" specifically designed to address banding artifacts.
- Import your image into Photoshop. For non-destructive editing, it's highly recommended to convert the layer to a Smart Object by right-clicking the layer and selecting "Convert to Smart Object." This allows you to re-edit filter settings later.
- Go to Filter > Boris FX > Optics. The Optics interface will launch, displaying your image.
- Within the Optics interface, navigate to the filter library and search for the DeBand filter.
- Apply the DeBand filter. You can start with a preset or manually adjust the settings. The DeBand filter typically has a single primary control for the Amount of debanding. Gradually increase this value while previewing the image until the banding is resolved. The goal is to smooth the pixels in the affected areas without sacrificing image detail.
- Optics allows for stacking multiple filters and using masks. You can add other filters like blur or noise to further refine the result, using masks to confine their effect to specific areas. To do this, add a new layer within Optics, select a filter (e.g., Blur), and then add a mask to that layer. Use the Paint Mask option with a brush to paint over the areas where you want the filter to be applied.
- Once satisfied with the adjustments, click Apply to return to Photoshop.
The DeBand filter in Optics is particularly adept at smoothing pixels in banding-prone areas, such as clear blue skies, while preserving the natural look of the image.
Proactive Measures: How to Avoid Banding in the First Place
While Photoshop offers robust tools for fixing banding, the most effective strategy is to prevent it from occurring. Implementing these practices from the outset can save significant post-processing time and effort.
Shoot in RAW
As previously emphasized, RAW files capture a wealth of image data directly from the camera sensor. This extensive information is crucial for smooth tonal transitions and provides the necessary latitude for editing without introducing banding. JPEG files, with their inherent compression, have already discarded much of this vital color information, making them far more susceptible to banding, even before editing begins.
Avoid Over-Editing JPEGs
If your workflow necessitates shooting in JPEG, be judicious with your editing. Avoid excessive color grading, aggressive sharpening, or repeated saving and re-opening of the file. Each time a JPEG is saved, it undergoes further compression, potentially discarding more information and exacerbating any existing banding or introducing new artifacts.
Work in 16-bit Mode
When opening RAW files in Photoshop, always ensure you are working in 16-bit mode (Image > Mode > 16-bit). This provides the expansive color palette necessary for smooth gradients. Remember that JPEGs are fundamentally 8-bit, and converting them to 16-bit will not restore lost data. The trade-off for 16-bit editing is larger file sizes, so ensure you have adequate storage capacity.
Calibrate and Utilize High-Quality Monitors
The way banding appears can sometimes be influenced by the display itself. Low-quality or uncalibrated monitors may struggle to accurately represent the subtle tonal variations in high-bit-depth images, leading to the perception of banding that isn't actually present in the file. If you suspect banding, test your image on multiple, preferably calibrated, displays to confirm whether the issue lies within the image data or the monitor's rendering.
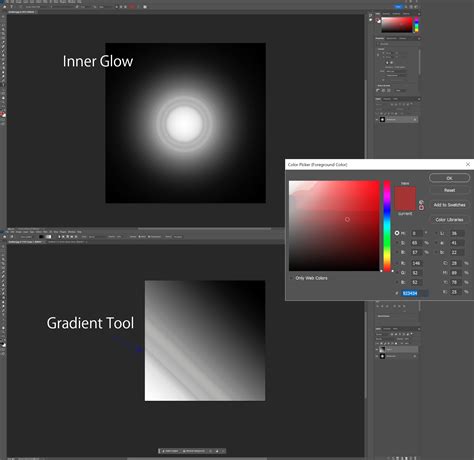
Creative Application of Gradients and the Gradient Tool
Beyond troubleshooting banding, understanding Photoshop's Gradient Tool is fundamental for creating smooth color transitions and adding depth to images.
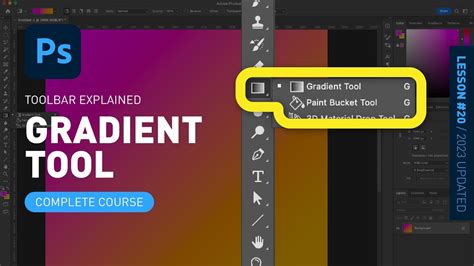
The Gradient Tool is located in the Photoshop toolbar, often sharing a spot with the Paint Bucket Tool. Pressing the 'G' key activates the Gradient Tool, though it might cycle through other tools in its group depending on what was last selected.
When the Gradient Tool is active, the Options Bar at the top of the screen provides access to its settings. Here, you can select from various gradient presets or open the Gradient Editor for custom creation. The Gradient Editor allows for precise control over colors, their positions (stops), opacity, and smoothness.
Gradient Styles
Photoshop offers several gradient styles:
- Linear: Creates a straight-line blend, ideal for skies or simple transitions.
- Radial: Generates a circular gradient, emanating from a central point.
- Angular: Sweeps colors in a counterclockwise arc around the starting point, useful for creating spotlight effects or circular patterns.
- Reflected: Mirrors a linear gradient on both sides of the starting point, producing a symmetrical effect.
- Diamond: Creates a diamond-shaped gradient, expanding outwards from the center.
Creating Custom Gradients
To create a custom gradient:
- Open the Gradient Editor.
- Click on the gradient bar to add new color stops (the small squares below the bar).
- Double-click a color stop to select a new color from the Color Picker.
- Drag the stops to adjust their position and the transition point between colors.
- The stops at the top control opacity.
- Click "OK" when satisfied, then click and drag on your image to apply the gradient.
Gradients can be applied as destructive layers or, more flexibly, as Gradient Fill Layers, which allow for non-destructive editing of colors, opacity, and style at any time.
Additional Tips for Gradients
- "Dither" Option: When applying gradients directly, especially if you're concerned about banding in your own created gradients, look for a "Dither" option in the gradient settings panel. Checking this box can help introduce subtle noise to smooth out transitions.
- Gradient Preset Packs: Thousands of free and premium gradient preset packs are available online, offering a vast array of color combinations and styles to enhance your creative workflow.
By understanding both the causes of banding and the powerful tools within Photoshop to prevent and correct it, you can ensure your images maintain their visual integrity and achieve a professional, polished appearance, regardless of their final output size. Whether you're aiming for a smooth, natural sky or a stylized, posterized effect, mastering these techniques will elevate your digital artistry.