The world of digital art and photo manipulation often hinges on the ability to precisely control how elements are added, removed, or modified on a digital canvas. In Adobe Photoshop, this control is largely achieved through its powerful suite of "paint tools." Among the most fundamental and versatile of these are the Brush tool, the Clone Stamp tool, and the Eraser tool. While each serves a distinct primary purpose, understanding their nuanced applications and how they interact within Photoshop's layer and timeline systems unlocks a new level of creative potential. This guide delves deep into the functionalities of these tools, exploring their properties, animation capabilities, and advanced integration for sophisticated workflows.
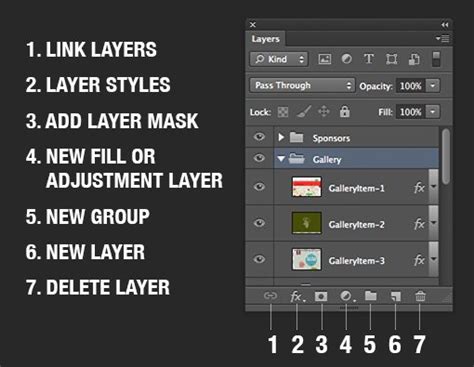
The Foundation: Understanding Paint Strokes and the Layer Panel
At its core, Photoshop's approach to these paint tools involves the concept of "paint strokes." When you use the Brush tool, Clone Stamp tool, or Eraser tool, you are essentially creating a paint stroke on a selected layer within the Layer panel. Each of these paint strokes is not a static addition but a dynamic object with its own set of editable properties.
Crucially, each paint stroke possesses its own "duration bar," "Stroke Options properties," and "Transform properties." These elements are not confined to the immediate act of painting; they can be accessed and meticulously modified within the Timeline panel. This means that not only can you paint an element onto your image, but you can also control when it appears, how it appears, and how it moves or changes over time. This animation capability transforms static paint strokes into living, evolving components of your digital creations.
Animating Your Artwork: The Power of the Timeline Panel
The Timeline panel is your command center for bringing paint strokes to life. After drawing a paint stroke, you gain the ability to modify and animate its properties using the same intuitive techniques employed for manipulating layer properties and durations. This unified approach ensures a consistent workflow, whether you're adjusting a layer's opacity or animating the flow of a paint stroke.
The flexibility extends further: you can "copy paint stroke path properties to and from properties for mask paths, shape layer paths, and motion paths." This interoperability is a game-changer, allowing you to transfer complex paths and animations between different types of Photoshop objects. For even greater control and dynamic interactions, these properties can be "linked using expressions." Expressions are powerful scripting tools that allow you to create relationships between different properties, enabling sophisticated and automated animations that would be incredibly time-consuming to achieve manually.
The Brush Tool: Precision and Expression
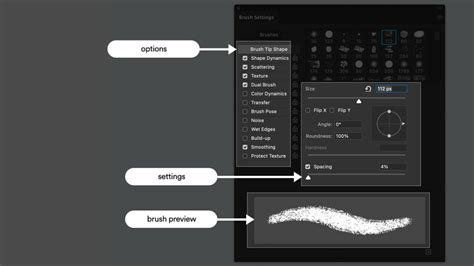
The Brush tool is perhaps the most direct and intuitive of the paint tools. It allows you to apply color and texture to your image with a wide array of customizable brushes. When using the Brush tool, you'll interact with the "Paint and Brushes panels" to select and configure your brush.
The "color removed" aspect is particularly relevant when discussing the Eraser tool, but the Brush tool's primary function is to apply color. The "Layer panel with the current foreground color" is where your brush strokes will be applied. The "duration of the paint stroke" is a critical concept for animation. You can set this duration in several ways:
- Constant: The stroke is applied from the current frame to the end of the layer's duration.
- Single Frame: The stroke is applied only to the current frame.
- Custom: The stroke is applied for a specified number of frames, beginning with the current frame.
Beyond duration, several other properties dictate the behavior of your brush stroke:
- Size: Controls the overall size of the brush.
- Rotation: The brush can be "rotated from horizontal," allowing for angled strokes.
- Aspect Ratio: This defines "the ratio between the short and long axes of a brush," affecting its elliptical shape.
- Hardness/Softness: This property, often controlled by opacity at the center and edges, can range from "100% transparent at the edges" to a sharp, defined edge. The "percentage of the brush diameter" often dictates the falloff of transparency.
When you "drag again, you create a new stroke." This means each distinct painting action with the Brush tool can be treated as an individual, animatable element. You can also "specify the duration in frames" and adjust the "Duration value to 1" for single-frame effects. For efficient operation, utilizing "shortcuts to the buttons on your pen" can significantly speed up your workflow.
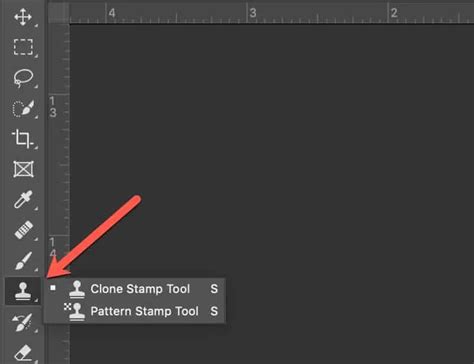
The Clone Stamp Tool: Duplication with Precision
The Clone Stamp tool is an indispensable asset for retouching, seamless pattern creation, and replicating elements within an image. Its core function is to "copy pixel values from one place and time and apply them at another place and time."
The process involves sampling pixels from a "source layer" and applying them to a "target layer." This target layer can be "the same layer or a different layer in the same composition." This ability to clone between layers offers immense flexibility in managing your artwork.
For precise alignment and visual feedback, Photoshop offers a "source overlay, a semi-transparent image of the source layer." This overlay is crucial for accurately lining up elements. You can "temporarily show the clone source overlay, press Alt+Shift (Windows) or Option+Shift (Mac OS)."
When using the Clone Stamp tool, each time you "drag again, you create a new clone stroke." This allows for discrete cloning actions that can be individually manipulated. The tool operates with a "sample point each time you drag again to create a new clone stroke."
Key features and considerations for the Clone Stamp tool include:
- Difference Mode: The "Difference Mode button next to the Clone Source Overlay option in the Paint panel" can be used to help "better line up elements and see the results of your clone strokes." Modifying the "opacity of the overlay" also aids in this alignment.
- Lock Source Time: When "Lock Source Time is selected," the "sampled layer" maintains its position in time relative to the cloning action. This property "appears only when Lock Source Time is selected."
- Time Shift, Offset, and Source Position: These values offer granular control over where and when the sampled pixels are sourced from, allowing for complex temporal cloning.
- Saving Preferences: Clone Stamp tool settings can be "saved in the preferences file, so they can be reused in other projects."
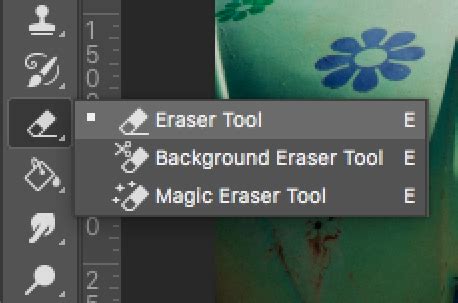
The Eraser Tool: Selective Removal
The Eraser tool, as its name suggests, is used to remove pixels from a layer. For "Eraser strokes, how quickly paint and layer color are removed" is a key consideration. This speed of removal is influenced by the brush settings applied to the Eraser.
Similar to the Brush tool, the Eraser tool utilizes brush tips and can have its strokes animated. The "duration of the paint stroke" applies here as well, determining how long the erasing effect persists. The "size," "rotation," and "aspect ratio" of the eraser brush all influence the shape and extent of the erased area.
The concept of "color removed" is central to the Eraser tool. It effectively makes parts of a layer transparent, revealing what lies beneath (other layers or the background). The "painted on by the Brush or Clone stroke" can be selectively removed, offering a powerful way to refine or alter existing painted elements.
Advanced Techniques and Integrations
The true power of these paint tools is unleashed when their individual capabilities are combined and integrated into more complex workflows.
Brush Marks and Stroke Options
The "brush marks" created by the Brush tool can be further refined. "Some portions of the stroke" can be made more or less opaque, contributing to depth and realism. The "Stroke Options settings" allow for fine-tuning the appearance of the stroke, such as its blending mode or opacity.
Customizing Brushes and Swatches
The "Paint and Brushes panels" are essential for customizing the appearance of your tools. "Swatches are grayscale" in certain contexts, meaning that the underlying brush shape is defined by shades of gray, which are then interpreted as opacity when applying color.
Path Properties and Expressions
The ability to "copy paint stroke path properties to and from properties for mask paths, shape layer paths, and motion paths" is a cornerstone of advanced animation. This allows for the creation of complex animated paths that can be applied to various Photoshop elements. Furthermore, using "expressions for its properties" allows for dynamic animation that can respond to other changes within the composition. Expressions can interpolate "values for all frames between keyframes," creating smooth transitions.
Tracking and Motion Paths
For animation that needs to follow specific movements within your footage, the "Attach Point property of the tracker" is invaluable. You can link the "path of the paint stroke to the Attach Point property of the tracker." This is particularly useful when you want to animate text or graphics that appear to be "drawn on" a moving object in your video. This technique can be used for "drawing animated masks rather than paint strokes," offering a different visual outcome.
Write-On Effect
The "Write On" effect is a popular application that can be achieved using these paint tools. By drawing a stroke with a paint tool in the "Layer panel using a paint tool to create a paint stroke," and then manipulating its properties in the Timeline, you can simulate handwriting or drawing appearing on screen. This is often achieved by controlling "how much of a stroke is shown at any time" or having the stroke "on over time."
WRITE ON Effect Tutorial in Premiere Pro | Handwriting Text Effect
Conclusion: A Toolkit for Digital Artists
The Brush tool, Clone Stamp tool, and Eraser tool are more than just simple drawing and editing instruments. They are sophisticated components of Photoshop's animation and manipulation engine. By understanding their individual properties, their interaction with the Layer and Timeline panels, and their potential for integration with other Photoshop features like masks, shape layers, and tracking, digital artists and designers can unlock a vast spectrum of creative possibilities. From subtle touch-ups to complex animated sequences, these paint tools provide the precision and flexibility needed to bring any vision to life.