When preparing artwork for professional printing, understanding and correctly implementing bleeds and margins is paramount. These elements are crucial for ensuring that your final printed pieces exhibit the highest quality and possess a polished, professional finish. While Photoshop is a powerful tool for image editing and creation, its capabilities for setting up print-ready files, particularly concerning bleeds and margins, require careful attention. This guide will walk you through the essential steps to effectively manage these critical print production settings within Photoshop, transforming your digital designs into tangible, high-fidelity prints.
The Crucial Role of Bleed and Margins
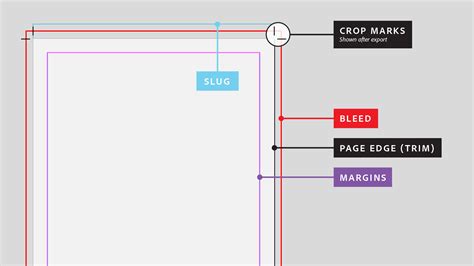
Bleed and margins are not mere stylistic choices; they are functional necessities in the printing process. Bleed refers to the area of your artwork that extends beyond the intended trim edge of the final printed piece. This extra area is essential because printers use large sheets of paper that are then cut down to the final size. By extending your background elements, colors, or images into the bleed area, you guarantee that no unprinted white edges will appear after trimming, even if the cutting process is not perfectly precise.
Margins, often referred to as safety margins, are equally important. These are areas within your artwork that are kept clear of critical content, such as text or important graphic elements. They act as a buffer zone between the edge of your final trimmed artwork and the content you want to be visible. This buffer is vital because it accounts for slight variations in the printing and trimming process, preventing essential parts of your design from being cut off or appearing too close to the edge.
Setting Up Your Canvas for Print
Before diving into bleeds and margins, ensuring your canvas size is correctly set for your final intended print dimensions is the foundational step. This initial setup dictates the boundaries within which you will then establish your bleed and safety areas.
Implementing Bleed in Photoshop
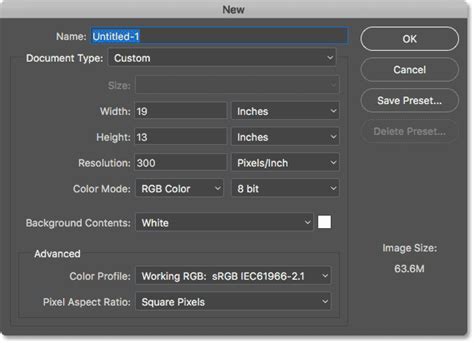
While Photoshop is not inherently designed as a dedicated print layout application, you can effectively manage bleed by adjusting your canvas size. The common practice is to increase your canvas by the required bleed amount on all sides. For instance, if your final artwork dimensions are 9cm x 5cm, and your printer requires a 0.3cm bleed on each side, you would increase your canvas size accordingly.
To achieve this, navigate to Image > Canvas Size. Within the dialog box, you'll find options to adjust the width and height. It is highly recommended to set the numbers to relative to make this process more straightforward. For our 9cm x 5cm example with a 0.3cm bleed on all sides, you would add 0.6cm to the width (0.3cm on the left + 0.3cm on the right) and 0.6cm to the height (0.3cm on the top + 0.3cm on the bottom). This results in a new canvas size of 9.6cm x 5.6cm. This expanded canvas now provides the necessary area for your bleed.
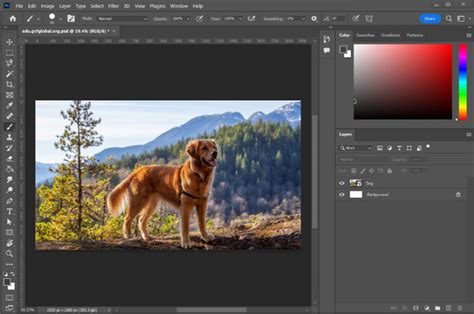
When you add a background, whether it's an image, a shape, or a solid color, it is imperative to extend it to the very edge of this enlarged canvas. This ensures that the bleed is fully incorporated and will cover any potential trimming discrepancies.
Establishing Safety Margins for Critical Content
Once your canvas is set up with the bleed area, the next crucial step is to establish safety margins. These margins define the safe zone where your critical content - text, logos, and other vital design elements - should reside. This ensures that these elements are not compromised during the printing and trimming process.
A common method for setting safety margins is to create a new rectangle within your existing artwork that represents the dimensions of your final printed product minus the safety margin on each side. For example, if your final product dimensions are 9cm x 5cm, and you want a 0.3cm safety margin on each side, you would create a rectangle with dimensions of 8.4cm x 4.4cm (9cm - 0.6cm and 5cm - 0.6cm).
To implement this accurately:
- Select the Rectangle Tool from the Photoshop toolbar.
- Create a rectangle that matches the calculated dimensions for your safety margin (e.g., 8.4cm x 4.4cm).
- Center-align this rectangle to your canvas. To do this, ensure your canvas is selected as the reference. Click the Align icon in the options bar (it typically looks like several stacked rectangles). In the dropdown menu, select Align to Canvas. Then, click on Horizontal Centers and Vertical Centers. This will precisely position your safety margin rectangle in the center of your artwork.
This centered rectangle now visually represents your safe area. All text and crucial design elements should be kept well within this boundary, ensuring they remain visible and intact after printing and trimming.
Utilizing Rulers and Guides for Precision
Photoshop's Rulers and Guides are indispensable tools for maintaining accuracy and visual control over your layout, especially when working with bleeds and margins. They provide a visual framework that helps you place elements precisely and ensure they adhere to your defined safe zones and bleed areas.
Turning On Rulers
The first step to leveraging these tools is to ensure your Rulers are visible.
- Go to the View menu.
- In the dropdown menu, select Rulers.A pair of rulers will appear along the top and left edges of your document window, displaying measurements in your chosen units (pixels, inches, centimeters, etc.).
Creating Guides from Rulers
Once Rulers are active, you can create guides to mark your bleed and safety margins.
- Hover your mouse cursor over the Ruler (either the horizontal or vertical one) until the cursor changes to a white arrow with a double-headed arrow icon.
- Click and drag from the ruler onto your canvas. As you drag, a blue line will appear, representing a guide. Release the mouse button to place the guide.
- You can repeat this process to drag guides from both the top and left rulers to create a grid that outlines your working areas.
Setting Guides to Exact Measurements
For ultimate precision, you can define guides to exact measurements using the "New Guide" feature. This is particularly useful for establishing your bleed and safety margins accurately without manual dragging.
- Navigate to the View menu.
- Scroll down and select New Guide….
- A dialog box will appear, allowing you to specify the Orientation (Horizontal or Vertical) and the Position (the measurement from the edge of the canvas).
- For instance, if you need a guide 3cm from the left edge, select "Vertical" and enter "3cm". If you need a guide 5cm from the top edge, select "Horizontal" and enter "5cm".
- By creating guides for all four sides of your intended bleed and safety areas, you establish a clear, non-intrusive framework for your design.
Understanding Printer Requirements
It's important to note that while Photoshop offers these tools, the ultimate requirements for bleeds and margins are determined by your specific printer. Printers often have established guidelines for bleed (commonly 0.125 inches or 3mm) and may recommend specific safety margin distances. Always consult with your print provider to confirm their exact specifications before finalizing your artwork.
The "grabbers" you might hear about are not typically a concern for the designer in the context of digital file preparation. Printers often work with paper stock that is larger than the final trim size. Your responsibility as a designer is to provide artwork with sufficient bleed so that the printer can accurately trim it down to the correct dimensions after the printing process is complete. Therefore, focus on ensuring your design extends fully to the edge of your defined bleed area on the enlarged canvas.
How to Add Bleed in Photoshop: Setting Up Bleed Area for Printing | instantprint
Designing Within the Safe Zone
When laying out your artwork, always keep critical elements like text, logos, and important graphical details within the established safety margins. While you can extend images and background colors to the very edge of your canvas (the bleed area), any content that must be visible in the final print should be placed inside the safety margin guides. This preventative measure is the most effective way to avoid content being unexpectedly cropped during the trimming process. Imagine your design as a target: the outermost ring is the bleed, the next inner ring is the trim line, and the innermost circle is your safe zone. Aim to keep all essential information within that innermost circle.
Workflow Summary for Adding Margins in Photoshop
To reiterate the process for adding margins and bleeds in Photoshop:
- Determine Final Trim Size: Know the exact dimensions of your final printed product.
- Calculate Bleed: Add the printer's required bleed amount to each side of your final trim size.
- Increase Canvas Size: Go to
Image > Canvas Sizeand increase your document's dimensions by the total bleed amount (e.g., if bleed is 3mm per side, add 6mm to width and 6mm to height). Set units to centimeters or inches as required. - Extend Background: Ensure any background colors, images, or elements extend to the very edge of this enlarged canvas.
- Determine Safety Margin: Subtract the printer's recommended safety margin from each side of your final trim size.
- Create Safety Guides: Use the
View > New Guide...option or drag guides from the rulers to mark the boundaries of your safety margin. Alternatively, create a rectangle of the safety margin dimensions and center-align it to the canvas as a visual guide. - Place Content: Design all critical content (text, logos) within the safety margin guides.
By diligently following these steps and understanding the purpose behind each setting, you can confidently prepare your artwork in Photoshop for professional printing, ensuring a high-quality, error-free final product.