Adding a stroke to an image or text in Adobe Photoshop is a fundamental yet powerful technique that can significantly enhance visual design projects. Whether you aim to create defined borders around images, add emphasis to text, or craft intricate graphic elements, understanding how to apply strokes effectively opens up a world of creative possibilities. This tutorial delves into the various methods for adding strokes in Photoshop, from simple text outlines to more complex path and frame applications, providing a detailed guide for users of all skill levels.
Understanding the Fundamentals of Strokes in Photoshop
At its core, a stroke in Photoshop is a colored outline applied to a selected area, layer, or path. The flexibility of Photoshop's stroke tools allows for customization in terms of size, color, position, and even fill type, enabling designers to achieve a wide array of aesthetic outcomes.
The Layer Style Stroke: A Versatile Approach
One of the most common and versatile ways to add a stroke is through the Layer Style panel. This method is particularly useful for text and shapes, offering a non-destructive way to apply outlines.
To begin, ensure you have your text or shape layer selected in the Layers panel. Navigate to the Layer Style panel, which can often be accessed by double-clicking on the layer itself or by going to Layer > Layer Style > Stroke. Within the Layer Style panel, you will find a list of available styles on the left. Check the "Stroke" option to enable it.
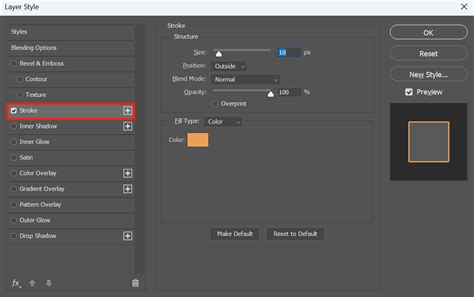
The "Stroke" option provides several key parameters for customization:
- Fill Type: This setting determines the nature of the stroke. You can choose from "Color," "Gradient," or "Pattern."
- Color: Select a solid color for your stroke by clicking on the color swatch. This opens Photoshop's Color Picker, allowing you to choose any hue, saturation, and brightness.
- Gradient: For more dynamic outlines, select "Gradient" and choose from Photoshop's extensive library of gradient presets or create your own. This allows for smooth transitions of color within the stroke.
- Pattern: You can also apply custom patterns as strokes. Photoshop offers default pattern choices, and you can import or create your own patterns for unique textures.
- Size: This parameter specifies the width of the stroke in pixels. Adjusting the size directly controls the thickness of the outline.
- Position: The position of the stroke is noteworthy. You can choose to place it "Inside," "Center," or "Outside" the boundaries of your layer's content.
- Outside: If the stroke is placed outside, it will outline the text or shape externally, without encroaching on the internal pixels. This is often preferred for text to maintain its original shape.
- Inside: Placing the stroke inside will render it within the edges of your layer's content.
- Center: This option places the stroke so that half of its width is inside and half is outside the layer's content.
- Opacity: This sets the transparency of the stroke, allowing pixels underneath to show through if desired.
- Blending Mode: Similar to layer blending modes, this controls how the stroke interacts with the pixels beneath it.
Advanced Stroke Techniques: Multiple Strokes and Fill Opacity
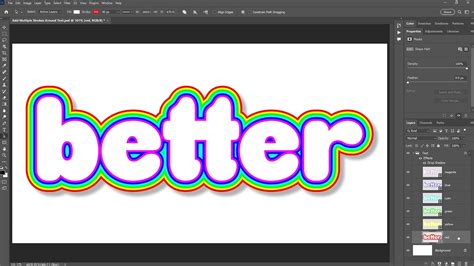
Photoshop allows for remarkable flexibility by enabling users to stack multiple strokes on a single layer. This is achieved by clicking the "+" button next to the stroke options within the Layer Style panel. Each added stroke can have its own unique color, size, position, and fill type. This technique is invaluable for creating complex outlines with layered effects, such as a thick outer glow and a thinner inner accent.
It's important to note that when working with multiple strokes, their order in the Layer Style panel dictates their stacking order on the canvas. Strokes higher in the list will appear on top of strokes lower in the list.
A crucial distinction in Photoshop's Layer Styles is the difference between "Opacity" and "Fill." While "Opacity" affects the entire layer, including any applied layer styles, "Fill" specifically controls the opacity of the layer's content itself, leaving layer styles unaffected. This means you can reduce the "Fill" opacity to 0% to hide the actual text or shape while keeping its strokes visible, a powerful technique for creating text effects where only the outline is desired.
Add Multiple Strokes to Layers in Photoshop
Adding Strokes to Text: Enhancing Readability and Style
Text strokes offer a great solution to issues of legibility, especially when text needs to be placed over busy backgrounds. Learning how to create text strokes in Photoshop will enhance the flexibility of your design projects.
Basic Text Stroke Application
- Create Your Text: Use Photoshop's Type Tool (T) to add your desired text to a new document. Choose your font, size, and color.
- Access Layer Styles: With the text layer selected, go to
Layer > Layer Style > Strokeor double-click the layer in the Layers panel. - Configure Stroke Settings: In the Layer Style panel, select "Stroke." Choose your desired "Fill Type" (Color, Gradient, or Pattern), "Size," "Position" (often "Outside" for text), and "Opacity."
- Apply and Refine: Click "OK" to apply the stroke. You can always re-access these settings by double-clicking the "fx" icon on the text layer.
Hiding Text Content for Stroke-Only Effects
As mentioned earlier, if you want to display only the stroke of your text, you can leverage the "Fill" opacity.
- Apply Stroke: Add your stroke as described above.
- Adjust Fill Opacity: In the Layers panel, locate the "Fill" slider above the "Opacity" slider. Reduce the "Fill" value to 0%. This will make the text content invisible while preserving the applied stroke.
Creating Multiple Text Strokes
To achieve multi-colored or layered stroke effects on text:
- Duplicate Text Layer: Select your text layer in the Layers panel and press
Ctrl+J(Windows) orCommand+J(Mac) to duplicate it. Repeat this process for each additional stroke you wish to add. - Apply Different Strokes: Select each duplicated layer one by one. Double-click the "fx" icon to open the Layer Style panel and apply a unique stroke (different color, size, or position) to each layer.
- Stacking Order: The order of the layers in the Layers panel will determine the visual stacking order of the strokes. Experiment with layer order to achieve desired effects. For instance, a smaller, inner stroke on a lower layer might be surrounded by a larger, outer stroke on a layer above it.
Strokes for Frames and Images
Adding a stroke to a frame in Photoshop creates a defined border around your image, enhancing its visual impact and helping it stand out. This is a common requirement for presenting photographs or graphic elements.
Using the Frame Tool for Borders
Photoshop's Frame Tool (a shape tool, often grouped with the Rectangle Tool) offers a dedicated way to create frames for images.
- Select the Frame Tool: Choose the Frame Tool from the toolbar.
- Draw a Frame: Click and drag on your canvas to create a rectangular or elliptical frame. This frame acts as a container for content.
- Place Image: Drag and drop an image file into the frame. It will automatically be clipped to the frame's boundaries.
- Add Stroke: Select the frame layer in the Layers panel. In the Properties panel (if not visible, go to
Window > Properties), locate the "Stroke options" section. - Configure Stroke: Here, you can set the stroke's color, width, and position (Inside, Center, Outside).
- Apply: Click "OK" to confirm your changes.
Applying Strokes to Selections or Raster Layers
The "Stroke" command, distinct from Layer Styles, allows you to apply a stroke directly to a selection or the pixels of a raster layer. This is particularly useful in Photoshop Elements or for specific pixel-level manipulations.
- Make a Selection: Use any selection tool (Marquee, Lasso, etc.) to define the area you want to stroke. Alternatively, select the raster layer you wish to affect.
- Access Stroke Command: Go to
Edit > Stroke.... - Configure Stroke Dialog Box:
- Width: Enter the desired pixel width for the stroke.
- Color: Choose the color for your stroke. By default, it uses the foreground color.
- Location: Select "Inside," "Center," or "Outside" the selection edge.
- Mode: Choose a blending mode for the stroke.
- Opacity: Set the transparency percentage.
- Apply: Click "OK" to apply the stroke. This action is destructive, meaning it directly modifies the pixels of the selected layer or selection.
Strokes on Paths: Precision and Control
When working with vector paths created using the Pen Tool, you can also apply strokes. This method is ideal for creating clean, scalable outlines for graphic elements.
- Create a Path: Use the Pen Tool (P) to draw your desired path. Ensure the tool is set to "Path" mode in the Options bar.
- Keep Path Selected: With the path active, focus on the Options bar at the top of the screen.
- Configure Stroke Color and Width: Click the stroke color swatch to open a fly-out menu and choose your desired color. Next to the color swatch, you'll find the stroke width setting.
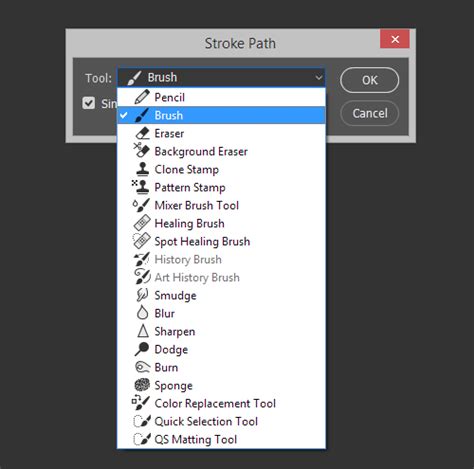
- Stylize the Stroke: To further stylize the stroke on a path, click the "Stroke Options" button (often represented by an icon like a dashed line or a brush). Here, you can choose a brush tip to apply along the path, dictating the stroke's appearance. You can even simulate a brush stroke by selecting a brush tool and then choosing the "Stroke Path" option from the path's context menu.
Tools for Enhanced Control
While Photoshop's built-in tools offer extensive control over strokes, specialized hardware can further refine the creative process. Devices like the TourBox, for example, provide tactile knobs and buttons that can be mapped to common Photoshop shortcuts and functions. This allows for precise adjustments to parameters like strokes, brushes, and color settings with intuitive physical controls, enhancing workflow efficiency and precision. Imagine using a controller similar to a gaming device for your creative tasks, offering a more hands-on and responsive experience compared to solely relying on a mouse and keyboard.
Conclusion
Mastering the art of adding strokes in Photoshop is an essential skill for any digital artist or designer. From the straightforward application of solid color outlines to intricate multi-stroke effects and precise path stroking, Photoshop provides a comprehensive suite of tools to bring your creative visions to life. By understanding the nuances of layer styles, selection-based strokes, and path operations, you can significantly elevate the visual appeal and professional polish of your design projects. Experiment with the various settings, combine techniques, and explore the full potential of strokes to make your work truly stand out.