The Genesis of Animated Imagery
The concept of imbuing still photographs with movement is not a new one. For over a century, creators have been captivated by the magic of stop motion animation, a technique that transforms static objects into dynamic narratives through a series of carefully orchestrated still images. This enduring art form has evolved dramatically since its nascent stages, yet its core principle remains: creating the illusion of motion by photographing objects, making incremental changes, and then playing the sequence back rapidly. The journey from early experiments to sophisticated digital animation is a testament to human ingenuity and the relentless pursuit of visual storytelling.
The very first documented entry in the realm of stop motion animation is widely considered to be The Humpty Dumpty Circus, released in 1898. This pioneering work laid the foundation for a genre that would captivate audiences for generations to come. Following in these early footsteps, creators like J. Stuart Blackton and Albert E. Wladyslaw Starewicz emerged as pivotal figures. Starewicz, in particular, was a visionary who produced a series of influential works throughout the 1910s and 1920s. His most notable creation, Lucanus Cervus, derived its title from the Latin term for ‘stag beetle’ and showcased a menagerie of taxidermied insects brought to life as an all-star cast. This demonstrated an early mastery of manipulating physical objects to achieve animated effects, a hallmark of stop motion.

The evolution of stop motion continued with luminaries like Willis O’Brien, who masterminded the groundbreaking animation for the cinematic icon King Kong in its 1933 big screen adventure. However, O’Brien had honed his craft much earlier, notably for the 1925 film The Lost World. His influence extended beyond his own creations; O’Brien mentored Ray Harryhausen, a figure whose work would come to define a golden age of special effects in cinema. Harryhausen was a singular force, often described as a "one-man machine," whose contributions to films such as The Beast from 20,000 Fathoms and 20 Million Miles to Earth propelled 1950s cinema into a pulpy, imaginative era. As the medium matured, stop motion animation found its way into broader mainstream applications, including television and music videos. A prime example of this widespread adoption is Aardman Animations, a studio responsible for globally acclaimed productions. They brought to life the beloved claymation character Morph, who was first introduced to audiences interacting with the British broadcasting legend Tony Hart before starring in his own series.
Essential Tools for Digital Stop Motion
While the historical context of stop motion is rich with physical manipulation and intricate craftsmanship, modern digital tools have made the process more accessible. For those looking to venture into creating their own stop motion animations, particularly using readily available software like Adobe Photoshop, a few key components are essential.
Digital Camera and Stable Mounting
At the heart of any stop motion production is the camera. While high-end professional equipment can be beneficial, a standard digital camera, even a smartphone with good resolution, can suffice for beginners. The most critical aspect, however, is stability. An essential part of the operation involves mounting the camera so it remains perfectly still throughout the entire production process. Any shift or movement of the camera between shots will introduce jarring inconsistencies into the final animation. Therefore, a sturdy stand or mount is non-negotiable. This ensures that the only elements changing in the frame are the objects being animated, maintaining the integrity of the illusion.
Editing Software: The Photoshop Advantage
Once the series of still images has been captured, the magic truly begins in the editing software. Adobe Photoshop, renowned for its powerful image manipulation capabilities, offers a surprisingly streamlined workflow for creating frame-by-frame animations. The latest episodes of Adobe’s YouTube series, such as “3 2 1 Photoshop,” are designed to guide aspiring animators through this process. These tutorials, often featuring Adobe Evangelists like Julieanne Kost, demonstrate how to transform a sequence of still photos into a moving image without requiring extensive prior animation knowledge. While these resources typically focus on the post-shooting editing phase, they cover everything needed to assemble and refine the animation.
Objects to Film and Creative Vision
Beyond the technical tools, the most vital ingredient is the subject matter itself. Objects to film can range from everyday items to meticulously crafted characters. The beauty of stop motion lies in its versatility; it can be applied to virtually anything. Whether it’s the simple act of grapes appearing to move or the complex narrative of a claymation figure, the creative vision of the animator is paramount. The practice file used in many tutorials, for instance, might feature two distinct layers: a "kernels" layer and a "popcorn" layer positioned above it. This layered approach is fundamental to building the animation within Photoshop, allowing for precise control over which elements are revealed or altered in each frame.
Crafting Animation in Photoshop: A Step-by-Step Approach
The process of creating a stop motion animation within Adobe Photoshop, while requiring attention to detail, is remarkably straightforward once the fundamental steps are understood. The software’s timeline feature is central to this workflow, enabling the assembly and manipulation of individual frames.
Preparing Your Image Sequence
The initial step involves importing your captured still images into Photoshop. The most effective method is to open your sequence "as layers" in Photoshop. This ensures that each photograph in your sequence becomes a separate layer within a single document. This layered structure is crucial for isolating and manipulating elements that will change between frames.
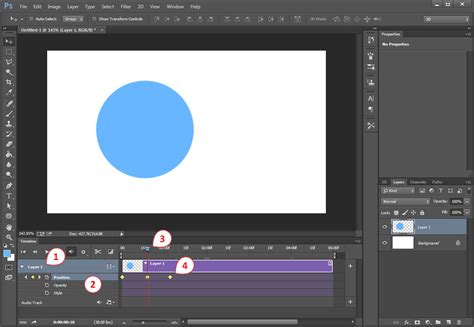
Utilizing the Timeline Window
Once your images are loaded as layers, the next crucial step is to access Photoshop's Timeline window. This panel is the control center for animation. Within the Timeline window, you will select the option to "Create Frame Animation." This action prepares the workspace for building your animation frame by frame.
Importing Layers into the Timeline
With the frame animation mode active, you can then import your layers into the Timeline panel. Each layer in your Photoshop document will be represented as an individual frame in the Timeline. This means that the content of each layer, as it appears in the document, will correspond to a specific moment in your animation.
Adjusting Frame Delay and Looping
This is where the illusion of motion is fine-tuned. Each frame in the Timeline can have its duration adjusted, known as the "frame delay." This setting determines how long each individual image is displayed before transitioning to the next. Shorter delays create faster motion, while longer delays result in slower, more deliberate movements. Furthermore, you can set the "looping" options to control how your animation repeats. Options typically include "Once," "3 Times," or "Forever," allowing for seamless loops or finite sequences as desired.
Exporting Your Animation
Once you are satisfied with the timing and flow of your animation, the final step is to export it in your preferred format. Photoshop offers various export options, commonly including animated GIFs or video files (like MP4). The choice of format will depend on where you intend to share or use your animation.
How to Create a Simple Stop Motion Animation Using Photoshop | Adobe Photoshop
Advanced Techniques and Considerations
While the basic framework for creating stop motion in Photoshop is accessible, there are techniques that can elevate the quality and complexity of your animations.
Masking for Selective Movement
Sometimes, you may want only a few parts of an image to move while the rest remains static. This is where layer masks become incredibly powerful. As demonstrated by Aaron Bernstein, a New York City-based creative and former Adobe Creative Resident, the process can involve duplicating layers and using the Brush tool with a white color to selectively reveal elements. For instance, in a practice file with a "kernels" layer and a "popcorn" layer above it, Bernstein would select the layer mask and use the Brush tool to gradually reveal the popcorn. This meticulous process of painting with a white brush to reveal more of the object is where much of the time is often spent, ensuring a smooth transition of movement.
Duplicating and Refining Frames
To create each distinct state of animation, the workflow often involves duplicating layers where elements are incrementally revealed or changed. For example, after revealing the first popcorn kernel, duplicating the layer (using Control+J on Windows or Command+J on macOS) allows for the creation of subsequent frames where more popcorn is revealed. This iterative process of duplicating, modifying, and then using the "Make Frames From Layers" option in the Timeline is fundamental to building the animation sequence.
Mastering the Timeline for Looping and Flow
Bernstein's work in the Timeline to create looping animations highlights key functionalities. After creating individual frames from layers, he would utilize options like "Select All Frames," "Copy Frames," and "Paste Frames" to build out the animation sequence. A particularly effective technique for creating a natural ebb and flow is to "Reverse Frames." This allows an action, such as popcorn popping, to be followed by its reverse, making the popcorn appear to pop and then unpop, creating a dynamic and engaging loop. Regularly previewing the animation by clicking "Play" in the Timeline is crucial for assessing the timing and making necessary adjustments.
Artificial Light and Post-Processing
When shooting your stop motion sequence, especially for beginners, the use of artificial light is highly recommended. Natural light can fluctuate, leading to unwanted changes in brightness and color between frames, which can be difficult to correct in post-processing. Consistent artificial lighting ensures a stable visual foundation. While significant post-processing can be minimized with good lighting, tools like Adobe Lightroom can be used for minor adjustments to color balance and exposure if needed.
Addressing Inconsistencies
It's common, particularly in early attempts, to encounter minor issues during the filming process. These can include slight movements of objects that were not intended, parts of the frame getting moved accidentally, or poor planning that results in the entire picture not being kept in mind. These imperfections might necessitate cleaning up the frame during the editing process. More complex masking techniques can be employed if you wish to have only a few parts of the image moving while the rest remains entirely still, providing a high degree of control over the final visual.
The journey of stop motion animation, from its historical roots to its modern digital iteration in software like Photoshop, offers a compelling avenue for creative expression. By understanding the fundamental tools, techniques, and historical context, individuals can embark on their own journey to bring still images to vibrant life.