Zooming in and out of video clips is a fundamental technique in video editing, essential for enhancing visual storytelling, drawing audience attention, and refining the composition of your shots. DaVinci Resolve, a professional-grade video editing software, offers a versatile array of tools to achieve these effects, from simple adjustments to complex animated sequences. This guide will walk you through the various methods for mastering zoom effects in DaVinci Resolve, ensuring you can add dynamic and cinematic flair to your projects.
The Power of Zoom in Video Editing
The zoom effect is more than just a visual transition; it's a powerful tool for narrative control. By strategically zooming in, editors can guide the viewer's focus to specific details, emphasize emotional moments, or create a sense of urgency and excitement. Conversely, a zoom out can reveal context, establish a broader scene, or provide a sense of scale. Mastering these techniques allows for a deeper engagement between the viewer and the video content, significantly enhancing the overall viewing experience. The ability to create intimate connections through close-ups or establish a grand perspective through wider shots is at the heart of compelling visual storytelling.
Basic Zooming with Transform Controls
The most straightforward way to adjust zoom levels in DaVinci Resolve is through the Inspector Panel's Transform controls. This method is ideal for simple zoom adjustments that do not require animation over time.
How to Zoom Using the Inspector Panel
- Select the Clip: In your DaVinci Resolve timeline, click on the video clip you wish to modify.
- Open the Inspector: Locate and open the Inspector Panel, typically found in the top-right corner of the DaVinci Resolve interface.
- Access Transform Controls: Within the Inspector Panel, navigate to the "Transform" section. Here, you will find "Zoom X" and "Zoom Y" parameters.
- Adjust Zoom Values: To zoom in, increase the values for Zoom X and Zoom Y. To zoom out, decrease these values. A value of 1.000 represents the original scale. Values greater than 1.000 zoom in, while values less than 1.000 zoom out.
- Reframe with Position: If you zoom in, the edges of your original frame will be cropped. To ensure your subject remains centered or to adjust the framing, use the "Position X" and "Position Y" controls.
This method is best suited for static zoom adjustments where you want to quickly change the apparent distance to your subject or fit a wider shot into a tighter frame without any movement.
Dynamic Zoom for Smooth, Effortless Effects
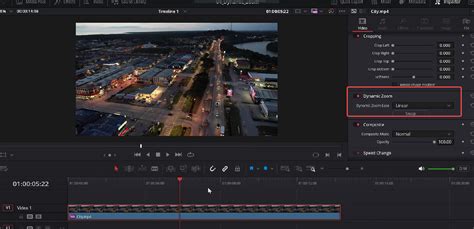
For creating gradual zoom-in or zoom-out effects without the need for manual keyframing, DaVinci Resolve offers the Dynamic Zoom feature. This tool is excellent for adding a touch of polish and movement to your clips quickly.
How to Use Dynamic Zoom
- Select the Clip: Choose the clip in your timeline that you want to apply a dynamic zoom to.
- Enable Dynamic Zoom: Open the Inspector Panel and find the "Dynamic Zoom" option. Toggle it on. By default, the clip will begin to zoom in until the end of the clip.
- Swap Zoom Direction: If you wish to have a zoom-out effect instead of a zoom-in, click the "Swap" icon.
- Set Zoom Points: In the Viewer, you will see two rectangles: a green one representing the start of the zoom and a red one representing the end. Adjust the size and position of these rectangles to define your desired zoom start and end frames. The green rectangle dictates the framing at the beginning of the zoom, and the red rectangle dictates the framing at the end.
- Preview and Refine: Play back the clip to preview the dynamic zoom effect. You can fine-tune the framing by repositioning the green and red rectangles as needed.
Dynamic Zoom is perfect for adding a subtle, organic zoom to your footage that enhances engagement without requiring complex animation setups.
Keyframed Zoom Animations for Precise Control
For advanced control over the speed, direction, and timing of your zoom effects, utilizing keyframes is the most effective approach. This method allows for highly customized and sophisticated zoom animations.
How to Zoom Using Keyframes
- Select Clip and Open Inspector: Select your clip in the timeline and open the Inspector Panel.
- Add Starting Keyframe: Navigate to the "Zoom" control within the Transform section. Click the diamond icon (🔷) next to the Zoom X/Y values to add a keyframe at the current playhead position. This marks the starting point of your zoom.
- Advance Playhead and Adjust: Move the playhead forward in the timeline to the point where you want the zoom to end or change.
- Set New Zoom Value: Increase or decrease the Zoom X/Y values to achieve the desired zoom level at this new point. DaVinci Resolve will automatically create a new keyframe and animate the zoom transition between the two keyframes.
- Repeat for Multiple Zooms: You can repeat this process to create multiple zoom-ins and zoom-outs within a single clip, building complex animated sequences.
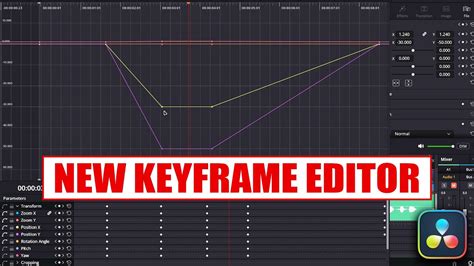
Refining Zoom Speed with Ease In/Out
To create smoother and more natural-looking zoom transitions, you can adjust the easing of your keyframes.
- Open Keyframe Editor: Click on the small keyframe icon (often represented by a graph or curve) located near the Zoom controls or at the bottom of the Inspector to open the Keyframe Editor.
- Apply Ease: Right-click on a keyframe in the Keyframe Editor. You will see options like "Linear," "Ease In," "Ease Out," and "Ease In and Out."
- Linear: Creates a constant-speed zoom.
- Ease In: The zoom starts abruptly and gradually slows down towards the keyframe.
- Ease Out: The zoom starts slowly and gradually speeds up towards the keyframe.
- Ease In and Out: The zoom starts slowly, accelerates, and then decelerates smoothly towards the keyframe, providing the most natural motion.
- Adjust Bezier Curves: For even finer control, you can manipulate the Bezier handles that appear when a keyframe is selected in the Keyframe Editor to precisely shape the animation curve.
Keyframed zoom animations offer the highest level of creative freedom, allowing for precise control over every aspect of the zoom effect.
Zooming with the Edit Page Crop Tool
The Crop tool on the Edit Page can be used in conjunction with the Transform controls to achieve specific zoom-in effects, particularly for creating close-ups that reveal a particular area of a clip.
How to Crop and Zoom
- Select Clip and Open Inspector: Select your clip and open the Inspector Panel.
- Apply Cropping: Expand the "Cropping" section. You can crop from the left, right, top, or bottom to remove unwanted portions of the frame.
- Increase Zoom: After cropping, go to the "Transform" section and increase the "Zoom" values. This will enlarge the remaining cropped area, effectively zooming into the selected part of the original frame.
- Adjust Position: Use the "Position X" and "Position Y" controls to properly frame your subject within the newly zoomed-in area.
This technique is useful when you want to isolate a specific detail within your shot and make it the primary focus, creating a distinct close-up without necessarily scaling the entire image from its original center.
How To Crop Video In Davinci Resolve 18 (Crop And Zoom)
Advanced Zoom Effects with the Fusion Page
For highly complex, cinematic zoom effects, motion tracking integration, or effects that require deep compositing, the Fusion Page in DaVinci Resolve provides unparalleled control.
How to Zoom in Fusion
- Select Clip and Switch to Fusion: Select your clip on the Edit or Cut page and switch to the Fusion Page.
- Add Transform Node: In the node editor, you'll see a MediaIn1 node. Press
Shift + Spacebarto bring up the Select Tool menu, type "Transform," select it, and click "Add." Connect the MediaIn1 node to the Transform node. - Adjust Size: With the Transform node selected, open the Inspector (usually on the left). Adjust the "Size" parameter to zoom in or out.
- Reposition with Center: Use the "Center X/Y" values to reposition the zoomed frame, similar to the Position controls on the Edit Page.
- Animate with Keyframes: To animate the zoom effect, move the playhead in the Fusion timeline, adjust the "Size" parameter, and click the keyframe button next to it. Repeat this process at different points in time to create your desired animation.
The Fusion Page is where you can achieve sophisticated zoom effects, integrate them with other visual elements, and create truly unique cinematic looks. If you're aiming for advanced, pro-level effects, learning how to track motion while zooming can be particularly powerful.
Troubleshooting Common Zoom Issues
Even with a thorough understanding of the tools, you might encounter issues when working with zoom effects. Here are some common problems and their solutions:
Zoom Is Blurry or Pixelated
Zooming into footage can sometimes result in a loss of clarity, making the image appear blurry or pixelated. This is often due to the resolution of your source footage.
- Use High-Resolution Footage: The most effective solution is to work with footage that has a higher resolution than your project's timeline (e.g., 4K footage for a 1080p timeline). This provides more pixels to work with when you zoom in, maintaining better image quality.
- Project Settings Scaling: In DaVinci Resolve, go to
File > Project Settings. Under the "Image Scaling" section, ensure "Zoom here" is set to "Scale full frame with crop." For improved clarity during scaling, you can also set the "Resize Filter" to "Smoother" (though this may slightly increase render times). - Sharpness Adjustments: If working with lower-resolution footage is unavoidable, you can attempt to mitigate blurriness by applying sharpness adjustments in the Color Page. However, this cannot recover detail that isn't present in the original footage.
Zoom Not Working in Fusion
If your zoom effect isn't behaving as expected in Fusion:
- Apply to Transform Node: Ensure you are applying the zoom effect to a "Transform" node, not directly to the "MediaIn" node. The Transform node is specifically designed for manipulation of position, size, and rotation.
- Reset Settings: If you encounter unexpected results, try resetting the "Zoom" and "Position" (or "Size" and "Center" in Fusion) settings in the Inspector Panel to their default values and start again.
Laggy Playback After Applying Zoom Effects
Complex zoom animations, especially when combined with other effects, can sometimes lead to choppy playback.
- Enable Render Cache: Go to
Playback > Render Cacheand select "Smart." DaVinci Resolve will automatically render sections of your timeline that are likely to be replayed, improving playback performance. For even more control, you can manually select clips or sections and choose "Render In/Out" from theRender Cachemenu. - Lower Playback Resolution: In the timeline viewer, use the playback resolution dropdown menu (usually located in the top-right corner of the viewer) and set it to "Half" or "Quarter." This reduces the processing load during playback.
- Optimized Media: For very demanding projects, consider generating "Optimized Media" for your clips. This creates lower-resolution proxy files that are easier for your system to handle during editing.
Zooming in on a Cropped Area
To zoom in on a specific cropped area:
- First, use the "Cropping" section in the Inspector to remove the unwanted parts of the image.
- Then, use the "Zoom" controls within the "Transform" section to enlarge the remaining cropped area.
- Finally, adjust the "Position X/Y" to fine-tune the framing of your zoomed-in subject.
Multiple Zooms and Pans
Yes, you can absolutely create multiple zoom-ins and zoom-outs within a single clip. This is achieved by placing multiple keyframes at different points in the timeline and setting different zoom and position values for each keyframe. This allows for dynamic visual storytelling, guiding the viewer's eye through a scene with intricate detail.
Conclusion: Unleashing Your Creative Zoom Potential
Mastering zoom effects in DaVinci Resolve is a journey from understanding basic adjustments to crafting sophisticated animated sequences. The Transform controls offer simplicity for everyday needs, Dynamic Zoom provides effortless smooth motion, keyframes grant precise control for advanced animations, and the Fusion Page opens the door to the most complex and cinematic possibilities. By leveraging these tools effectively, you can elevate your video projects, engage your audience more deeply, and tell your stories with greater impact. Remember that the quality of your source footage is paramount, and experimenting with different techniques will lead to the most compelling results.