Shadows, when used artistically, can help to create some of the most stunning images. But sometimes, harsh shadows can become a distracting element and lower the overall appeal of an image. The balance lies in knowing when and how to remove and reduce shadows in an image to create a more realistic yet visually pleasing effect. Fortunately, yes, we can fix this in Photoshop. This tutorial is made in Photoshop CC, but it will work on Photoshop CS6 as well.
Understanding the Impact of Shadows in Photography
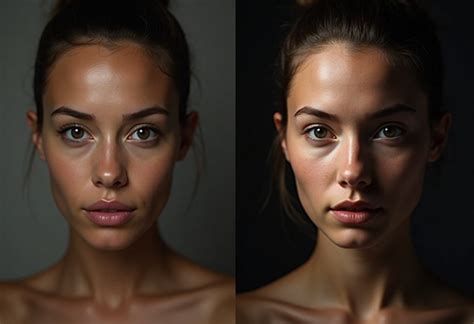
The interplay of highlight and shadow is important in any photo, but some shadows appear in inconvenient places. Severe shadows can distract the viewer and make an image look more intense or bright than you want it to. To create an interesting photo, you want to draw the viewer’s eye to your intended point of focus. Removing shadows is just one way to shift a photo.
A prime example of this challenge was shared by one of our members, Richard Pilcher, who sent in a NEF file of elephants drinking. He asked, “Is there any way to reduce the impact of harsh shadows on the baby elephants?” The answer is a resounding yes, and Photoshop offers a variety of powerful tools to address this very issue.
Essential Photoshop Tools for Shadow Manipulation
Adobe Photoshop has many tools that can be used to remove shadows, depending on the requirement and the effect/result you desire. While Photoshop doesn’t have a single “Shadow Removal” button, it offers several powerful tools to achieve this. The Patch Tool, Clone Stamp Tool, and Content-Aware Fill are among the most popular methods. Additionally, Adjustment Layers like Curves and Levels can non-destructively lighten shadows, giving you more precise control over the final result. It is best to master a combination of these techniques for professional shadow removal.
Method 1: Utilizing the Patch Tool for Seamless Shadow Removal
The Patch tool is an excellent choice for removing shadows from an image more accurately and smoothly, as by selecting it, Photoshop will create new pixels that blend seamlessly with the surrounding areas.
Create a Duplicate Layer: To ensure that you can easily make edits and undo them without affecting the original image, create a duplicate layer. Go to File and click on New to select the file you want to open. As the file shows up in the document window, the Background layer will appear in the Layers palette on the right side. Now, right-click on the Background Layer, and select Duplicate Layer from the displayed menu. The Duplicate Layer dialog will appear where you can rename the layer and press OK. For reference, we are referring to it as the Duplicate Layer. This provides a backup for when something goes wrong, or you make a mistake. Leave the original file as it is.
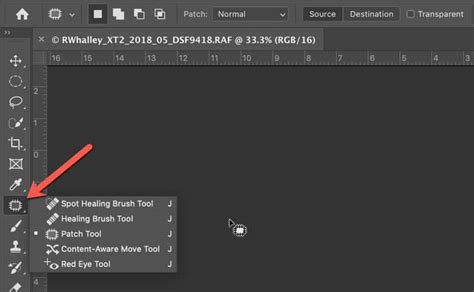
Select the Patch Tool and Content-Aware Mode: Go to the toolbar on the left side of the screen and select the Patch tool. From the Patch drop-down menu, change the mode from Normal to Content-Aware.
Removing Shadows with the Patch Tool: Begin by selecting the area that has the unwanted shadow. Now, drag the selected area to a portion that appears to be relatively similar. As you drag the area, observe that the selected area will change. Once you have got the desired result, release the mouse’s button, and the area will smooth out. This will help you remove shadows from an image more accurately and smoothly.
Method 2: Employing the Clone Stamp Tool for Precision
The Clone Stamp tool allows for precise control over which pixels are used to cover up shadows, making it ideal for detailed retouching.
Duplicate Your Layer: As with the previous method, begin by creating a duplicate layer using CTRL + J (Cmd + J for Mac) or by following the steps outlined above.
Select the Clone Stamp Tool: Select the Clone Stamp tool (the rubber stamp icon) from the toolbar on the left side. Then, adjust the diameter of the brush if required by dragging the Size slider left or right. For smooth edges, use a soft medium-sized brush. Set the Opacity of the brush at 100% if you wish to remove the shadow completely.
Define the Clone Source: In this step, we will select a clone source so that we can use the pixels in that area to remove the shadow. To do this, first, select a non-shaded area by moving the cursor there and then press Alt (Option key in Mac). This will confirm the selected source pixels. You will find that the cursor has now changed into a crosshair.
Painting Away the Shadows: Zoom in on the image for more accurate work. Then, paint over the area that has shadows. To get more natural-looking results, you can again select clone pixels from a different portion of the image and repeat the process. Step 2. Paint over the shadow area. Click Reset Brush Settings.
Quick Tutorial: Removing shadows with clone stamp(for class)
Method 3: Reducing Shadows with the Dodge Tool
For images where you only want to reduce shadows in Photoshop and not completely remove them, the Dodge tool comes in handy. The Dodge tool is used to selectively lighten areas of an image. Its name comes from the traditional darkroom technique of “dodging,” where a photographer blocks light from hitting certain parts of the photo during exposure to make them lighter.
Select the Dodge Tool: Go to the toolbar on the left and select the Dodge tool (a filled-out magnifying glass icon). The Dodge tool looks like a lollipop (a carryover symbol from the days of darkroom photography) in the toolbar, and it can provide a sweet assist when you’re trying to brighten up dark spots.
Set the Range to Shadows: Now, go to the Range at the Dodge menu and select Shadows from the drop-down menu.
Paint Over the Shadows: Again, zoom in and begin painting over the shadow area that you want to reduce. You will see that the shadows of the painted area will appear reduced.
It is important to note that although the Dodge tool can lighten a shadowed area, it is not the most effective or precise method for removing shadows. The tool directly modifies pixels on the image layer, which is a destructive edit. This can lead to an unnatural, “painted-on” look, and it is difficult to reverse the changes later. For this reason, other non-destructive tools like Adjustment Layers or content-aware tools are often preferred for more professional and seamless results.
Method 4: Layer-Based Adjustments for Harsh Shadows
This method is most appropriate for when you want to reduce a harsh shadow and create a softer shadow effect.
Select the Shadow Area: To begin with, select the shadow. To do this, go to the toolbar and select any of the selection tools - Magic Wand tool, Quick Selection tool, or the Lasso tool.
Copy the Shadow to a New Layer: Go to Edit at the top menu bar and select Copy. Then, go to Layer at the top and click on New and then select Layer via Copy. This creates a new layer containing only the selected shadow.
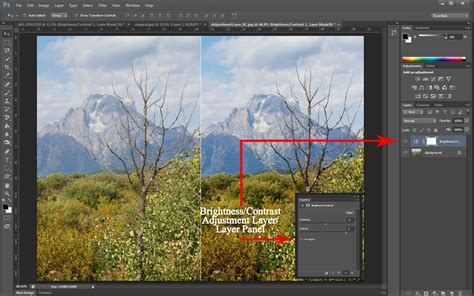
Adjust Brightness and Contrast: In this step, we will adjust the brightness and temperature of the shadows so that they are relatively less harsh and, at the same time, natural-looking. To do this, go to the Adjustments panel and select the Brightness/Contrast icon (a Sun-like icon). As you click on the icon, the Brightness/Contrast Properties panel will appear, where you will find two sliders - Brightness and Contrast. Move the Exposure slider until the brightness matches the surrounding areas. This is what I have come up with. The shadow areas are looking good.
Adjust Color Balance: Once you have adjusted the brightness, it’s time to change the temperature. So select the Color Balance icon (it looks like a balance scales symbol) in the Adjustments panel. Then, set the Tone to Shadows and adjust the temperature by using the Cyan, Magenta, and Yellow sliders listed under it.
Method 5: Leveraging Adjustment Layers for Non-Destructive Editing
Adjustment layers offer a non-destructive way to reduce shadows, providing greater flexibility and control. The two most common and effective adjustment layers for this purpose are Levels and Curves.
Using Levels Adjustment Layer
- Open Levels Adjustment: Open a Levels adjustment layer by going to Layer > New Adjustment Layer > Levels.
- Adjust the Histogram: In the histogram, you will see three sliders: black (shadows), gray (mid-tones), and white (highlights). To reduce shadows, drag the black slider to the right to brighten the darkest areas. Alternatively, move the gray slider slightly to the left to lift the overall mid-tones, which will also lighten the shadows.
Using Curves Adjustment Layer
- Open Curves Adjustment: Open a Curves adjustment layer by going to Layer > New Adjustment Layer > Curves.
- Modify the Curve: This is a more powerful tool. The diagonal line on the graph represents the tonal range of your image. To lighten shadows, click on the bottom-left part of the curve (representing the darkest tones) and drag it upward. You can also create an “S” curve by adding another point in the middle to maintain contrast.
Both Levels and Curves adjustment layers will selectively target and lighten shadows without permanently altering your original image, allowing for easy revisions.
Automated and Advanced Shadow Removal Techniques
Photoshop has features that automate shadow removal to a degree. Content-Aware Fill is a prime example. This tool analyzes surrounding pixels to intelligently fill in a selected area, making it very effective for removing shadows with minimal effort. While not a one-click button, it is a powerful and mostly automated process.
Newer AI features like Generative Fill also offer highly automated, professional results for shadow removal and image manipulation. For more complex jobs, you can also explore third-party plugins.
Erasing Drop Shadows
Yes, you can easily remove a drop shadow in Photoshop. The most direct way is to go into the Layer Style settings of the layer with the shadow. It will simply uncheck the Drop Shadow box to remove the effect entirely. For more precise control, you can separate the drop shadow from the layer. To do this, right-click the Effects (fx) icon on the layer in the Layers panel and select Create Layer. This makes the drop shadow its own separate layer, allowing you to edit it with tools like the Eraser tool or a Layer Mask for more control.
Final Considerations for Realistic Edits
Now that you know how to remove shadows in Photoshop, keep experimenting on photos with different types of shadow areas. Shadows can sometimes turn out to be an important element of an image, so as you reduce or remove them, try to keep the edit as realistic as possible.
I really hope that you found this video and written steps useful and that this helps you fix distracting shadows in your photos.
For more tips on other Photoshop tools, you can explore our tips section. At ShootDotEdit, we offer professional photo editing services to help ease your post-production workflow.