Procreate offers a dynamic and intuitive platform for digital art, and its brush engine is a key component of its appeal. For those looking to elevate their coloring game, understanding and utilizing Procreate's coloring brushes can transform a simple pastime into a sophisticated artistic endeavor. This tutorial delves into the practical application of coloring brushes within Procreate, offering insights and techniques applicable to both beginners and experienced artists.
Laying the Foundation: Sketch and Base Layers
The initial step in any digital artwork, including coloring, involves establishing a clear sketch or outline. Once this is complete, the next crucial step is to create a new layer positioned beneath your sketch layer. This layer can be conveniently named "base" for organizational purposes. This base layer serves as the foundation upon which your colors will be applied, ensuring a clean separation between the linework and the color fill.
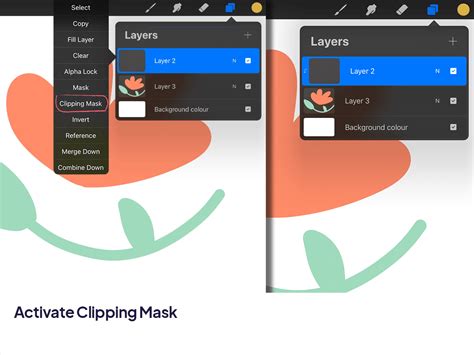
Following this, for elements like hair and clothing, it's highly recommended to utilize separate layers. These layers should be set up as clipping masks and placed below the sketch layer but above the base layer. This method ensures that any color applied to these layers will stay within the boundaries of the sketch, preventing accidental spills and maintaining crisp lines. This organizational approach is fundamental to achieving a polished final product.
The Art of Shading with Color
Shading is where a flat illustration begins to gain depth and dimension. To achieve this in Procreate, create a new layer specifically for your shading. Instead of defaulting to black or grey, experiment with color. For instance, using a reddish hue to paint over areas intended to be darker can add a subtle warmth and richness that traditional shading might miss. This technique is particularly effective when working with characters or objects that have warm undertones.
The choice of brush significantly impacts the blending and texture of your shading. For a very soft and seamless blend, the "Acrylic brush" from the Painting set is an excellent choice. Its properties allow for smooth transitions and a painterly feel. If a slightly rougher texture is desired, to mimic the look of traditional media or to add a more organic feel, the "Stucco" brush, also found in the Painting set, provides a more granular and textured application. Experimentation with different brushes will reveal their unique characteristics and how they can best serve your artistic vision.
Adding Detail and Refining Your Work
As you progress, adding finer details is essential for bringing your illustration to life. This is achieved by continuously adding new layers on top of your existing ones. The number of layers you need will depend on the complexity of the details you wish to incorporate. This layered approach allows for non-destructive editing, meaning you can adjust or remove details without affecting other parts of your artwork.
Throughout the entire blending and detailing process, it is paramount to pay close attention to two critical brush settings: brush size and brush opacity. Adjusting the brush size allows for precision when working on small areas or broad strokes when covering larger sections. Similarly, modifying brush opacity controls the intensity of the color applied. Lowering opacity is key for building up color gradually, achieving subtle gradients, and creating soft transitions, which are vital for realistic shading and blending.
How to Add Shading in Procreate Using Clipping Masks
Procreate as a Digital Coloring Book: Unlocking Fun and Effects
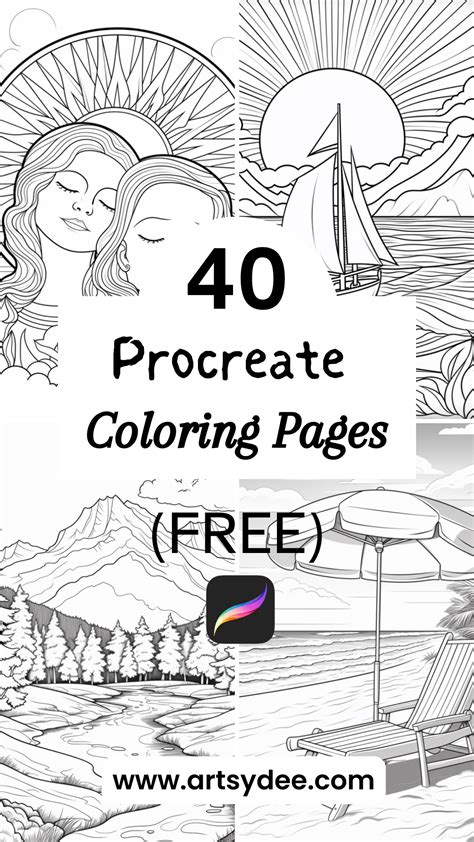
Did you know that Procreate can be utilized much like a traditional coloring book? It offers an even more engaging experience, allowing you to employ cool digital art tricks that are simply not possible with paper and crayons. This interactive approach makes coloring a dynamic and creative process.
By following along with provided tutorials or free coloring pages, artists can learn valuable tips and tricks. Procreate's fundamental features, such as Layers and Alpha Lock, can dramatically speed up the coloring process and enable the creation of stunning visual effects that would be incredibly difficult, if not impossible, to achieve with physical media. These features are not just for advanced artists; they are accessible tools that can enhance the enjoyment and outcome of coloring for everyone.
Utilizing Free Procreate Coloring Pages
Many artists and platforms offer free downloadable coloring pages designed specifically for Procreate. These pages are typically provided as Procreate files, allowing you to open them directly on your iPad and begin coloring immediately. This is an excellent way to practice your skills without the pressure of creating your own line art.
When you open a Procreate coloring file, you will often find a layer designated for coloring, usually labeled something like "Color Here." This layer is strategically placed below the linework layer. You have two primary methods for filling these areas: using the "Color Drop" tool for quick, solid fills, or by coloring them in by hand with your chosen brushes. Both methods offer different creative possibilities and can be combined for varied effects.
Exploring Free Procreate Brushes for Coloring
To further enhance the coloring experience, many creators offer free brush sets specifically designed for digital coloring. These sets often cater to different styles and skill levels. For instance, a "Kids Make Art!" brush set might include brushes that are forgiving and easy to use, perfect for younger artists or those new to digital art. These brushes can emulate the feel of traditional art supplies like markers, crayons, or colored pencils, adding a familiar tactile quality to the digital medium.
The "Kids Make Art!" brush set, for example, comprises six high-quality Procreate brushes. These are ideal for young artists learning the ropes of Procreate or for anyone who appreciates the simple joy of coloring with a diverse set of tools. The brushes are designed to be versatile, allowing for a range of applications from broad fills to intricate details.
Specific Brush Recommendations for Different Elements
When working with Procreate coloring pages, different elements of the illustration might benefit from specific brush choices. For example:
- For Planets: A combination of "Marker" and "Fine Point Marker" brushes can be used for the base color and outlines, while a "Crayon" brush can be employed to add texture and a hand-drawn feel.
- For Shooting Stars: A "Fine Point Marker" is often sufficient for rendering sharp, defined shooting stars.
- For Fish: The "Fine Point Marker" can be used for the main body, and a "Colored Pencil" brush is excellent for adding delicate scales and highlights.
- For the Sky: A "Messy Paint" brush is ideal for blending various colors together, creating atmospheric effects and smooth gradients in the sky.
- For Rockets: The "Wet Paint" brush is particularly useful for blending different shades of grey, achieving a metallic or rendered look.
- For Extra Stars: A "Colored Pencil" brush can add a soft glow or fine details to stars, making them appear more luminous.
Downloading and Using Procreate Coloring Pages
The process of using downloadable coloring pages in Procreate is straightforward:
- Download: Obtain the Procreate .Procreate files. These are typically saved to your iPad's "Files" app, often in the Downloads folder.
- Import: Tap on the downloaded file. This action will automatically import it into your Procreate app.
- Open and Color: Locate the imported file within your Procreate gallery and open it. You are now ready to begin coloring.
- Navigate Layers: Open the Layers panel by tapping the icon with two overlapping squares in the upper right corner of the Procreate interface.
- Identify Coloring Area: You will see a layer clearly marked for coloring, such as "Color Here," situated beneath the linework layer. This is your designated space for applying color.
It's also worth noting that many creators offer printable PDF versions of their coloring pages, providing an option for those who prefer to color on paper using traditional media. This dual availability ensures that the creative content can be enjoyed in multiple formats.
Advanced Coloring Techniques and Brush Exploration
Beyond the basic application of colors, Procreate offers advanced techniques that can significantly enhance the visual appeal of your colored artwork. These techniques often involve a deeper understanding of brush settings and layer modes.
Alpha Lock for Controlled Coloring
One of the most powerful tools for coloring within Procreate is Alpha Lock. Once you have filled a base layer with a color, you can apply Alpha Lock to that layer. This feature restricts any further drawing or painting to only the areas that have already been colored on that layer. This means you can add shading, highlights, or texture directly onto your base color without the risk of accidentally coloring outside the lines of that specific element. It's an incredibly efficient way to add depth and detail precisely where you want it.
Layer Modes for Creative Effects
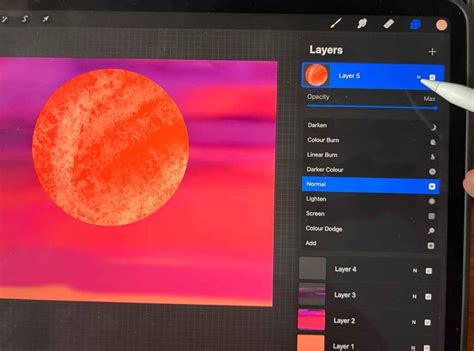
Procreate's layer modes offer a vast array of possibilities for creating unique visual effects. By changing the blend mode of a layer, you can alter how it interacts with the layers below it. For example:
- Multiply: This mode is excellent for shading. When you paint with a dark color on a layer set to Multiply, it will darken the colors below it, creating natural-looking shadows.
- Screen: This mode is the opposite of Multiply and is perfect for adding highlights. Painting with a light color on a Screen layer will lighten the colors below, simulating bright spots or glows.
- Overlay / Soft Light / Hard Light: These modes are fantastic for adding color overlays or enhancing existing colors. They can be used to introduce atmospheric effects, adjust the mood of an illustration, or add subtle color variations.
- Color Dodge / Linear Dodge (Add): These modes are for creating intense highlights and glows, often used for magical effects, reflections, or light sources.
Experimenting with different layer modes in conjunction with various brushes can lead to unexpected and beautiful results.
Brush Customization and Creation
While Procreate comes with a robust library of pre-installed brushes, and many free ones are available, you also have the ability to customize existing brushes or even create your own from scratch. This level of control allows you to tailor your tools precisely to your artistic style and the specific needs of your coloring projects.
You can adjust parameters such as shape, grain, stroke path, jitter, color dynamics, and Apple Pencil tilt and pressure. By tweaking these settings, you can create brushes that mimic specific textures, have unique blending behaviors, or respond dynamically to your stylus input. Creating a custom brush can be a time-consuming process, but it offers unparalleled control and can lead to a truly unique artistic signature.
Tips for Achieving Professional-Looking Results
To move beyond basic coloring and achieve a more professional aesthetic, consider these additional tips:
- Color Theory Basics: Understanding basic color theory, such as complementary colors, analogous colors, and color temperature, can help you make more informed color choices that create harmony and visual interest in your artwork.
- Reference Images: Don't hesitate to use reference images. Whether you're coloring a character like Moana or a fantastical creature, looking at real-world references for lighting, textures, and color palettes can significantly improve the believability and quality of your work.
- Value Study: Before diving into color, consider doing a quick value study. This involves sketching out your illustration using only shades of grey. Understanding the light and shadow patterns in grayscale can make it much easier to apply color effectively later on.
- Consistent Lighting: Decide on a light source for your illustration and maintain it consistently across all elements. This will ensure that your shading and highlights make sense and contribute to a cohesive overall image.
- Experiment with Texture: Don't be afraid to layer different brushes to create unique textures. For example, you could use a soft brush for a base color, then a textured brush like a charcoal or chalk brush for added detail and grit.
By combining these techniques and tips, you can transform your Procreate coloring sessions into a deeply rewarding and artistically fulfilling experience. The flexibility of Procreate and its vast array of brushes and tools empower you to explore your creativity without limits.