Inkscape is a powerful, free, and open-source vector graphics editor that offers a robust alternative to expensive commercial software like Adobe Illustrator. Whether you're an artist, illustrator, hobbyist, or professional looking to create scalable vector graphics (SVG) for web design, print projects, or precise manufacturing processes like laser cutting, Inkscape provides the tools and flexibility to bring your designs to life. This tutorial will guide you through the fundamental concepts of vector graphics, the essential tools within Inkscape, and practical workflows, including converting raster images for laser cutting.
Understanding Vector Graphics vs. Raster Images
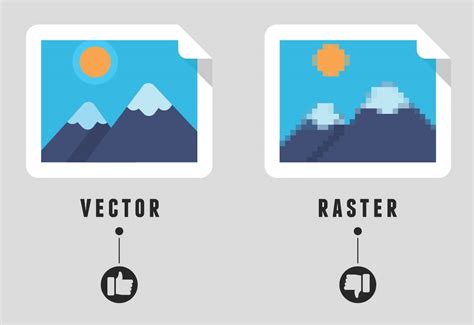
Before diving into Inkscape, it's crucial to understand the fundamental difference between vector and raster image formats. This distinction is paramount for applications like laser cutting, where precision is key.
Raster Images: Pixel-Based Limitations
Raster images, such as JPEGs and PNGs, are composed of a grid of individual pixels. Each pixel has a specific color value. The clarity and detail of a raster image are dependent on its resolution; zooming in too closely will reveal these individual pixels, leading to a blocky or "pixellated" appearance. This lack of scalability means that raster files are not suitable for laser cutting. CNC machining software, like that used by lasers, does not interpret colors or pixels as distinct boundaries. Instead, it might perceive the entire square area of the image, leading to inaccurate cuts or an inability to "find" the true edge lines of your intended part.
Vector Graphics: Mathematical Precision
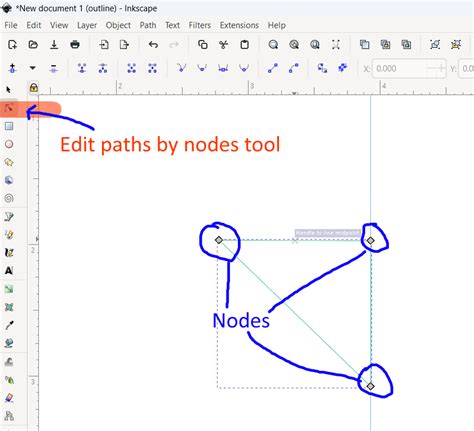
Vector graphics, on the other hand, are based on mathematical equations that define geometric shapes, lines, and curves. These elements are represented by a series of coordinates, mathematical paths, and nodes. This mathematical foundation allows vector graphics to be scaled infinitely without any loss of quality or resolution. For laser cutting, vector files are essential because the laser understands these coordinates. It follows the paths defined by nodes, enabling precise cuts along the exact edges of your design. The "Edit path by nodes" tool in Inkscape allows you to visualize and manipulate these defining points, ensuring the laser has a clear map to follow.
Getting Started with Inkscape: The Interface and Basic Tools
Inkscape's interface, while comprehensive, is intuitive to navigate. Understanding its core tools is the first step to efficient design.
The Workspace and Tool Controls
Upon opening Inkscape, you'll be presented with a blank canvas, typically an A4 page by default. The main workspace is where your design will take shape. To the left, you'll find the Toolbox, containing all the drawing and editing instruments. Above the canvas, the Command Bar offers quick access to common actions and tool options. The right side of the window often houses dockable dialogs, such as the Fill and Stroke properties, which can be toggled via the View menu.
Essential Tools for Design
- Select and Transform Objects Tool (F1): This is your primary tool for selecting, moving, scaling, and rotating objects on your canvas. Holding the
Ctrlkey while scaling ensures proportional resizing. Clicking an object twice activates the rotation and skew handles. - Edit Path by Nodes Tool (F2): Crucial for working with vector paths. This tool allows you to select, add, delete, and manipulate nodes (the points defining paths) and their handles to shape curves and lines precisely.
- Draw Bezier Curves and Straight Lines Tool (Shift+C): This versatile tool enables you to create both straight lines and complex curves. For straight lines, click to set a start point and click again to set an end point. For curves, click and drag to shape the path as you create it.
- Create Rectangles and Squares Tool (F4): Use this to draw rectangular shapes. Holding
Ctrlwhile dragging constrains the shape to a perfect square. - Create Circles, Ellipses, and Arcs Tool (F5): Similar to the rectangle tool, this allows you to draw ovals. Holding
Ctrlcreates a perfect circle. You can also adjust the start and end angles to create arcs or "pac-man" shapes. - Create Stars and Polygons Tool (Shift+*): This tool is used to draw polygons and stars. Holding
Ctrlsnaps the corners to 15-degree increments, aiding in alignment. - Text Tool (F8): For adding and editing text. You can adjust font, size, color, and alignment.
Manipulating Objects: Fill, Stroke, and Gradients
- Fill and Stroke Dialog: Accessible via
Object > Fill and Stroke, this dialog is fundamental for defining the appearance of your objects. You can set the fill color, stroke (outline) color, stroke width, and apply various line styles like dashes. Transparency can be adjusted using the alpha bar. - Gradients: Inkscape allows for sophisticated gradient fills. You can create linear or radial gradients and edit them by manipulating color stops and their positions along the gradient line.
Layers and Grouping for Organization
- Layers: For complex designs, layers are indispensable for organization. You can create multiple layers, each containing various objects. Layers can be stacked, reordered, hidden, or locked, providing a structured workflow. The Layers dialog is typically found in the Command Bar.
- Grouping: You can group multiple objects together (
Object > GrouporCtrl+G) to move, scale, or transform them as a single unit. Ungrouping (Object > UngrouporCtrl+Shift+G) separates them again.
Converting Raster Images to Vector for Laser Cutting with Inkscape
One of the most common and practical applications of Inkscape is converting raster images (like JPEGs or PNGs) into vector files suitable for laser cutting. This process is often referred to as "tracing."
Why Avoid Online Converters?
While tempting for their perceived speed, online file converters are strongly discouraged for professional use, especially for laser cutting. They frequently produce low-quality files with excessive nodes, distorted paths, and poor accuracy, making them difficult or impossible to process correctly by manufacturing equipment. Inkscape's built-in "Trace Bitmap" feature offers a far superior and controllable solution.
The "Trace Bitmap" Process
Create a New Document and Import: Start by creating a new document in Inkscape (
File > New). Then, import your raster image (File > Import) into the document.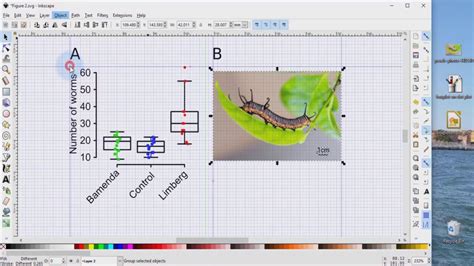
Prepare the Image (Optional but Recommended): For optimal tracing results, especially with complex images, it's often beneficial to pre-process the raster image.
- Grayscale Conversion: Go to
Filters > Color > Grayscale. This removes color information, simplifying the image for tracing. - Brightness and Contrast Adjustment: Navigate to
Filters > Color > Lightness and Contrast. Adjust the sliders to create a clear distinction between the foreground and background. The goal is to achieve a silhouette-like appearance with high contrast, making it easier for the tracing algorithm to identify edges. Always use the "Preview" option to see the effect of your adjustments in real-time.
The Complete Guide To Using Trace Bitmap in Inkscape
- Grayscale Conversion: Go to
Open Trace Bitmap: With your raster image selected, open the "Trace Bitmap" dialog. You can access this via
Path > Trace Bitmapor by using the shortcutShift+Alt+B.Choose a Tracing Mode: The "Trace Bitmap" dialog offers several modes:
- Brightness Cutoff: This mode converts the image to black and white based on a brightness threshold. It's effective for stencils or images with clear tonal differences.
- Edge Detection: This mode uses an algorithm to find isoclines (lines of similar contrast). The output may differ significantly from the original but can sometimes provide useful paths.
- Color Quantization: This mode identifies areas of similar color and converts them into paths. It's excellent for images with distinct color areas, like logos or stylized graphics. For most laser cutting applications requiring a simple outline, setting the "Number of colors" to
2is a good starting point.
Crucially, always enable the "Preview" option within the dialog to see how your settings affect the trace in real-time. Experiment with the various settings, such as "Speckles," "Smooth corners," and "Optimize," to refine the tracing output.
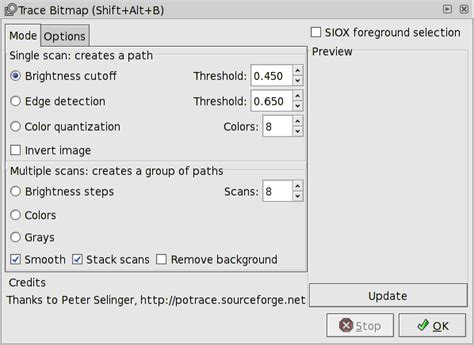
Apply the Trace and Clean Up: Once you're satisfied with the preview, click "OK" to apply the trace. A new vector object will be created directly on top of your original raster image. You must now delete the original raster image, which is hiding behind the traced vector. Select the vector object and move it aside.
Node Editing and Simplification:
- Select the Vector Object: Use the "Edit path by nodes" tool (F2) on your newly created vector object. You'll now see the defining nodes and paths.
- Simplify Paths: Depending on the complexity of the original image and the tracing settings, you might have an excessive number of nodes. Too many nodes can make the path difficult for the laser to follow. Select your object and go to
Path > Simplify(Ctrl+L). This will reduce the number of nodes while trying to preserve the shape. Repeat this process if necessary, but be mindful not to over-simplify, which could distort the design. - Clean Up Edges: Inspect the edges of your vector object using the "Edit path by nodes" tool. The laser will cut exactly as the path is defined.
- Excess Nodes: Select unwanted nodes by
Shift+clickingthem (they turn blue) and pressDelete. You can also use the eraser tool to draw across paths you wish to remove. - Smoothing Curves: Adjust the handles of nodes to smooth out bumpy or jagged curves. Click on a node, then drag its red handles to refine the curve's shape.
- Straightening Lines: If you have a curve that should be a straight line, select the nodes and use the "Make selected nodes smooth, symmetric, or straight" buttons in the toolbar at the top to adjust their behavior. You can convert corners to straights or vice versa.
- Excess Nodes: Select unwanted nodes by
Scaling and Final Checks:
- Check Size: Use the "Select and transform objects" tool (F1) to check and adjust the size of your vector object. Drag the bounding box arrows to scale, holding
Ctrlfor proportional scaling. Alternatively, type your desired dimensions into the top toolbar. - Design Guidelines: Ensure your design adheres to the specific design guidelines for laser cutting, such as material size limitations, thickness constraints, and the requirement for appropriate bridging on interior elements.
- Check Size: Use the "Select and transform objects" tool (F1) to check and adjust the size of your vector object. Drag the bounding box arrows to scale, holding
Once these steps are completed, your raster image has been successfully converted into a precise vector file, ready for laser cutting.
Advanced Techniques and Considerations
Inkscape offers a wealth of features for creating intricate and professional vector artwork.
Working with Bezier Curves
Bezier curves are the backbone of most vector graphics. Understanding how they work is key to creating smooth, organic shapes. A Bezier curve is defined by four points: two end nodes and two control points (handles). The handles dictate the curve's tangent at the end nodes. By manipulating these handles with the "Edit path by nodes" tool, you can achieve precise control over curves and create custom shapes from scratch or by modifying existing ones.
Creating Custom Shapes and Designs
Inkscape's geometric shapes are excellent starting points. You can combine, subtract, and intersect these shapes to build more complex forms. For instance, creating a Venn diagram involves overlapping circles and then using the "Difference" operation (Path > Difference).
Utilizing Text in Designs
The Text tool allows you to add typography to your designs. You can convert text to paths (Path > Object to Path or Ctrl+Shift+K) to further manipulate individual characters as vector shapes, which is often necessary for precise cutting or unique typographic treatments. You can also place text on a path for curved or flowing text effects.
Exporting and File Formats
- Inkscape SVG: This is Inkscape's native format and is ideal for saving your work in progress, as it preserves all vector information for future editing.
- PNG: For web use or presentations, exporting as a PNG (
File > Export Bitmap) is common. You can specify the resolution and dimensions. - PDF, EPS, AI, DXF: Inkscape can export to various other formats, including PDF (Portable Document Format), EPS (Encapsulated PostScript), and DXF (Drawing Exchange Format), which is widely used in CAD. These formats are crucial for professional print workflows and manufacturing. When exporting for laser cutting, ensure the output is a clean vector file.
The Complete Guide To Using Trace Bitmap in Inkscape
Inkscape as a Powerful Alternative
For individuals and professionals seeking a capable vector graphics editor without the high cost of commercial software, Inkscape stands out. Its extensive feature set, active community, and open-source nature make it a valuable tool for a wide range of creative and technical applications. From intricate illustrations to precise manufacturing designs, Inkscape empowers users to express their creativity and achieve professional results.
Applications Beyond Laser Cutting
While this tutorial has focused on laser cutting, Inkscape is equally adept at creating:
- Logos: Design professional logos that scale perfectly for any application.
- Illustrations: Craft detailed and scalable artwork for websites, books, and marketing materials.
- Diagrams and Schematics: Create clear visual representations of data, processes, or technical concepts for research or presentations.
- Web Graphics: Design icons, buttons, and other visual elements for websites and applications.
By mastering the tools and workflows within Inkscape, you unlock a world of design possibilities, enabling you to produce high-quality vector graphics for virtually any purpose.