The Orton Effect, a technique deeply rooted in the golden days of film and darkroom processing, offers a captivating way to imbue your photographs with a soft, ethereal glow. Originally developed by Michael Orton in the 1980s to mimic the painterly qualities of watercolor, this effect has found a powerful digital reincarnation in Adobe Photoshop. While some photographers find it an indispensable tool for adding "pop" and a dreamy, pictorial-style aesthetic, others caution against its overuse, emphasizing the importance of subtlety and selective application. This tutorial delves into various methods for achieving the Orton Effect in Photoshop, from straightforward duplication and blurring to more advanced techniques involving layer masks and smart filters, aiming to provide a comprehensive understanding for photographers of all levels.
Understanding the Orton Effect's Core Principle
At its heart, the Orton Effect is achieved by combining a sharp, in-focus image with a softened, slightly overexposed version of itself. This blending creates a luminous quality where highlights gently bleed into shadows, resulting in a dreamy, almost otherworldly appearance. The original darkroom method involved sandwiching two slides-one sharp and one deliberately out of focus and overexposed. Photoshop allows us to replicate this process digitally, offering greater control and flexibility.
Method 1: The Straightforward Duplicate and Blur Approach
This method is often cited as the simplest and most straightforward, requiring minimal Photoshop expertise. It's an excellent starting point for those new to the Orton Effect.
Open and Duplicate: Begin by opening your chosen image in Photoshop. The first crucial step is to duplicate the background layer. This can be achieved by going to
Layer > Duplicate Layeror by simply dragging the background layer onto the "Create a new layer" icon at the bottom of the Layers panel. It's good practice to rename this duplicated layer, perhaps to "Orton Effect," to maintain a clear workflow.Apply Gaussian Blur: With the duplicated layer selected, navigate to
Filter > Blur > Gaussian Blur. The key here is to apply a significant amount of blur. The optimal radius is subjective and depends on your image's resolution and the desired intensity of the effect. A common recommendation is to set the radius to the approximate number of megapixels of your camera (e.g., 24 pixels for a 24MP image). The goal is to obscure sharp details while retaining the overall subject and colors. You can adjust the strength of the effect later using the layer's opacity.Adjust Blending Mode and Opacity: Now, change the Blending Mode of the blurred layer. While "Overlay" is frequently used for a stronger effect, "Soft Light" offers a gentler, more subtle glow. Experiment with both to see which best suits your image. Following this, adjust the opacity of this blurred layer. This slider is critical for controlling the intensity of the Orton Effect. Many photographers recommend a low opacity, typically between 8% and 20%, to maintain subtlety. However, some tutorials suggest starting with 100% opacity to visualize the effect before reducing it.
Method 2: Leveraging Smart Objects for Non-Destructive Editing
For those who prefer a non-destructive workflow, converting your layer to a Smart Object before applying filters is highly recommended. This allows you to revisit and re-edit filter settings at any time.
Convert to Smart Object: Open your image and either right-click on the background layer and select "Convert to Smart Object," or go to
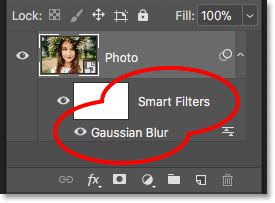
Filter > Convert for Smart Filters.Apply Gaussian Blur as a Smart Filter: With the layer as a Smart Object, go to
Filter > Blur > Gaussian Blur. Apply the blur as described in Method 1. Because it's a Smart Filter, you'll see "Gaussian Blur" listed beneath your Smart Object layer in the Layers panel. You can double-click this to readjust the blur radius at any point.Set Blending Options and Opacity: Similar to the previous method, change the Blending Mode of the Smart Object layer to "Overlay" or "Soft Light." You can then adjust the opacity of the layer to fine-tune the effect's strength. The advantage here is that you can also access the "Blending Options" directly from the Smart Object layer to further refine how the blurred layer interacts with the layer below.
Method 3: Enhancing the Effect with Brightness and Contrast Adjustments
Some approaches to the Orton Effect involve further enhancing the blurred layer before blending it with the original.
Duplicate and Blur: Follow steps 1 and 2 from Method 1 or Method 2.
Adjust Brightness and Contrast: On the blurred layer, navigate to
Image > Adjustments > Brightness/Contrast. While you can use Levels or Curves as alternatives, for this specific step, increasing the contrast to 100% and adjusting the brightness can help create a more pronounced glow. It's acceptable to "overdo" these adjustments at this stage, as the final intensity will be managed by the layer's opacity.Blend and Refine: Change the Blending Mode of this adjusted layer to "Screen" or "Overlay." Then, significantly reduce the layer's opacity, often to a range of 8-15%, to achieve a subtle yet effective glow.
Method 4: Advanced Control with Layer Masks and Channels
For greater precision and to avoid unwanted softening in specific areas, layer masks are invaluable.
Create the Base Orton Effect: Follow any of the previous methods to create a blurred layer and set its Blending Mode and opacity.
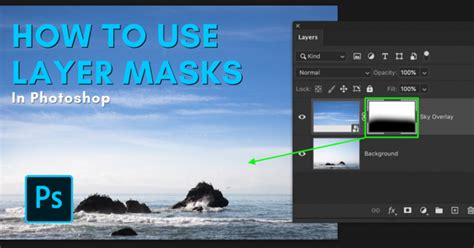
Add a Layer Mask: With the blurred (Orton Effect) layer selected, click on the "Add layer mask" icon at the bottom of the Layers panel. A white rectangle will appear next to the layer thumbnail.
Paint to Reveal/Conceal: Select the Brush Tool (B). Set your foreground color to black. Ensure the brush has a soft edge (hardness 0%) and adjust its size and opacity as needed (a large, soft brush with 100% opacity is often used initially). By painting with black on the layer mask, you will conceal the Orton Effect in those areas, revealing the sharper details of the layer beneath. Conversely, painting with white will reveal the effect. This allows you to selectively apply the glow to highlights or specific elements while keeping other areas sharp.
Method 5: Targeting Highlights and Refining Shadows
A more sophisticated approach involves using selections from the Channels panel to isolate the effect to the highlights, preventing shadows from becoming overly dark or "crushed."
Create the Orton Effect: Establish your blurred layer with its Blending Mode (e.g., Screen or Overlay) and potentially a moderate opacity.
Select Highlights via Channels: Go to the Channels panel. Command-click (or Ctrl-click) on the RGB channel's thumbnail. This creates a selection of the brightest areas of your image.
Apply Mask to Orton Layer: Switch back to the Layers panel. With the Orton Effect layer selected, click the "Add layer mask" icon. This will automatically apply the selection from the Channels panel as a mask to your Orton layer, ensuring the effect is primarily applied to the highlights.
Refine with Blend-If Sliders: To further control how the Orton Effect interacts with shadows, double-click on the Orton Effect layer to open the Layer Style dialog box. Within the "Blending Options" section, you'll find "Blend If" sliders for the underlying and current layer. By adjusting the triangle slider on the "Underlying Layer" section (the black triangle), you can make the darker areas of the image transparent in the Orton layer, effectively recovering shadow detail. Holding down the Alt (or Option) key while clicking and dragging this triangle will split it, creating a smoother transition between transparent and opaque areas, preventing harsh edges.
Method 6: Reintroducing Detail with High Pass Sharpening
A common side effect of the Orton Effect is the loss of fine details and textures due to the blurring. This can be counteracted by reintroducing sharpness selectively.
Duplicate the Base Layer: Copy your original background layer and place it on top of all other layers, including the Orton Effect layer.
Apply High Pass Filter: With this topmost layer selected, go to
Filter > Other > High Pass. Adjust the Radius slider. For landscape images, a radius of 2-3 pixels is often recommended. This filter creates a grey overlay with white areas indicating where sharpening will be applied.Set Blending Mode to Overlay: Change the Blending Mode of this High Pass layer to "Overlay." This will reintroduce detail and texture to your image.
Mask the Sharpening: To ensure the sharpening only affects areas where the Orton Effect might have softened details too much, you can apply a layer mask to the High Pass layer. You can either create a mask by painting with black or, for a more integrated approach, use the mask from your Orton Effect layer (if you used one) by Command-clicking (or Alt-clicking) on the Orton Effect layer's mask thumbnail while the High Pass layer's mask is active.
Method 7: Camera Raw Filter for Color Grading and Fine-Tuning
The Camera Raw filter provides a powerful environment for further enhancing the Orton Effect, particularly for color grading and luminosity adjustments.
Create a Merged Layer: Before diving into Camera Raw, it's beneficial to create a new merged layer of all visible layers by pressing
Ctrl+Shift+Alt+E(Windows) orCmd+Shift+Option+E(Mac). Name this layer "Orton Effect Camera Raw."Open in Camera Raw: With this merged layer selected, go to
Filter > Camera Raw Filter.Color Grading: Within the Camera Raw interface, navigate to the "Color Grading" section. You can add warmth and depth by adjusting the "Highlights" color and "Balance." This step can add a rich, ethereal quality to the glow.
Basic Adjustments: In the "Basic" section, you can further fine-tune the image. Increasing "Whites" can boost luminosity, and you can revisit the "Color Grading" section to tweak colors and balance as needed.
Fine-Tune Opacity: After applying your Camera Raw adjustments, return to Photoshop. You can now adjust the opacity of the "Orton Effect Camera Raw" layer to seamlessly blend the processed effect with your base image. Experiment with values around 10-20% for a subtle enhancement.
Learn the Orton Effect – Photography's Most Wanted Glow
Considerations for Optimal Use
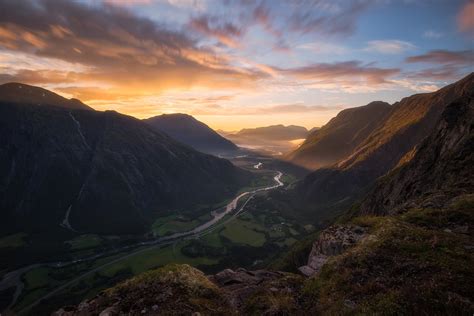
- Image Selection: The Orton Effect is not universally applicable. It tends to work best on images with lush greenery, vibrant skies, water bodies, or scenes where a soft, romantic, or dreamy aesthetic is desired. Landscapes, close-ups of nature, and even some portraits can benefit. Ask yourself: "Would a soft, pictorial look suit this photo?"
- Subtlety is Key: The most common critique of the Orton Effect is its overuse, which can lead to images appearing overly soft, muddy, or artificial. The goal is usually to enhance, not to overpower. If you can clearly tell an effect has been applied, it's likely too strong.
- Experimentation: Photoshop offers numerous ways to achieve the Orton Effect, and each image may respond differently. Don't be afraid to experiment with different blending modes (Screen, Overlay, Soft Light), blur amounts, opacity levels, and masking techniques.
- Non-Destructive Workflow: Whenever possible, work with Smart Objects and adjustment layers. This preserves your original image data and allows for easy revisions.
- Beyond the Glow: While the glow is a primary characteristic, remember that the Orton Effect also helps blend highlights and shadows, contributing to a smoother tonal transition.
By understanding the core principles and exploring these various techniques, you can effectively incorporate the Orton Effect into your Photoshop workflow, adding a touch of magic and artistic flair to your photography when the subject matter calls for it.