Adobe Photoshop, a powerhouse for digital image manipulation, relies heavily on its layer system to provide flexibility and control. Understanding how to manage these layers, particularly how to unlock them, is fundamental for both novice and experienced users. This guide delves into the various methods and considerations for unlocking layers in Photoshop, ensuring you can freely edit and manipulate your digital creations.
The Basics of Layer Locking and Unlocking
At its core, a locked layer in Photoshop is essentially a safeguard. It prevents accidental modifications, helping to preserve specific elements of your design while you work on other parts. However, when you need to make changes to these protected elements, unlocking them becomes a necessary step.
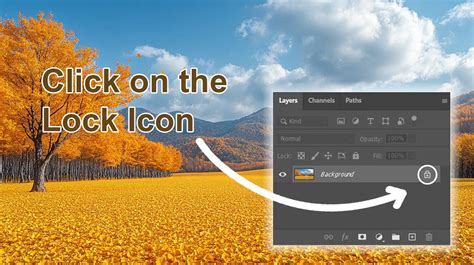
The most straightforward method to unlock a layer is by directly interacting with the lock icon. When you have a layer selected in the Layers tab, you will notice a lock icon situated to the right of the layer's name. A simple click on this icon will toggle off any type of lock applied to that layer. This is a universal shortcut that works for most layers, allowing for quick access and modification. If you don't see the Layers tab, you can easily bring it up by navigating to "Window" in the menu bar and selecting "Layers" from the drop-down menu.
Addressing the Unique Case of the Background Layer
The default "Background" layer in Photoshop often behaves differently from other layers. When you create a new Photoshop file, the Background layer is automatically locked. This is designed to act as a base image, preventing it from being moved or having its blending modes changed, much like a physical background in a studio.
To unlock the default Background layer and gain full editing capabilities, you can employ a specific method. First, select the Background layer in the Layers tab. Then, navigate to the menu bar and choose "Layer," followed by "New" and then "Layer from Background." This action effectively replaces the locked Background layer with a regular, unlocked layer. This new layer will be a copy of the original Background, allowing you to freely edit it, including changing its name, blending mode, and opacity. You can then freely edit this newly unlocked layer.
Alternatively, a keyboard shortcut can also be used to toggle off locks, though it's important to note that this shortcut doesn't work directly for the default Background layer in its original state. For other locked layers, selecting the layer and pressing Ctrl + J (on Windows) or Cmd + J (on macOS) will create a duplicate of the selected layer, which will be unlocked and appear above the original. This is a highly efficient way to create a working copy of a locked layer that you can then manipulate.
Unlocking Layers in Specific Scenarios
There are instances where layers might be locked in ways that aren't immediately obvious or easily resolved by the basic methods. This can happen when files are shared or when specific editing constraints are applied.
One common scenario involves receiving files from clients or previous designers where all layers have been locked. This can be particularly frustrating when you need to extract specific elements for use in new projects, such as creating an animated banner. While copy-pasting the image content from a locked layer into a new document is a functional workaround, it's an inefficient method that sacrifices the benefits of working with editable layers. The desire to unlock these layers and manipulate them directly - moving them, resizing them, and integrating them seamlessly into new designs - is entirely valid.
The challenge here is that sometimes the terminology used can cause confusion. For example, a user might describe layers as "merged" when they are, in fact, "locked." This can lead to troubleshooting efforts being misdirected. It's crucial to distinguish between a merged layer, which is a flattened combination of multiple layers, and a locked layer, which is a single layer with restrictions applied.
For users encountering persistently locked layers, especially in older versions of Photoshop like CS4, the process might feel elusive. The core issue often lies in understanding that the fundamental unlocking mechanisms remain consistent, but the user interface or terminology might have varied slightly across versions. The key is to always look for the lock icon in the Layers panel and utilize the "Layer > New > Layer from Background" command for the specific Background layer.
Mastering Layer Management in Photoshop - Tips and Techniques
Why Layers Get Locked and Advanced Considerations
Understanding why layers are locked can provide further insight into managing them. Primarily, locking is a feature designed to protect your work. Designers might lock layers to:
- Prevent Accidental Edits: This is the most common reason. Locking a layer ensures that elements, like a carefully placed logo or a detailed background, are not inadvertently altered while working on other parts of the design.
- Maintain Composition: In complex designs, locking layers can help maintain the intended arrangement and prevent elements from shifting unintentionally.
- Control Editing Scope: For collaborative projects, locking certain layers can ensure that only specific aspects are open for modification by different team members.
- Prepare Files for Distribution: As mentioned in the user query, some creators lock layers to protect their work from being easily altered by end-users who purchase their designs. This raises an interesting point: if you lock layers to protect them, can buyers unlock them? Yes, they can, using the methods described. The act of locking is a setting within the PSD file that can be reversed by anyone with Photoshop access. It's not a permanent encryption.
It is important to note that certain file formats, particularly those using "Indexed Color" mode, have limitations and may not be fully compatible with all Photoshop layer functionalities. If you encounter issues with layer manipulation, checking the image's color mode (Image > Mode) is a good troubleshooting step.
The ability to lock specific aspects of a layer (e.g., transparency, pixels, position) also exists. These granular locks offer more precise control. Unlocking these would involve clicking the corresponding lock icons in the "Lock:" section above the layer list in the Layers panel. When you select a locked layer, you will see a small window that gives you the option to unlock it and rename it.
For those looking to sell their Photoshop files, providing unlocked layers is generally recommended if you want your customers to be able to fully utilize and modify your work. While locking can be used as a form of protection, it can also be a significant barrier to usability for the end-user. If the goal is to sell editable templates or assets, leaving layers unlocked is the most user-friendly approach.
Ultimately, mastering layer management in Photoshop, including the straightforward process of unlocking them, is key to unlocking your creative potential and ensuring a smooth workflow, regardless of the complexity of your projects or the origin of your files.