This comprehensive guide serves as a reference for navigating common Photoshop tasks, particularly those related to preparing images. While designed to be a quick aid, it acknowledges that its level of detail may resonate differently with users of varying experience levels. The focus here is primarily on photo manipulation for visual presentation, rather than text-based design. It's intended as a foundational resource, encouraging users to adapt and expand upon these techniques to suit their specific needs. The information compiled draws from a wide array of sources, including books and online resources, with the aim of providing practical, actionable steps.
Navigating Layers and Opacity with Precision
Efficiently controlling the opacity of layers is a fundamental aspect of photo editing. Photoshop offers a remarkably swift method for adjusting layer opacity directly from your keyboard. By simply pressing a combination of number keys, you can set a specific percentage for opacity. For instance, pressing the keys '1' and '2' in succession will instantly set the layer opacity to 12%. Similarly, '5' alone will set it to 50%, and '100' will bring it to 100% opacity. This numerical input method bypasses the need to manually drag the opacity slider, significantly speeding up your workflow, especially when making numerous subtle adjustments. This technique is invaluable for blending elements, reducing the intensity of effects, or achieving specific visual balances within your image composition.
Mastering Pixel-Level Movement with Arrow Keys
For precise adjustments to selections, layers, or other elements within your Photoshop canvas, the arrow keys provide an intuitive and controlled method. When the Move tool is active, pressing any of the arrow keys will move the selected item by exactly one pixel in the corresponding direction (up, down, left, or right). This granular control is crucial for aligning elements perfectly, fine-tuning the placement of graphics, or making minute corrections to photographic details.
Beyond single-pixel movements, holding down the Shift key in conjunction with the arrow keys will increase the increment of movement to ten pixels. This allows for faster, yet still controlled, repositioning of elements across larger distances on the canvas. Understanding and utilizing these arrow key functions can drastically improve the accuracy and efficiency of your layout and composition work. This technique is particularly useful when working with high-resolution images where subtle shifts can have a significant impact on the overall aesthetic.
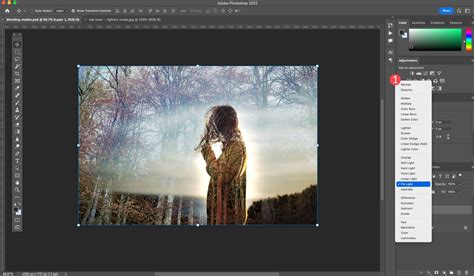
Unlocking the Power of Blending Modes Shortcuts
Blending modes are a cornerstone of creative image manipulation in Photoshop, allowing you to control how layers interact with each other. While many users are familiar with accessing blending modes through the Layers panel, Photoshop also offers direct keyboard shortcuts for cycling through them. These shortcuts can dramatically accelerate the process of experimenting with different blending effects.
On both macOS and Windows operating systems, you can access these shortcuts. The "Arrow" keys, along with other designated "other" keys (typically found between the main typewriter keys and the numeric keypad), are instrumental. When a blending mode is active and you wish to cycle through the available options, you can use these keys. For example, pressing the "Option" key (macOS) or "Alt" key (Windows) in combination with the up or down arrow keys will move you forward or backward through the list of blending modes, respectively. This allows for rapid iteration and discovery of the perfect blend for your image.
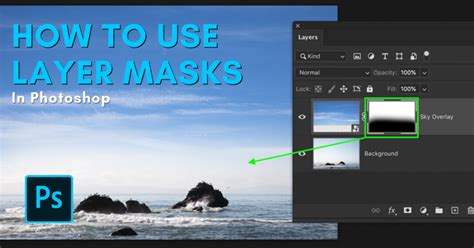
Advanced Selections and Masking Techniques
The ability to create precise selections and masks is fundamental to advanced image editing in Photoshop. This is where the true power of non-destructive editing lies, allowing for complex manipulations without permanently altering the original image data. A deep understanding of these tools is essential for any serious Photoshop user.
For those looking to elevate their skills in this area, resources such as dedicated "Selections and Masking Mastery" courses are invaluable. These comprehensive programs often include step-by-step lessons, structured modules, downloadable practice files, and custom Photoshop brushes, all designed to guide users through intricate selection and masking workflows. Such courses are typically led by experts in the field, such as Jesús Ramirez, a renowned digital graphics expert and educator. Ramirez is widely recognized for founding the Photoshop Training Channel, a highly popular YouTube resource for Photoshop tutorials. His expertise in Adobe Photoshop, particularly in areas like selections and masking, makes him a trusted source for learning advanced techniques.
Keyboard Shortcuts for Opacity and Fill
Beyond the numerical input for specific percentages, Photoshop also offers quick access to opacity and fill adjustments using the number keys in conjunction with modifier keys.
Opacity:
- Typing a number (e.g., '5') sets the layer opacity to 50%.
- Typing two numbers (e.g., '25') sets the layer opacity to 25%.
- Typing '0' by itself will set opacity to 100%.
- Typing '00' will set opacity to 0%.
- Typing '10' will set opacity to 10%.
Fill:
- The same numerical input method applies to the Fill opacity, but it requires holding down the Shift key while typing the numbers. For example, Shift + '5' will set the Fill opacity to 50%.
This dual functionality allows for nuanced control over both the overall transparency of a layer and the transparency of its contents (effects, styles, etc.) independently.
The "Arrow Keys" and "Other Keys" Explained
The reference to "Arrow & 'other' keys" pertains to a specific set of keyboard shortcuts that enhance precision and speed. The "typewriter" keys are your standard alphanumeric keys. The "numeric keypad" is the block of number keys typically found on the right side of a full-sized keyboard. The "Arrow keys" are the four directional keys (up, down, left, right). The "other keys" that are mentioned in conjunction with the arrow keys for blending mode shortcuts typically refer to modifier keys like Shift, Ctrl (Windows), or Command (macOS), and Option (macOS) or Alt (Windows). When the Move tool is active, pressing any arrow key moves the selected element by one pixel. Holding Shift while pressing an arrow key moves it by ten pixels. These are fundamental for pixel-perfect alignment and fine adjustments.

Understanding the Importance of Layer Blending Modes
Blending modes are not merely aesthetic tools; they are powerful mechanisms for compositing and manipulating image data. Each blending mode calculates the interaction between the pixels of the active layer and the pixels of the layers beneath it based on specific mathematical formulas. Understanding these formulas, even at a conceptual level, can unlock advanced creative possibilities.
For instance, modes like "Multiply" darken the image by multiplying the color values, making them excellent for darkening shadows or overlaying textures. "Screen" modes lighten the image by inverting and multiplying, ideal for creating highlights or light effects. "Overlay" and "Soft Light" modes increase contrast by blending based on the underlying luminosity, preserving highlights and shadows effectively. "Color" and "Luminosity" modes are particularly useful for color grading and tonal adjustments without affecting the other channel. Experimenting with the various blending modes, using the keyboard shortcuts mentioned, can lead to unexpected and compelling visual results.
Master Photoshop Blending Modes in Just 7 Minutes!
The Role of Jesús Ramirez and the Photoshop Training Channel
Jesús Ramirez is a prominent figure in the online Photoshop community. As a digital graphics expert, speaker, and educator, he has dedicated himself to making Photoshop more accessible and understandable. His founding of the Photoshop Training Channel on YouTube has provided millions of users worldwide with high-quality, in-depth tutorials covering a vast spectrum of Photoshop features and techniques. His expertise is particularly noted in complex areas like selections and masking, where clarity and precision are paramount. Courses and resources developed by him, such as the "Selections and Masking Mastery Course," offer structured learning paths for users aiming to achieve professional-level results. His work exemplifies a commitment to sharing knowledge and empowering users to harness the full potential of Photoshop.
Beyond the Basics: Expanding Your Photoshop Repertoire
While this cheat sheet focuses on specific shortcuts and techniques, it's important to remember that Photoshop is a vast and ever-evolving software. Continuous learning and exploration are key to mastering its capabilities. Consider these areas for further development:
- Smart Objects: Learn how to use Smart Objects to maintain the scalability and editability of your layers, especially when applying filters or transformations.
- Adjustment Layers: Understand the power of non-destructive color and tonal adjustments using Adjustment Layers, which offer flexibility and control over your image's look and feel.
- Pen Tool Mastery: While selections are crucial, the Pen Tool offers unparalleled precision for creating custom shapes and complex selections, especially for product photography or intricate compositing.
- Action Recording: Automate repetitive tasks by recording Actions, which can then be applied to multiple images with a single click, saving significant time.
- Color Management: Develop a solid understanding of color spaces (sRGB, Adobe RGB, ProPhoto RGB) and color profiles to ensure accurate color representation across different devices and print outputs.
By integrating these advanced concepts into your workflow, you can move beyond basic photo preparation and achieve truly professional and sophisticated results. The initial steps outlined here serve as a gateway to these more complex yet rewarding techniques.