Have you ever wished you could make your own custom fur brush in Procreate? The desire to imbue digital artwork with the tactile and visual richness of fur is a common aspiration for many artists. Whether you're aiming to depict a majestic wild animal, a cuddly pet, or even a fantastical creature, the ability to render fur convincingly can significantly elevate your illustrations. This tutorial will guide you through the process of creating your own specialized fur brushes within Procreate, transforming a potentially daunting task into an accessible and rewarding experience. We will delve into the foundational steps of brush creation, exploring how to define brush shapes and textures, and then move on to applying these custom tools to bring your furry subjects to life with detail and depth.
Understanding the Fundamentals of Brush Creation in Procreate
At its core, creating a custom brush in Procreate involves defining two primary components: the "Shape" and the "Grain." The Shape dictates the silhouette or form of each individual stamp of the brush, while the Grain determines the texture that fills that shape. For fur, we'll be manipulating these settings to create a brush that mimics the appearance of individual strands or clumps of hair.
Designing Your Fur Texture Stamp
To begin, you'll need to launch the Procreate app and open up a new canvas. Since we'll be using a white brush at this stage, it will make it much easier if we turn the background layer off. This ensures a clean slate for our texture creation.
Now it's time to choose the brush that you'll be using to draw your fur texture. Open the Brush Library by tapping the brush icon. For this initial texture drawing, a simple monoline or technical pen brush often works well, as it provides consistent stroke weight and doesn't introduce unwanted textures.
Now it's time to draw your fur texture! The brush strokes that you create here will inform the thickness and texture of the fur that you will create with your final brush, so keep this in mind when making them. For example, do you want the fur to be straight or curly? Fluffy or smooth? Fine or thick? Using your selected brush, draw the texture in the centre of the canvas. Aim for a density and variation that reflects the type of fur you wish to emulate. Think about the directionality of the hair, how it clumps together, and the overall flow. You can experiment with different pressures and strokes to achieve a complex, organic look.
Once you are satisfied with the drawn texture, you need to prepare it to become the "Shape" of your new brush. Tap on the brush icon again to open the Brush Library. Tap the "+" icon in the top right corner to create a new brush. This will open up the Brush Studio.
In the Brush Studio, navigate to the "Shape" tab on the left-hand menu. Here, you will see a preview of the current brush shape. Tap on "Edit." This will open up the Shape Editor. From here, hit "Import" and then "Paste." This will insert the fur texture that you drew in an earlier step. Ensure that the texture fills the entire square. You may need to pinch to zoom and center your texture. Tap "Done" to exit the Shape Editor.
Refining Brush Settings for Realistic Fur
With the basic shape established, we now need to refine the brush's behavior to make it behave like fur. This involves adjusting various settings within the Brush Studio, particularly focusing on how the brush interacts with the canvas and the stylus.
Adjusting Brush Behavior and Dynamics
Still within the Brush Studio, navigate to the "Stroke Path" tab. This setting controls the spacing between each stamp of the brush. For fur, you generally want a tighter spacing to create a continuous look, rather than distinct dabs of texture. Experiment with the "Spacing" slider. A lower value will create denser fur, while a higher value might be suitable for sparser tufts.
Next, move to the "Taper" settings. This can be used to create a finer point at the beginning or end of each stroke, mimicking the natural tapering of hairs. Adjusting the "Pressure" and "Speed" taper sliders can add a layer of realism.
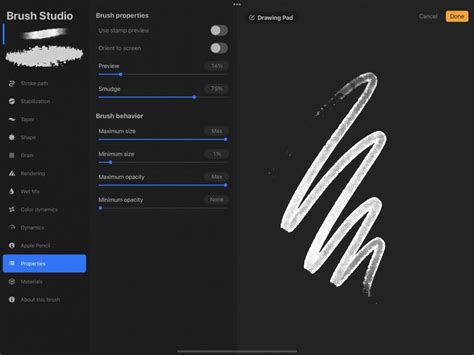
The "Properties" tab is crucial for defining how your brush will be used. Under "General," you'll find settings for "Maximum Size" and "Minimum Size." For the largest freedom whilst drawing, set the "Maximum size" to Max and the "Minimum size" to None. This allows you to easily control the scale of your fur strokes by simply adjusting the size slider.
A key setting for creating a stamp-like fur brush is found under the "Apple Pencil" settings. In the Apple Pencil section, I chose to drag the "Opacity" slider to None. This setting change will turn the brush into a stamp. This means that the brush will place the texture down as a single image, rather than duplicating it across a line as seen in the Drawing Pad on the screenshot from step 6. This is vital for ensuring that each stroke lays down your unique fur texture without unwanted repetition or tiling.
You may also want to explore the "Rendering" tab. Settings like "Blend Mode" can affect how the brush interacts with existing colors on the canvas. Experiment with different modes to see how they impact the final look of your fur.
Adding Grain Texture for Depth
While the shape provides the silhouette, the "Grain" setting adds the internal texture. For fur, you might want to import a subtle noise or a fine fibrous texture here. To do this, go to the "Grain" tab in the Brush Studio. Tap "Edit," then "Import," and choose a suitable texture from your photos or Procreate's library. This grain will be layered on top of your shape, adding further detail and preventing a flat, uniform appearance. Adjust the "Scale" and "Movement" of the grain to integrate it seamlessly with your shape.
How To Create a FUR BRUSH in PROCREATE
Applying Your Custom Fur Brush
Once you've meticulously crafted and refined your fur brush, the next step is to utilize it effectively in your artwork. The application of a custom brush is as much about technique as it is about the tool itself.
Layering and Texturing with Your New Brush
To add even more texture to your artwork, you can begin by creating two Clipping Mask layers above the body layer of your subject. Clipping masks ensure that your brush strokes only appear within the boundaries of the underlying layer, allowing for precise application. As before, I added this texture all over the bear's body. Use your custom fur brush with varying pressures and sizes to build up layers of fur. Think about the direction of growth for different parts of the animal's body - fur on the back will flow differently than fur on the legs or face.
To add even more texture to the bear, I also wanted to add some fur around the edges. This can be achieved by using the same brush with a slightly larger size or by using a different fur brush with a more wispy or sparse texture. Concentrate on areas where fur would naturally be more prominent, such as the mane of a lion, the ruff of a dog, or the fluffy tail of a squirrel.
Consider using different shades and colors within your fur texture. Instead of a single flat color, use darker tones for the undercoat and lighter tones for the tips of the fur. This creates depth and dimension, making the fur appear more realistic and less like a flat pattern.
Elevating Your Artwork with Specialized Brushes
Now you know how to make Procreate brushes that mimic a fur texture and how to add brushes to your artwork in Procreate to elevate it to the next level. The creation of custom brushes is a powerful way to streamline your workflow and achieve unique artistic effects.
If you’ve ever found yourself feeling frustrated about drawing anything furry or fluffy, join me in my first-ever Skillshare class as I teach you all the fundamentals of drawing fur in Procreate. Have you ever wanted to draw a furry animal but quickly gave up when you thought about drawing ALL THOSE HAIRS? I don’t blame you. But I’m here to help you see that drawing fur does not have to be difficult or time-consuming. In this class, I’ll show you how using specialized brushes can speed up the process of drawing fur immensely. In just a few minutes, you’ll be able to create a furry illustration that looks like it took you forever. I’ll also be providing you with three .Procreate files containing the animal sketches, so you can focus on learning to draw fur. Watch a trailer for my class below!
My Fur & Fluff brushes make it fun and easy to create furry illustrations! This set of FREE Procreate brushes includes 17 brushes that you can use to create 5 unique fur textures. You’ll learn all about how to use these brushes in my Skillshare class!
The ability to create and utilize custom brushes, like those designed for fur, opens up a world of possibilities for digital artists. By understanding the underlying mechanics of brush creation in Procreate and applying thoughtful techniques, you can achieve stunningly realistic and stylized fur textures that bring your characters and creatures to life. This process not only enhances your artwork but also deepens your understanding of the digital art tools at your disposal.