Capturing the world as we see it often presents challenges, and sometimes, the resulting photograph doesn't quite reflect the intended reality. This is particularly true when dealing with objects that should appear rectangular but, due to the angle of capture, end up distorted. Imagine photographing a perfectly square sheet of paper for a project; the casual shot might result in proportions that are all wrong, making the square look anything but. When reshooting is not an option, and further manipulation of the image is required, understanding how to correct these perspective distortions becomes an invaluable skill. Fortunately, Photoshop and Photoshop Elements offer robust tools to rectify such issues, transforming skewed images into visually balanced compositions.
The Foundation of Perspective Correction: Understanding the Problem
Perspective distortion, also known as keystone distortion, is a common optical illusion that occurs when a camera is not positioned perfectly parallel to the subject. This leads to vertical lines and shapes appearing to converge or diverge, ruining the perceived quality of photographs. Such a problem becomes visible with some vertical lines & shapes which ruin the quality of photographs. The cause is often improper camera settings and operation, or simply the limitations of capturing a three-dimensional scene on a two-dimensional plane. Bent lines in your image are serious issues that destroy the quality of the image. It spoils the quality of the great images of the photographers. So, perspective correction for fixing bent lines is very important. Besides, there may come situations when you cannot shoot images with perfect perspective. You may take the image with a bad perspective reluctantly.
Photoshop's Lens Correction for Initial Adjustments
One of the most accessible and effective tools for tackling perspective issues lies within Photoshop's Lens Correction filter. To initiate this process, navigate to Filter > Lens Correction. Within this dialog box, you'll find a "Custom" tab that houses a suite of manual adjustment tools. For Photoshop Elements users, the equivalent functionality is found under Filter > Correct Camera Distortion.

It is crucial to enable the "Show Grid" option. This grid serves as a visual aid, allowing you to accurately assess the straightness of edges and lines within your image. Adjusting the grid size can further enhance its usefulness for determining the accuracy of perspective.
The "Vertical Perspective" adjustment slider is instrumental in correcting images where the subject appears to be leaning inwards or outwards. For an image that should be a square but appears trapezoidal, dragging this slider to the left can increase the width at the top, compensating for the incorrect perspective. Conversely, if the top appears wider than the bottom, you would drag it to the right.
As you make these adjustments, you might observe that the image develops geometric distortion. A common type is barrel distortion, where the edges of the subject seem to billow outwards. To counteract this, the "Remove Distortion" slider is employed. While achieving absolute perfection might be elusive, this slider can significantly reduce the distortion to acceptable levels. Additionally, the "Vignetting" slider within the same dialog can be useful if your lens tends to create dark corners in your images, allowing you to correct for light fall-off. Once satisfied with the adjustments, click "OK" to apply them and return to your main Photoshop workspace.
Leveraging the Transform Tool for Finer Control
After initial corrections with the Lens Correction filter, further refinement might be necessary. This is where the Transform tool becomes essential. To prepare for these transformations, it's highly recommended to convert your image layer into a Smart Object. This ensures that any transformations applied are non-destructive, allowing for future modifications. You can achieve this by right-clicking on the layer in the Layers panel and selecting "Convert to Smart Object."
Photoshop Transform Tool Tips and Tricks
To activate the transform handles, press Ctrl+T (or Cmd+T on a Mac). You will see bounding box with handles appear around your image. From here, the adjustments are highly dependent on the specific distortions present in your photograph. The goal is to straighten vertical lines and align objects to create a balanced composition. For instance, if you were happy with the horizontal lines but found the vertical lines were still causing a "stumpy" appearance, you would use the transform handles to stretch the image vertically.
If you need to stretch the image beyond the current canvas dimensions, you can do so and then confirm the change. Subsequently, selecting Image > Reveal All will display any parts of the image that were previously off the canvas, ensuring you don't lose any of your corrected image data. If you find yourself unhappy with the adjustments, simply press Ctrl+T again to re-activate the transform handles and continue tweaking. The key is to remember that every photo requires different distortions to get the lines right.
Advanced Perspective Correction with Perspective Warp
For more complex scenarios, particularly with architectural photography or intricate scenes with multiple converging lines, Photoshop's Perspective Warp tool offers a powerful solution. This tool allows you to create and manipulate perspective grids to correct multiple issues within a single image.
To access this tool, navigate to Edit > Perspective Warp. Once activated, you’ll see a grid overlay on your image. You can then draw lines to define the planes of your image that should be parallel or perpendicular. By adjusting the handles and corners of these grids, you can precisely correct distorted perspectives. This is particularly useful for real estate images where converging lines can make rooms appear smaller or oddly shaped.
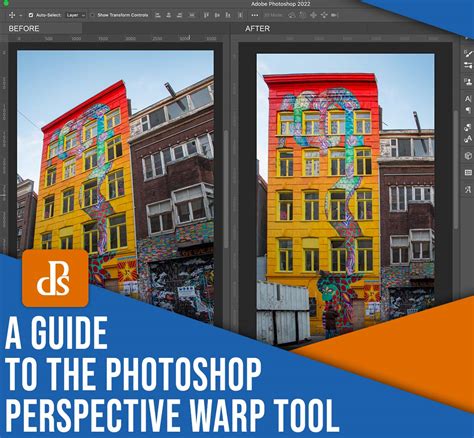
The Perspective Warp tool allows for a more granular control over the perspective grid, enabling you to define multiple vanishing points and correct complex distortions that the Lens Correction filter might not fully address. Once you have established your perspective grid and made the necessary adjustments, you can commit the changes. This tool is invaluable when dealing with images that have several elements requiring perspective correction simultaneously.
Utilizing Content-Aware Fill for Seamless Repairs
In situations where perspective correction leads to empty or distorted areas, especially at the edges of the image, Photoshop's Content-Aware Fill feature can be a lifesaver. If you've used the Lasso tool to select a defective corner or an area that needs to be "filled in," right-clicking within the selection and choosing "Fill" will bring up a dialog box. Selecting the "Content-aware" option allows Photoshop to intelligently analyze the surrounding pixels and generate a seamless fill that blends naturally with the rest of the image. This is particularly useful for repairing the areas that are cropped out or distorted after perspective adjustments, ensuring a clean and professional final result.
The Role of Camera Raw Filter for Comprehensive Correction
Another highly effective method for correcting perspective distortions involves using Photoshop's Camera Raw filter. This filter provides a dedicated "Geometry" panel where you can make both guided and automatic perspective corrections.
To utilize this method, it's recommended to convert your image into a Smart Object first. Then, open the Camera Raw filter (Filter > Camera Raw Filter). Within the Camera Raw interface, locate the "Geometry" panel. Here, you have two primary options:
- Guided Correction: You can manually draw two or more lines on your image that should be vertical or horizontal. Photoshop will then use these lines as a reference to automatically correct the perspective. This is an excellent method for precise control.
- Auto Button: Clicking the "Auto" button allows the software to automatically detect and correct perspective distortions in the shot. While convenient, it may not always yield perfect results and might require further manual tweaking.
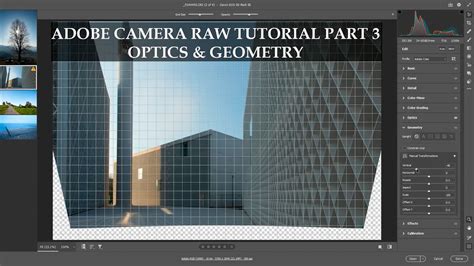
The tools within the Camera Raw filter, particularly in the Geometry panel, are designed to handle a wide range of perspective issues, from simple keystone distortions to more complex lens aberrations. This approach offers a powerful and integrated workflow for photographers who frequently deal with perspective challenges.
Best Practices and Continuous Improvement
Correcting perspective in photos is essential for creating visually appealing and balanced images. When backgrounds are distorted and lines converge, it can make photos look unprofessional and cluttered. As you get better at Photoshop, remember that practice makes perfect. Try different scenarios and images to improve your skills in correcting perspective.
It's critical for your image to be a smart object when transforming or distorting. This ensures that your edits are non-destructive. Always remember the golden rule of editing: never crop the image during the initial stages of correction. Saving your work as a PSD file allows you to return and make further adjustments later.
Photoshop Transform Tool Tips and Tricks
Don't despair if you don't master perspective correction right away. It takes a little while to figure out what all the Transform and correction options do. The best way to learn is to experiment and play with different images and scenarios. Photography is an art, and art should be flawless (unless the flaw is part of the artistic intent). By understanding and utilizing the tools available in Photoshop, you can transform even the most distorted images into polished, professional-looking photographs.
tags: #photoshop #perspective #correction