Drawing in Procreate offers numerous possibilities, one of which is the ability to create stunning effects with light and shadow. Light and shadow give your artwork depth, dimension, and a sense of realism. Understanding and effectively utilizing these elements is crucial for any digital artist aiming to elevate their work. This tutorial delves into the fundamental principles of light and shadow in digital art and provides practical techniques for applying them within Procreate, focusing on brush selection, blending modes, and layer management.
Understanding Light and Shadow in Art
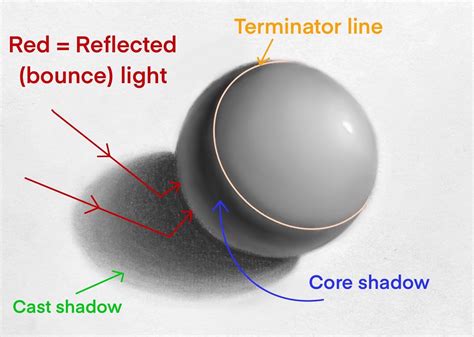
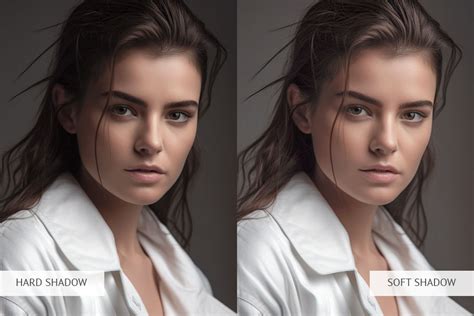
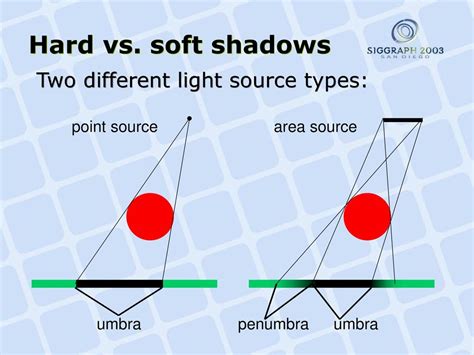
The first step in mastering light and shadow is understanding light itself. Light in your artwork is what illuminates your subjects and sets the overall tone. Its direction, intensity, and color significantly influence how we perceive form and texture. Just as light illuminates, shadows define. Shadows in your artwork provide the contrast needed to highlight form and depth. They are not merely the absence of light but rather a complex interplay of form, light source, and surrounding environment. Shadows can be hard-edged and distinct, or soft and diffused, depending on the light source and the surface it falls upon. Recognizing these nuances is foundational to creating believable and engaging artwork.
Procreate's Tools for Light and Shadow
Procreate provides a range of tools that can help you effectively apply light and shadow to your artwork. These tools, when used in conjunction, offer immense flexibility and control over your rendering process.
Brush Selection: The Foundation of Shading
Procreate has a variety of brushes that can be used to create light and shadow effects. The choice of brush significantly impacts the look and feel of your shadows and highlights. For instance, hard-edged brushes are excellent for sharp, defined shadows cast by direct light, while soft, airbrush-like brushes are ideal for diffused shadows and subtle transitions.
A particularly effective technique involves mixing hard and soft brushes. You can start by using a hard-edged brush to block in the primary shadow shapes, establishing the core form. Then, switch to a softer brush to blend the edges and create smoother gradients. This approach allows for both precision and subtlety.
The user's experience highlights a valuable technique: "By using an airbrush, you can easily and quickly create a combination of hard and soft shadows." This suggests that even a single brush, with careful application, can yield varied results. "After you are done making shadows with the selection tool, take a soft edged brush… and start to make your soft shadows. This brush is handy because it’s very easy to create both hard and soft shadows, simply by pressing harder or softer. In other words, if you apply less pressure, the flow of the brush is lower, which makes it blend the color in a softer way. But when you apply more pressure, it will create hard, sharp edges." This demonstrates the power of pressure sensitivity in digital brushes, allowing for dynamic control over shadow intensity and edge definition without needing to constantly switch tools.
Blending Modes: Enhancing Depth and Atmosphere
Layer blending modes can be used to create interesting light and shadow effects. By changing how layers interact with each other, you can achieve a wide array of looks, from subtle atmospheric effects to dramatic lighting. For example, using a "Multiply" blending mode for shadows can naturally darken the underlying layers while preserving their texture and color. Conversely, "Screen" or "Add" modes can be used to create luminous highlights. Experimenting with different blending modes is key to discovering their potential for enhancing your shading.
Layers and Layer Masks: Precision and Non-Destructive Editing
Layers are incredibly useful when working with light and shadow. They allow you to isolate your shading work from your base colors, making it easier to adjust, refine, or even remove without affecting the original artwork. Layer masks take this a step further by enabling you to selectively reveal or hide parts of a layer. This means you can paint your shadows or highlights on a separate layer and then use a mask to precisely control where they appear. This non-destructive workflow is invaluable for complex shading and allows for easy iteration and correction.
Advanced Brush Customization in Procreate
Beyond selecting pre-made brushes, Procreate’s Brush Studio offers extensive customization options, allowing you to fine-tune brush behavior for specific shading needs. Understanding these settings can unlock even greater control over your digital painting.
Brush Studio: A Deep Dive into Brush Settings
The Brush Studio is where the magic of brush customization happens. Here, you can modify numerous properties that control how a brush behaves.
1. Properties (Size Limits):Changing your brush size is a simple matter of adjusting the slider on the left side of your screen. For example, you might wish to paint a background texture but the grain starts behaving differently at scale. Or you may need to edit a liner brush to produce finer detailed lines. You’ll see the different category icons on the left side of the brush panel. Tap on Properties to access the Size Limits settings. Increase or decrease your Maximum and Minimum size ranges.
2. Stabilization (StreamLine):The StreamLine settings correct your curves by reducing any wobble in your strokes. It is particularly useful for precision drawing. To access the StreamLine settings, open the Stabilization menu in the Brush Studio. The more StreamLine you add, the more smooth your stroke will be. You can reduce the Streamline or remove it altogether if you prefer.
3. Shape and Grain:The Shape is the container for the Grain, meaning whatever texture you set for the Grain will be stamped within the Procreate brush shape source. You can think of it as a brush tip - some brush tips are blunt and rectangular, while others are soft and round. The Procreate Handbook describes the Grain source like this - ‘"Think of the Grain as a paint roller." You can access these shape images under the Shape tab of the Brush Studio. These same steps apply for editing your Grain image. 100% black will be transparent and 100% white will be solid.
4. Pressure Curve:Another preference that is worth experimenting with is the Pressure Curve. You can edit settings within an individual brush, as well as the global Apple Pencil behavior. I find it easiest to use a sketching brush when tweaking these values. The RSCO Standard Pencil #4 from the Standard Pencil Pack for Procreate is a perfect example - it has an obvious opacity change with pressure. Or the standard 'Technical Pencil' that comes with Procreate would work well too. To edit the settings, open the Actions Panel (wrench icon) and the Preferences tab. Tap Pressure & Smoothing to open the pressure graph. Try making a few very light strokes on the canvas, and work up to darker markings. If it feels like you need to press very hard to see your strokes, increase the start of the curve to a sharper upwards angle.
Exploring Stabilization in the Brush Studio | Learn to Procreate
5. Apple Pencil Settings (Tilt, Gradation, Bleed, Size):You’ll find settings for Tilt under the Apple Pencil tab within the Brush Studio. The Angle slider is when the Pencil Tilt starts to affect the stroke. You can also change the Opacity settings for Pencil Tilt. If the value is set to None, the change in tilt will not impact the brush's opacity. Gradation makes a gradient from the tip of where your pencil touches the screen to fade off at the base. Bleed affects the detail of the stroke. Size, as you can imagine, controls the brush size for the tilted stroke. You can also try the toggle for Size Compression.
6. Taper Settings:Brush Taper refers to the brush size reduction at the start or end of a stroke. You’ll find the Taper settings under the Taper tab in the Brush Studio. There are two sets of controls: Pressure Taper (for using the Apple Pencil), and Touch Taper (using your finger). A retro enthusiast's best friend! You’ll see two sliders on either side of a line underneath Pressure Taper. The first one affects the amount of taper on the start of the stroke and the second affects the stroke end. You will need some percentage given to the Size slider to see these changes. The Size controls the amount of taper applied to your stroke. The Opacity slider controls changes to the opacity of the stroke where there is a taper. The Tip slider controls the shape of the tapered endings. A Sharp setting (all the way to the left) will produce a very pointed end tip. When Tip Animation is set to Off, the taper is applied when you lift your pencil from the canvas. Taper settings don’t suit every brush. In the right situation, however, it can add more realism to your strokes.
7. Wet Mix (for Blending Brushes):A Blend brush is different to a normal brush in that it mixes and drags existing colors around. The Smudge Tool offers a similar effect, but it doesn’t give nearly as much variety or control. Tap the Wet Mix tab in the Brush Studio. As mentioned earlier, a blender brush interacts with the paint on the canvas rather than adding more. The first slider for Dilution is the main setting that affects the paint amount. So if you are creating your own blending brush, you would want Dilution set to Max. The Charge value will impact the amount of paint applied to a brush. Attack is designed for the Apple Pencil. The Pull slider works in partnership with the Dilution slider. Try playing around to see what effect you like best.
💡 Top Tip: Before you start making changes, it’s a good habit to create a backup of the brush first. If you'd like to know how to duplicate a brush in Procreate, open the brush panel, swipe left on the brush thumbnail and choose ‘Duplicate’.
Practical Application: A Shading Workflow
Mastering light and shadow in Procreate can truly take your artwork to the next level. It may seem daunting at first, but with understanding and practice, you’ll soon be adding depth and dimension to your digital art like a pro.
Step 1: Conceptualize Light and Shadow
First of all, sit down, close your eyes and imagine: Where will the light come from? What will the shadows look like? Try to see the composition of the face (or subject) in your mind. This mental visualization is crucial for accurate and believable shading.
Step 2: Block in Shadows with the Selection Tool and Airbrush
To learn how to shade on Procreate, you need to mix the hard and soft brushes. Here is an interesting technique: creating shadows using the selection tool. By using an airbrush, you can easily and quickly create a combination of hard and soft shadows. After you are done making shadows with the selection tool, take a soft-edged brush and start to make your soft shadows.
Step 3: Refine with a Versatile Brush
The user's preferred brush is handy because "it’s very easy to create both hard and soft shadows, simply by pressing harder or softer." This emphasizes the importance of a brush that responds dynamically to pressure.
Step 4: Blend Edges for Realism
Further, take a blending brush. Afterwards, blend every edge of the shadow made using the selection tool, even the hard ones, just a bit, using a very small blending brush, simply because it looks better. That way, it’s not as messy. Once you have blended everything out, you can see, for example, on her lips, that the shadow has hard edges when it’s closer to her skin, and the further the object that casts the shadow is, the more blended it becomes, or, the softer the shadow gets. I’ll give you an example, right here in the corner as to how it works.
Step 5: Add Highlights and Refine
Remember that shadows are rarely pure black. Not all highlights are pure white. Use a lighter color, often with a slightly different hue, to create highlights. Again, consider the light source and the form of the object. Use soft brushes for diffused highlights and harder brushes for specular highlights.
Practice and Experimentation
To master light and shadow, practice is key. Start with simple shapes, like a sphere or a cube, and experiment with different light sources and shadow positions. Try different brush types and blending modes to see how they affect your result. Understanding how light interacts with different surfaces and forms is a continuous learning process.
Beyond Basic Shading: Exploring Brush Packs and Techniques
Want to learn the dark, hidden secrets of bending Procreate brushes to your will? There’s something to suit every style. The theme of a Procreate brush pack can even influence your work and push your creativity to new places. You may think you have the best default Procreate brush for you - and you might be right. However, exploring different brush packs can introduce you to new textures and behaviors that can enhance your shading capabilities.
The following tips can apply to both custom and default Procreate brushes: Experiment with StreamLine. Increase the Wet Mix. Adjust the Pressure Curve. Use Brush Taper and Tilt. Mid-century art often has a simple yet charming look. In this easy-to-follow tutorial, you'll learn the 3 simple steps to creating classic mid-century illustrations. Learn how to use clipping masks, layer masks, and alpha lock in this easy-to-understand tutorial for Procreate.
Our Complete Collection for Procreate is everything you need to create high quality artwork on your tablet. Get realistic wet and dry media brushes, paper textures, and print effects. As Procreate continues to adapt and improve their Brush Studio, the possibilities for creating and editing your brushes is endless!