Lens flares and light rays are powerful tools in a digital artist's arsenal, capable of transforming ordinary images into dramatic, visually compelling scenes. Whether you aim to add a subtle, natural glow to a portrait or infuse a landscape with the ethereal beauty of sunbeams, understanding how to create and manipulate these effects in Adobe Photoshop is invaluable. This tutorial delves into various techniques, from simulating natural lens phenomena to generating custom light ray brushes, empowering you to elevate your imagery with captivating light.
Understanding the Nature of Lens Flares
Lens flare is a photographic artifact that occurs when a bright light source, such as the sun or a studio light, hits the camera's lens. This light can reflect internally within the lens elements, manifesting in the final image as circles, rings, starbursts, or an overall haze. These visible spots are often referred to as "ghosting." In some instances, a diffuse haze of light can cover the entire scene, leading to a reduction in contrast and a "washed-out" appearance. This phenomenon is known as "veiling," and it typically happens when the primary light source is outside the frame but its rays still strike the front element of the lens. While often considered an unwanted artifact, veiling can be intentionally employed to evoke a soft, warm, and moody atmosphere.
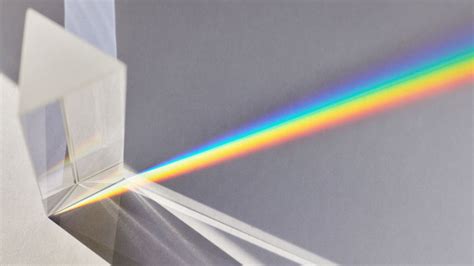
The appearance of lens flare is significantly influenced by several factors, including the camera's equipment, aperture settings, and the angle of the light source. Modern lenses often feature anti-reflective coatings designed to minimize glare, which can make capturing pronounced lens flares more challenging. Consequently, older lenses or those with fewer coatings might yield more pronounced flare effects. The use of filters such as UV, polarizers, or neutral density filters can also reduce the amount of flare captured. Zoom lenses, with their increased number of internal elements, tend to amplify internal reflections, leading to more pronounced sun flare effects.
A particularly striking effect, the "starburst," is achieved by shooting with a smaller aperture, typically f/11 or f/16. Aperture, the adjustable opening within the lens that controls the amount of light entering the camera, plays a crucial role in shaping the appearance of starbursts. The distinct horizontal flares often seen in cinematic productions are frequently the result of anamorphic lenses, which capture a wider field of view without distortion due to their unique square shape and horizontal lens elements. Directors like J. J. Abrams are well-known for their signature use of anamorphic lens flares.
To naturally capture lens flares, photographers often aim their cameras directly into the sun or another intense light source. Experimentation with shooting angles is key, as the appearance of the flare is highly dependent on the precise interaction between the light and the lens. Photographer Martha Galvan advises, "The best thing you can do is shoot at a lot of different angles, so that even if some are blown out, you can see what works and what doesn’t work." This trial and error process is essential for understanding how different equipment and shooting conditions influence the final flare.
The "golden hour," the period shortly after sunrise or before sunset, is a prime time for capturing natural lens flares. During this time, the sun is lower in the sky, making it easier to position it within the frame. The light itself is also softer and more diffused, contributing to a more aesthetically pleasing flare. While outdoor shoots offer the allure of natural light, they also carry the risk of producing overexposed, backlit, or silhouetted images.
Simulating Lens Flares in Photoshop: A Step-by-Step Approach
Photoshop offers robust tools to simulate and enhance lens flares, allowing for precise control and artistic freedom. Here's a method to add realistic lens flares to your images:
Prepare Your Image: For portraits, it's often beneficial to darken the image slightly to create a more dramatic mood before introducing the flare. This can be achieved by adding an adjustment layer and selecting the "Curves" option. Crucially, you'll want to mask out the subject's face to prevent the darkening effect from impacting it.
Create a New Layer for the Flare: Since lens flares cannot be directly applied to a transparent layer, begin by creating a new layer and filling it entirely with black.
Set the Blending Mode: Change the blending mode of this new black layer to "Screen." This mode will make any non-black pixels visible, effectively isolating the flare you're about to create.
Position the Flare Source: To define where the lens flare will originate, paint a single white dot on this "Screen" layer. This dot acts as the virtual light source.
Render the Lens Flare: Navigate to "Filter" > "Render" > "Lens Flare." A dialog box will appear, offering various presets and customization options. You can select the type of flare (e.g., anamorphic, prime, zoom), adjust its brightness, and reposition it using the on-screen handles. Customize the flare to your liking and click "OK."
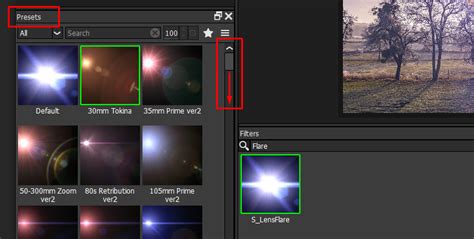
- Refine the Flare's Appearance: The rendered lens flare can be further enhanced using adjustment layers. Experiment with "Hue/Saturation" to alter its color, or apply a "Photo Filter" to imbue it with a specific color cast, such as a warm sunset tone.
Adding Lens Flares to Landscape Images
The process for incorporating lens flares into urban landscapes or other scenic shots is remarkably similar:
Convert to Smart Object: To ensure the lens flare effect is fully editable, convert your background layer to a "Smart Object." This is done by right-clicking on the layer in the Layers panel and selecting "Convert to Smart Object."
Apply Lens Flare: Go to "Filter" > "Render" > "Lens Flare" and customize the effect as desired.
Editable Smart Filters: Because you applied the filter to a Smart Object, the lens flare will appear as an editable "Smart Filter." This means you can double-click on the "Lens Flare" filter in the Layers panel at any time to readjust its settings, position, or even remove it entirely without degrading the image quality.
Creating Custom Light Ray Brushes in Photoshop
Beyond simulating lens flares, Photoshop provides the means to create your own light ray brushes, offering a flexible way to add or enhance light effects in your compositions. These custom brushes can be used to add dramatic sunbeams, enhance existing light sources, or create entirely new lighting scenarios.
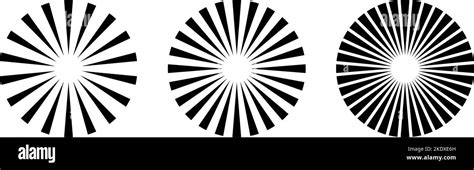
Technique 1: Radial Blur Sun Rays
This method focuses on creating a base for light beams using radial blur.
New Document Setup: Create a new document in Photoshop with dimensions of 5000 pixels by 5000 pixels and a resolution of 72 pixels per inch.
Black Background: Select the Paint Bucket Tool (G), choose black as your foreground color, and fill the background layer.
Feather Selection: Go to "Select" > "Modify" > "Feather Selection" and set the Feather Radius to 200 pixels. This will create a soft transition for the light.
Duplicate and Blur: Duplicate your background layer (or the layer you're working on, let's call it "SUN RAYS") by pressing Ctrl+J (Cmd+J on Mac). Select the duplicated layer ("SUN RAYS 1").
Radial Blur: Apply a "Radial Blur" filter by going to "Filter" > "Blur" > "Radial Blur." Set the "Amount" to 99 and choose the "Zoom" method. Click "OK."
Adjust Levels: To make the sun rays more visible, go to "Image" > "Adjustments" > "Levels." Set the Input Levels to approximately 25 for the shadows, 0.65 for the gamma, and 205 for the highlights.
Sharpening: To add definition to the rays, apply an "Unsharp Mask" filter by going to "Filter" > "Sharpen" > "Unsharp Mask." Set the "Amount" to 1% and the "Radius" to 180 pixels. This creates the base for your first light beam brush.
Further Refinement: Duplicate the "SUN RAYS" layer again (Ctrl+J/Cmd+J). Apply "Radial Blur" with an "Amount" of 99. To make the rays narrower, use "Edit" > "Free Transform" and scale them down vertically.
Define Brush Preset: Once you have the desired shapes, you need to define them as brushes. Select all (Ctrl+A/Cmd+A) and go to "Edit" > "Define Brush Preset." Give your brush a descriptive name. To ensure the brush works correctly, you might need to invert the colors (Image > Adjustments > Invert) before defining it, depending on how you intend to use it.
Trick to Create Custom Light Rays Brushes in Photoshop | Create Custom Sun Rays Brushes
Creating Variations and Enhancing Realism
The beauty of custom brushes lies in their versatility. To create a wide array of light ray effects:
- Adjust Contrast: Increase or decrease the contrast of your ray shapes.
- Sharpening: Experiment with different "Unsharp Mask" settings.
- Transformations: Use the "Free Transform Tool" to make rays wider, narrower, or angled.
- Blur Direction: Apply radial blur from different directions or use other blur filters.
- Study Real Light: Observe how light behaves in real-world scenarios. Mimic the way light diffuses, scatters, and interacts with particles in the air.
- Color Choices: Avoid using pure white for light; instead, opt for off-white, yellow, or colors that complement the scene. Consider the color temperature of your light source.
- Directionality: Always keep the direction of your light source in mind for a believable effect.
Exploring Pre-made Light Ray Brushes and Actions
For those seeking quicker solutions or inspiration, a plethora of pre-made light ray brushes and Photoshop actions are available:
- Edgy and Eerie Effects: Some brush packs are designed for dramatic, distorted light effects, perfect for creating an unsettling or artistic ambiance.
- Fiery and Intense Glows: Brushes and actions can produce a golden or reddish glow, adding a sense of power and visual intensity to images. These are often compatible with recent Photoshop CC versions.
- Energy and Movement: Certain Photoshop actions are crafted to generate luminous GIFs or static images, allowing you to simply brush over your image to apply dynamic light effects.
- Glow-in-the-Dark Effects: "Black Light" action and brush packs can simulate the effect of glowing paint without the need for actual physical application.
- Neon Lights: Brush packs specifically designed for neon effects offer numerous options to create vibrant, eye-catching neon light rays without extensive manual work.
- Soft and Vintage Looks: Actions like the "Soft Bright Photoshop Action" provide a gentler approach, imparting a delicate, vintage feel to images with a softer light ray effect. These often come with multiple actions and user guides.
Practical Application and Artistic Considerations
Lens flares and light rays are not merely decorative elements; they can significantly enhance a photograph's narrative and emotional impact.
- Portraits: A subtle lens flare can add a warm, dreamy quality to backlit portraits, framing the subject softly.
- Landscapes: Sun rays can define the contours of a landscape, add depth, and create a sense of grandeur or tranquility, especially when captured during the golden hour.
- Cinematic Look: Both effects can contribute to a cinematic or sun-drenched aesthetic, making images feel more immersive and professionally produced.
When working with lens flares, especially in portraits, it's essential to consider their flattering potential. While they can add beauty, an overly intense flare can be unflattering. Controlling the light source, whether natural or artificial, is paramount. If a natural light source is too harsh, diffusing it can soften the effect.
In the studio, creating lens flares offers greater control over intensity, color, and placement. This allows for a more deliberate and artistic integration of the effect.
Ultimately, whether you're simulating natural phenomena or crafting entirely new light sources, experimentation is the key. Don't be discouraged if your first attempts don't yield the desired results. Understanding the underlying principles of light and practicing different techniques will lead to mastery, enabling you to imbue your images with the captivating power of light.