DaVinci Resolve, a powerhouse in video editing and color grading, offers a surprisingly flexible interface that can be tailored to individual workflows. While it might not appear overtly customizable at first glance, a closer examination reveals numerous ways to adjust and optimize the panels within each of its dedicated pages. This adaptability is crucial for editors, colorists, and visual effects artists seeking to streamline their creative process and work efficiently.
Working Modes: Full Screen vs. Floating Window
DaVinci Resolve provides two primary viewing modes, each catering to different user preferences and work environments. You can opt to work within a standard floating window, complete with a title bar that allows for easy resizing, repositioning, and minimization. This mode is particularly beneficial for users who frequently switch between DaVinci Resolve and other applications, as it enables them to be viewed and managed alongside each other.
Alternatively, users can engage "Full Screen" mode by navigating to Workspace > Full Screen. In this mode, the title bar vanishes, and DaVinci Resolve expands to occupy the entire display of your computer. This immersive approach is often favored by colorists and sound mixers who find the standard title bar visually distracting and desire every available pixel for their grading or mixing tasks. The added screen real estate, however minimal, can contribute to a more focused and less cluttered workspace.
Understanding Panels and Panel Focus
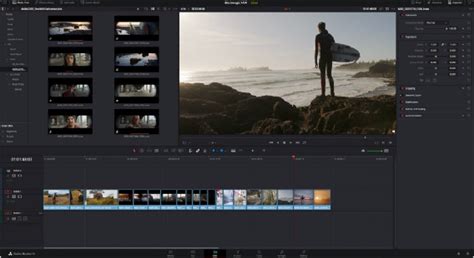
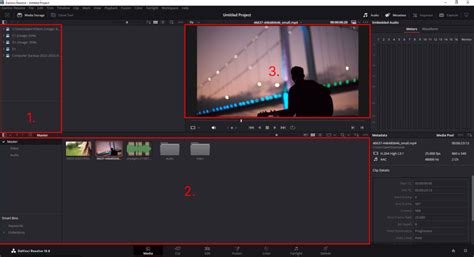
Each page within DaVinci Resolve is meticulously organized into a series of panels. These panels are self-contained units, each housing the specific controls and displaying the relevant information necessary for a particular function. For instance, on the Media page, you'll find panels like "Media Storage," which facilitates file browsing, and the "Viewer," where you can preview your video clips. Accompanying these might be an "Audio" panel, providing visual feedback on audio playback levels through integrated meters. While each panel operates independently with its own set of controls, they all reside within the overarching DaVinci Resolve user interface window.
The concept of "panel focus" is fundamental to efficient keyboard shortcut usage. When you interact with a control or click within a specific panel, that panel becomes the "active" or "focused" panel. This focus directs any keyboard shortcuts that are shared across multiple panels to the currently active one. To easily identify which panel currently has focus, you can enable the "Show focus indicators in the User Interface" option within the UI Settings of the User Preferences. This visual cue is invaluable for ensuring that your commands are being applied to the intended panel, preventing unintended actions and improving overall workflow speed.
Customizing Panel Layouts
One of the most significant ways to tailor your DaVinci Resolve experience is by customizing the layout of these panels. DaVinci Resolve allows you to undock, move, resize, and even hide panels to create a workspace that perfectly suits your editing or grading style.
Undocking and Repositioning Panels
To undock a panel, you can typically click and drag its title bar. Once undocked, the panel becomes a floating window that can be moved freely around your screen. This is incredibly useful if you have multiple monitors, allowing you to dedicate specific panels to different screens. For example, you might place your scopes and color wheels on a secondary monitor while keeping your timeline and media browser on your primary display.
You can also reposition panels within the main DaVinci Resolve window. By clicking and dragging a panel's title bar, you can then hover over different areas of the interface. As you approach potential drop zones, visual indicators will appear, showing you where the panel can be docked. This allows you to rearrange panels to group related functions together, such as keeping all your playback controls in one area or consolidating your effects and transitions.
Resizing Panels
The dimensions of each panel can be adjusted to give more or less screen real estate to specific functions. To resize a panel, simply hover your mouse cursor over its edge or corner. The cursor will change to indicate that you can click and drag to resize. This allows you to make the Viewer larger for detailed inspection of footage, or expand the timeline to give yourself more room to maneuver clips. Conversely, you can shrink less frequently used panels to maximize space for your primary tools.
Hiding and Showing Panels
If a particular panel is not relevant to your current task, you can hide it to declutter your interface. This is often done by clicking the "X" button on the panel's title bar (if it's undocked) or by right-clicking on the panel's title bar and selecting "Close Panel" or a similar option. Hidden panels can usually be brought back by navigating through the relevant page's menu or by right-clicking in an empty area of the interface and selecting the panel you wish to reveal. This ability to hide and show panels on demand is crucial for maintaining a clean and efficient workspace, especially for users working on laptops or with smaller displays.
Saving and Recalling Workspace Layouts
Recognizing that different tasks may require different panel arrangements, DaVinci Resolve allows you to save custom workspace layouts. Once you have arranged your panels exactly how you want them for a specific task - perhaps one layout for editing, another for color grading, and a third for audio mixing - you can save this configuration.
To save a workspace, go to Workspace > Save As > New Workspace. You'll be prompted to give your layout a name. This saved layout can then be recalled at any time from the Workspace menu. This feature is a significant time-saver, eliminating the need to reconfigure your interface every time you switch between different stages of your post-production workflow.
Utilizing Presets and Custom Presets
Beyond just saving overall workspace layouts, DaVinci Resolve also offers presets for individual panels and toolbars. For example, the Edit page's toolbar can be customized to show only the tools you use most frequently. You can right-click on the toolbar and select "Customize Toolbar" to add or remove icons. These customizations can also be saved as presets.
Furthermore, DaVinci Resolve comes with a variety of pre-defined workspaces and panel configurations designed for specific workflows. Exploring these presets can often reveal efficient ways of organizing your interface that you might not have considered. You can access these through the Workspace menu, often under categories like "Editing," "Color," or "Fairlight."
Advanced Customization and Third-Party Tools
For users seeking even deeper customization, DaVinci Resolve's flexibility extends to the integration of third-party tools and plugins. While not directly panel manipulation, these can significantly alter the functionality available within the interface. For instance, plugins can introduce new panels or extend the capabilities of existing ones, offering specialized effects, color grading tools, or audio processing options.
The provided text also alludes to external ecosystems like MotionVFX, which offers a suite of tools and elements accessible directly within editing software. While the specifics of their integration might vary, the general concept highlights how external solutions can enhance and customize the user's experience within the Resolve environment. The mention of mExtension as an application that enables browsing, downloading, and applying plugins and elements directly to the timeline without leaving the editing software is a prime example of how the workflow can be extended and customized.
QUICK TIP: Customize AND Save your Workspace in Davinci Resolve 20!
The ability to subscribe to services and download elements, coupled with free trials and free collections of assets, suggests a trend towards a more integrated and accessible post-production workflow. This further emphasizes the user's ability to personalize their toolkit, which in turn influences how they might arrange and utilize the panels within DaVinci Resolve to best leverage these new assets and functionalities.
Panel Behavior and User Preferences
Several user preferences can subtly alter how panels behave. As mentioned, the "Show focus indicators in the User Interface" setting is one example. Others might include preferences related to playback behavior, thumbnail display, and general UI theme. Exploring the DaVinci Resolve > Preferences (or Edit > Preferences on Windows) menu will reveal a wealth of options that can fine-tune the application's responsiveness and appearance, indirectly affecting how you interact with and perceive the various panels.
The principle of "edit without limits" with a complete toolkit designed to bring your ideas to the screen without friction, and cinematic, million-dollar-looking effects within minutes, relies heavily on a well-configured interface. When your tools work flawlessly, creativity flows naturally, unhindered by tedious technicalities of building everything from scratch across different tools. By mastering the art of panel customization in DaVinci Resolve, users can indeed say goodbye to technical limitations holding them back and foster a more fluid and intuitive creative process. The continuous effort by developers to improve these tools further empowers users to sculpt their ideal editing environment.