Procreate, despite a name that might initially suggest a connection to fertility, stands as one of the most potent digital art tools available today. Whether your creative pursuits lie in sketching, painting, crafting intricate calligraphy, or even venturing into animation, Procreate offers a remarkably versatile and surprisingly user-friendly platform, especially once you become familiar with its core functionalities. This guide aims to help you unlock the full potential of Procreate, transforming you from a novice user into a confident digital artist.
Navigating the Procreate Ecosystem: The Gallery and Canvas Creation
Upon launching Procreate, you'll be greeted by the Gallery, which serves as your central hub for managing all your artistic projects. This is where you’ll organize, import, and create new artworks. To embark on your creative journey, simply tap the '+' button. This action will lead you to a selection of canvas presets, or you can opt to create a custom canvas by defining its dimensions, resolution, and color profile. Once your canvas is set up, a pristine, blank space will appear, ready for your artistic vision.
The Gallery is not just a storage space; it's an integral part of your workflow. Here, you can select multiple artworks to group them, duplicate them for experimentation, or export them in various formats. Understanding the Gallery’s organizational capabilities is the first step to maintaining a streamlined and efficient creative process.
Core Tools and Their Functions
Procreate offers a robust suite of tools designed to cater to a wide spectrum of artistic needs. Each tool, when utilized effectively, can significantly enhance your creative output.
The Brush Tool: Your Primary Creative Instrument
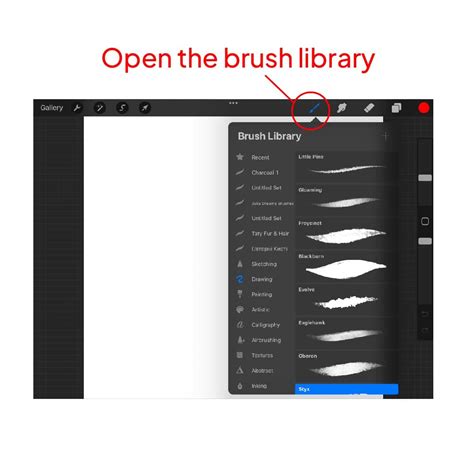
The Brush Tool, represented by a brush icon, is your gateway to a vast library of over 200 meticulously crafted brushes. These brushes are designed for a multitude of purposes, including drawing, inking, painting, and texturing. You can seamlessly switch between different brush sets, each offering a unique feel and aesthetic.
The sidebar adjacent to the canvas provides intuitive controls for adjusting the brush size and opacity. The size slider dictates the thickness of your stroke, while the opacity slider controls its transparency. Experimenting with these settings is crucial for achieving the desired visual impact. Beyond these basic controls, Procreate's brushes offer deep customization. You can delve into the Brush Studio to fine-tune parameters such as shape, grain, stroke path, and stabilization, allowing you to create brushes that are perfectly tailored to your unique style.
The Eraser Tool: Refining Your Work
Complementing the Brush Tool is the Eraser Tool. Its functionality mirrors that of the selected brush, meaning it will erase with the same texture and characteristics. This is particularly useful when you want to maintain a consistent aesthetic while refining your artwork. For instance, if you're using a textured brush to paint, the eraser will remove areas with that same texture, ensuring a cohesive look.
Layers: Building Depth and Complexity
Layers are a fundamental concept in digital art, and Procreate implements them with exceptional ease of use. Imagine layers as transparent sheets stacked one on top of another. You can draw, paint, or add elements on each layer independently without affecting the content on other layers. This non-destructive workflow is invaluable for editing, experimentation, and managing complex compositions.
You can add, delete, duplicate, and group layers within the Layers panel. Each layer can be individually adjusted for opacity, blend mode, and even color. Blend modes, in particular, offer powerful ways to interact layers with each other, creating effects like multiply, screen, overlay, and more. This allows for sophisticated visual manipulation and the creation of rich, nuanced artwork.
The Color Picker: A Universe of Hues
The Color Picker is your portal to an expansive spectrum of colors. Tapping the color icon opens a dynamic color wheel, allowing you to select any hue, saturation, and brightness. Procreate offers several color selection modes, including classic color wheel, disc, classic, and harmony. The Harmony mode is particularly useful for generating palettes that work well together, offering complementary, analogous, and triadic color schemes.
You can save your frequently used colors to custom palettes, ensuring quick access to your preferred shades. Furthermore, the Color Drop feature, discussed later, offers an efficient way to fill areas with your selected color.
Advanced Features for Enhanced Creativity
Beyond the core tools, Procreate boasts a range of advanced features that elevate the digital art experience. These functionalities are designed to streamline your workflow, enhance precision, and unlock new creative possibilities.
QuickShape and QuickLine: Precision at Your Fingertips
Procreate’s QuickShape and QuickLine features are game-changers for achieving perfect geometric forms and clean lines.
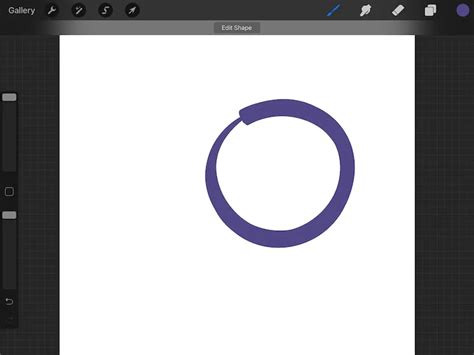
- QuickShape: To utilize QuickShape, simply draw a shape - be it a circle, ellipse, square, rectangle, or line - and then hold your Apple Pencil steady on the canvas at the end of your stroke. Procreate will automatically recognize your imperfect freehand shape and transform it into a mathematically perfect version. You can then tap and hold on the shape to enter a mode where you can adjust its proportions, rotate it, and even change its curvature. This is incredibly useful for creating logos, UI elements, or any artwork requiring precise geometric forms.
- QuickLine: Similar to QuickShape, QuickLine assists in drawing perfectly straight lines. Draw a line, and as you hold your pen steady at its end, Procreate will straighten it. This feature is a lifesaver for architectural drawings, technical illustrations, or any situation demanding absolute linearity.
AlphaLock: Controlled Coloring and Effects
AlphaLock is a powerful layer property that restricts painting or applying effects to the areas where you have already drawn on a layer. Once a layer is AlphaLocked, any marks you make will only appear on top of existing pixels, preventing you from accidentally painting outside the lines of your artwork on that layer. This is immensely useful for coloring line art, adding shading, or applying textures without encroaching on transparent areas. To activate AlphaLock, navigate to the Layers panel, tap the layer you wish to lock, and then tap the AlphaLock icon.
Gesture Controls: Intuitive Interaction
Procreate's gesture controls are designed to make using the app feel as natural as possible. Mastering these shortcuts can significantly speed up your workflow.
- Two-Finger Tap: This is your go-to undo command. A quick tap with two fingers on the canvas will instantly revert your last action. This is arguably the most frequently used gesture and a true lifesaver when mistakes happen.
- Three-Finger Tap: The inverse of the two-finger tap, a three-finger tap will redo an action that you have just undone.
- Two-Finger Pinch: Pinching with two fingers will zoom in and out of your canvas, allowing you to work on fine details or get an overview of your piece.
- Three-Finger Scrub: Swiping with three fingers across the canvas will clear the current layer. Use this with caution!
- Four-Finger Tap: Tapping with four fingers on the canvas will toggle the interface on and off, giving you a full-screen view of your artwork.
Essential Procreate Gestures You Must Know
Color Drop: Rapid Filling of Areas
Color Drop is an incredibly efficient tool for filling closed shapes with color. To use it, select your desired color from the Color Picker. Then, tap and drag the colored circle from the top-right corner of the interface onto the area you wish to fill. Procreate will instantly flood the closed shape with your chosen color. If the shape is not completely closed, the color may "spill" out. You can adjust the Color Drop threshold by dragging your finger slightly to the left or right after initiating the drop, controlling how much the color "sticks" to existing lines.
Time-Lapse Recording: Documenting Your Creative Process
Procreate automatically records your entire drawing process as a time-lapse video. This feature is not only a fantastic way to document your progress but also an excellent tool for self-reflection and learning. You can watch your artwork evolve from a blank canvas to a finished piece, observing your decision-making process and identifying areas for improvement. The time-lapse recording can be accessed and exported from the Actions menu (wrench icon) under the Video tab.
Customization and Advanced Settings
Procreate offers a degree of customization that allows you to tailor the app’s behavior to your personal preferences and workflow. While many settings can be adjusted directly within the app, some fundamental interactions with iOS require adjustments within your iPad’s Settings app.
Accessing Advanced Settings
To access Procreate’s advanced settings within iOS, navigate to the main Procreate interface (your Gallery), tap the Actions menu (wrench icon), then select Help, followed by Advanced Settings. This will open the Procreate section within your iPad’s main Settings app.
Permissions and Integrations
Within the Advanced Settings, you’ll find options related to app permissions. For example, granting Procreate access to your Photos library is essential if you intend to import images from your photo roll or export your finished artwork directly to the Photos app. Similarly, ensuring iCloud Drive access allows you to seamlessly save and back up your Procreate artwork to the cloud, making it accessible across your Apple devices and providing a crucial backup solution.
Undo Behavior Customization
Procreate offers a nuanced control over how the Undo function operates, particularly concerning complex operations like transformations. By default, Simplified Undos are enabled, meaning Procreate groups consecutive actions within a specific mode (like Transform) into a single undo step. However, you can disable this to have Procreate remember every individual step within a mode. This can be beneficial if you perform a series of intricate transformations and wish to revert to a very specific intermediate stage. This setting can be toggled in the Advanced Settings.
Brush Stroke Speed Sensitivity
For users who find that brushes with speed-based settings react too abruptly or sluggishly, Procreate allows you to adjust the point at which a stroke's speed registers as 100%. This setting, also found in Advanced Settings, lets you fine-tune the responsiveness of such brushes, ensuring a smoother and more intuitive drawing experience.
Importing and Exporting Your Artwork
The ability to share and integrate your Procreate work with other applications and platforms is a vital aspect of the digital art workflow.
Saving to iCloud Drive
To ensure your artwork is safe and accessible, saving to iCloud Drive is highly recommended. From the Gallery view, tap 'Select,' choose the artwork(s) you wish to back up, tap 'Share,' and then select 'Procreate' as the format. You can then choose 'Save to Files' and select your iCloud Drive.
Exporting for Sharing and Further Work
Procreate offers a variety of export options to suit different needs. To export, go to Actions (wrench icon) → Share. You can export your artwork as a JPEG for easy sharing via messaging or social media, a PNG for higher quality with transparency, a PDF for print-ready documents, or even a layered PSD file to open in Photoshop or other compatible desktop software. Procreate can also export your artwork as a short video file, showcasing the time-lapse recording of its creation.
Tips for New Procreate Users
Embarking on your Procreate journey can feel a bit overwhelming at first, given the app's extensive capabilities. However, with a few key strategies, you can accelerate your learning curve and begin creating with confidence.
Start Simple and Experiment
The best way to get comfortable with Procreate is to start with the basics. Practice with simple shapes and brushes to get a feel for how they respond to your touch. Don't be afraid to experiment with different brush settings, colors, and layer effects. The more you play around, the more you'll discover what works best for your style.
Master the Gestures
As mentioned earlier, Procreate’s gesture controls are incredibly powerful. Prioritize learning the two-finger tap for undo, the three-finger tap for redo, and the quick color fill using Color Drop. These fundamental gestures will dramatically improve your efficiency.
Embrace Layers
Don't shy away from using layers. They are your safety net and your tool for building complex and editable artwork. Start by using separate layers for line art, base colors, shading, and highlights. As you become more proficient, you'll discover even more creative ways to utilize layers.
Consider a Paper-Like Screen Protector
For those who find the smooth, glossy surface of the iPad screen a bit slippery or unnatural for drawing, a paper-like screen protector can make a significant difference. These protectors offer a textured surface that mimics the feel of drawing on paper, providing more resistance and control for your Apple Pencil. While not essential for everyone, it’s a popular accessory for many digital artists.
Utilize the Procreate Handbook
Procreate offers an incredibly comprehensive and well-written user manual, often referred to as the Procreate Handbook. This resource is available directly within the app (Actions → Help → Procreate Handbook) and online. It provides detailed explanations of every feature, tool, and setting. Supplementing your learning with the Handbook is an excellent way to deepen your understanding and troubleshoot any issues you might encounter.
Beyond the Basics: Unlocking Advanced Techniques
As you become more comfortable with Procreate, you'll want to explore more advanced techniques to further refine your art.
Clipping Masks and Layer Masks
While AlphaLock is excellent for restricting color to existing artwork, Clipping Masks and Layer Masks offer even more sophisticated control over how layers interact and are revealed.
- Clipping Mask: A Clipping Mask allows a layer (the "clipping layer") to show through only where there are pixels on the layer directly below it (the "base layer"). This is perfect for applying textures or patterns to specific shapes without affecting anything else.
- Layer Mask: A Layer Mask allows you to selectively hide or reveal parts of a layer without permanently erasing them. You paint on the mask with black to hide and white to reveal. This offers a non-destructive way to composite images and create complex effects.
Utilizing Blend Modes Effectively
Procreate offers a wide array of blend modes that dramatically alter how colors on one layer interact with the colors on the layers beneath it. Experimenting with modes like Multiply (for darkening and shadows), Screen (for highlights and glows), Overlay (for increasing contrast), and Soft Light can add depth, dimension, and unique visual characteristics to your artwork.
Exploring the Brush Studio in Depth
The Brush Studio is where the true magic of Procreate's brush engine lies. Beyond basic size and opacity, you can manipulate parameters like shape dynamics, grain, rendering, stroke properties, and Apple Pencil tilt and pressure. Creating custom brushes can be a deeply rewarding process, allowing you to develop unique tools that perfectly match your artistic vision. From custom lettering brushes to specialized texture applicators, the possibilities are virtually endless.
Troubleshooting and Support
Even with a powerful app like Procreate, you might occasionally encounter issues. Procreate provides several avenues for support and solutions.
Migration Issues
If you experience problems migrating your artwork or settings to a new device or a Procreate update, Procreate offers a retry mechanism. This will attempt the migration process again, which can be useful if you encountered a temporary glitch. Ensure your device has a stable internet connection and sufficient storage space when attempting migrations.
Seeking Further Assistance
Beyond the Procreate Handbook, the Procreate community is a valuable resource. Online forums, social media groups, and art communities are filled with experienced users who are often willing to share their knowledge and help troubleshoot problems. The official Procreate website also provides access to support resources and contact information.
Downloading 3D Model Files
For artists working with 3D elements, Procreate allows you to tap and download 3D model files directly into your gallery. This integration opens up new possibilities for incorporating 3D assets into your 2D artwork or using them as reference.
By systematically exploring Procreate's features, from its intuitive interface and core tools to its advanced customization options and robust support system, you can transform your iPad into a powerful digital art studio. The key lies in consistent practice, experimentation, and a willingness to delve into the app's extensive capabilities. Remember, the ultimate goal is to make Procreate work for you, adapting its powerful features to your unique creative process and personal style.