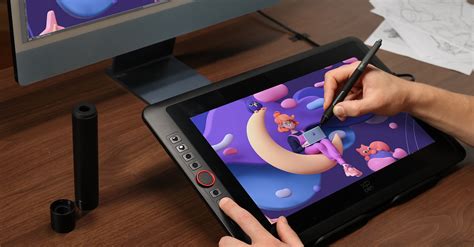
Embarking on a digital art journey often begins with the right tools, and the XP-Pen Artist 15.6 Pro V2 pen display is a powerful companion for creators of all levels. This guide is designed to walk you through the essential steps of setting up your new device, ensuring a smooth transition from unboxing to digital creation. We will delve into the specifics of connecting your display, installing the necessary drivers, and configuring the pen and tablet settings to optimize your workflow.
Unboxing and Initial Connections: Bringing Your Display to Life
The first step in any new tech setup is to carefully unbox your device. Within the packaging, you'll find your XP-Pen Artist 15.6 Pro V2 pen display, a stylus, various cables, and potentially an adapter. It is crucial to identify all the components and familiarize yourself with their functions before proceeding.
Connecting the Cables: The Lifeline of Your Display
Connecting the cables is the most critical initial step, as it establishes the communication link between your computer and the pen display. There are a couple of primary connection methods to consider for the XP-Pen Artist 15.6 Pro V2.
Computer USB-C Connection
A streamlined approach for compatible computers involves using a USB-C to USB-C cable. This single cable can often handle both data transfer and power delivery, simplifying the setup process.
Direct USB-C Connection: Connect one end of the USB-C to USB-C cable to the corresponding port on your computer and the other end to the appropriate USB-C port on your Artist 15.6 Pro V2. If your computer supports DisplayPort Alternate Mode over USB-C, this connection should power and display your screen simultaneously.
Power Backup via USB-A: In instances where the drawing display does not light up or receive sufficient power through the USB-C connection alone, a secondary power connection is necessary. This typically involves using the provided USB-A to USB-C cable. Connect the USB-A end to a USB port on your computer or, preferably, to a power adapter. The USB-C end then connects to the designated power input port on your pen display. This ensures that even if your computer's USB port has limited power output, your display will receive the necessary juice to function correctly.
It's important to note that due to varying product specifications across different batches or regions, the power adapter included might not be a standard offering. Always refer to the actual product you received to confirm the specific power adapter requirements and included accessories.
Understanding the Connections for Optimal Performance
The Artist 15.6 Pro V2 typically utilizes a 3-in-1 cable or a USB-C connection for data and power. The 3-in-1 cable usually comprises a USB-A connector for power, a HDMI connector for video signal, and another USB-A connector for data. The USB-C connection simplifies this, often requiring only a single USB-C cable if your computer supports it.
- Power Connection: This is essential for the display to turn on and function. If using the 3-in-1 cable, the red USB-A connector is for power. If using USB-C, ensure the cable supports power delivery or connect the display to an external power source as described above.
- Video Signal: For the 3-in-1 cable, the HDMI connector transmits the video signal from your computer to the pen display. For USB-C, this signal is often carried over the same cable if DisplayPort Alternate Mode is supported.
- Data Transmission: The USB-A connector (often black or blue) on the 3-in-1 cable, or the USB-C cable, handles the data input from the stylus, allowing your pen strokes to be registered by the computer.
The specific configuration might vary slightly depending on the exact model revision and bundled accessories. Always consult the included manual for the most precise connection diagram for your specific unit.
Driver Installation: The Key to Responsiveness
Once your hardware is physically connected, the next crucial step is installing the correct drivers. Drivers are software that enable your operating system to communicate effectively with your XP-Pen Artist 15.6 Pro V2. Without the proper drivers, the pen may not be recognized, or its pressure sensitivity might not function.
Downloading the Latest Drivers
- Visit the Official XP-Pen Website: Navigate to the support or download section of the official XP-Pen website. It is vital to download drivers directly from the manufacturer to ensure authenticity and avoid potential malware.
- Select Your Model: Locate and select the XP-Pen Artist 15.6 Pro V2 from the list of available products.
- Choose Your Operating System: Select the correct operating system for your computer (e.g., Windows 10, macOS Ventura).
- Download the Driver File: Download the latest available driver package. It is generally recommended to use the most recent version, as it often includes bug fixes and improved compatibility.
Installing the Drivers
- Close Running Applications: Before installing, it's good practice to close any other graphics-related software or applications that might interfere with the installation process.
- Run the Installer: Locate the downloaded driver file (usually an .exe for Windows or .dmg for macOS) and run it.
- Follow On-Screen Prompts: The installer will guide you through the process. Read each step carefully and accept the license agreement.
- Restart Your Computer: After the installation is complete, you will typically be prompted to restart your computer. This step is essential for the new drivers to be fully loaded and integrated.
Configuring Your Pen Display and Stylus: Tailoring to Your Needs
With the hardware connected and drivers installed, it's time to configure your XP-Pen Artist 15.6 Pro V2 and stylus to match your artistic preferences. This involves utilizing the XP-Pen driver software.
Accessing the XP-Pen Driver Settings
After restarting your computer, you should find the XP-Pen driver application installed. You can usually launch it from your desktop shortcuts, the Start Menu (Windows), or your Applications folder (macOS).
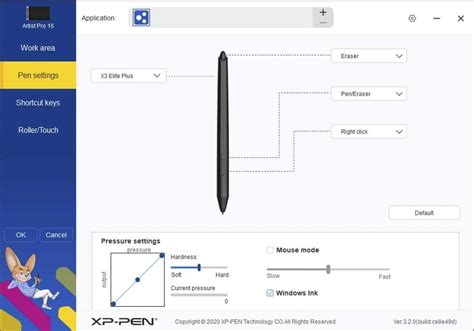
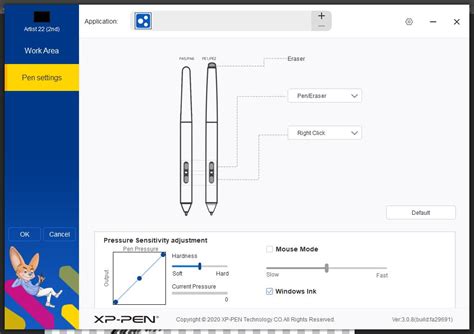
Pen Settings: Pressure Sensitivity and Button Customization
The driver software provides extensive customization options for your stylus.
Pressure Sensitivity: This is arguably the most critical setting for digital art. The Artist 15.6 Pro V2 supports a high level of pressure sensitivity, meaning the harder you press the stylus, the thicker or darker the line becomes, mimicking traditional art tools.
- Adjusting Sensitivity: Within the driver software, you'll find a slider or graph to adjust the pressure sensitivity curve. You can increase or decrease the overall sensitivity or customize the curve to respond more to light or heavy strokes. Experiment with this setting to find a feel that is comfortable and intuitive for you.
- Testing Pressure: Most driver applications include a pressure test window where you can draw and see how your strokes register at different pressures. Use this to fine-tune your settings.
Pen Buttons: The stylus usually comes with one or two programmable buttons. These can be customized to perform various functions, such as acting as an eraser, simulating keyboard shortcuts (like Ctrl+Z for undo), or activating specific tools within your art software.
- Assigning Functions: In the driver settings, you can select a desired function for each pen button. This can significantly speed up your workflow by allowing you to perform common actions without reaching for your keyboard.
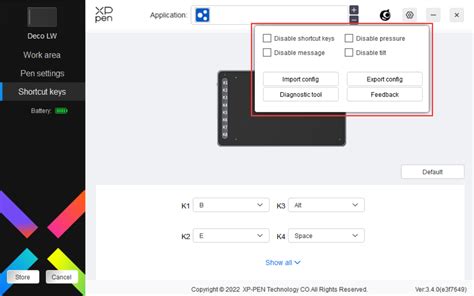
Tablet Settings: Mapping and Express Keys
The driver software also allows you to configure the pen display itself.
Screen Mapping: This setting determines how the active area of your pen display is mapped to your computer monitor(s).
- Full Screen: By default, the pen display will map to your entire monitor.
- Specific Monitor: If you have multiple monitors, you can choose which monitor the pen display should map to.
- Aspect Ratio: You can also adjust the aspect ratio to ensure that circles drawn on the tablet appear as circles on the screen, preventing distortion.
Express Keys: The Artist 15.6 Pro V2 features programmable Express Keys on the side of the display. These buttons can be assigned to shortcuts for your most frequently used software functions, further streamlining your creative process.
- Customizing Keys: Similar to pen buttons, you can assign specific functions to each Express Key within the driver software. Consider assigning keys for common actions like brush size adjustments, zooming, panning, or switching tools.
Advanced Setup and Troubleshooting: Maximizing Your Experience
While the basic setup is straightforward, a few advanced tips and troubleshooting steps can enhance your experience with the XP-Pen Artist 15.6 Pro V2.
Working with Different Art Software
The XP-Pen Artist 15.6 Pro V2 is designed to be compatible with a wide range of popular art and design software, including Adobe Photoshop, Illustrator, Clip Studio Paint, Krita, and Autodesk Sketchbook, among others.
- In-Software Settings: Some art applications have their own tablet settings. It's often beneficial to check these settings within your preferred software to ensure that pressure sensitivity and other tablet-specific features are enabled and configured correctly.
- Driver Conflicts: Occasionally, other graphics tablet drivers (from different manufacturers) can conflict with XP-Pen drivers. If you encounter issues, try uninstalling any other tablet drivers before installing the XP-Pen drivers.
Troubleshooting Common Issues
Pen Not Working:
- Check Connections: Ensure all cables are securely connected to both the computer and the pen display.
- Driver Reinstallation: Try uninstalling and then reinstalling the XP-Pen drivers. Download the latest version from the official website.
- Restart: A simple computer restart can often resolve temporary glitches.
- Test Pen: If possible, test the stylus on another compatible device or try a different stylus on your display to rule out a faulty pen.
Display Not Turning On:
- Power Cable: Verify that the power cable is properly connected and that the power source is active. If using a power adapter, ensure it's plugged into a working outlet.
- USB-C Power Delivery: If relying on USB-C for power, confirm that your computer's USB-C port supports power delivery or use the separate USB-A to USB-C power cable.
Lag or Jittery Lines:
- Driver Update: Ensure you have the latest drivers installed.
- Computer Performance: Check if your computer's specifications meet the recommended requirements for the software you are using. Resource-intensive art software on an underpowered computer can lead to performance issues.
- Graphics Card Drivers: Ensure your computer's graphics card drivers are up to date.
- Polling Rate: Some driver software allows adjustment of the polling rate (how frequently the tablet reports the pen's position). While not always an option, a higher polling rate can sometimes reduce lag.
How To Fix XP Pen No Signal - (Updated Guide!)
Maintaining Your Pen Display
To ensure the longevity and optimal performance of your XP-Pen Artist 15.6 Pro V2, regular maintenance is recommended.
- Cleaning: Gently clean the screen surface with a soft, lint-free cloth. Avoid using abrasive cleaners or solvents, which can damage the screen coating.
- Pen Nib Replacement: Pen nibs wear down with use. When you notice the pen becoming less responsive or the drawing line becoming thicker due to a worn nib, it's time to replace it. XP-Pen typically includes spare nibs and a nib removal tool in the box.
- Cable Care: Avoid tightly bending or kinking the cables, as this can damage the internal wires.
By following these steps, you can ensure your XP-Pen Artist 15.6 Pro V2 is set up correctly, allowing you to dive into your creative projects with confidence and efficiency. The flexibility and responsiveness of this pen display provide a powerful platform for bringing your artistic visions to life.