Photopea.com stands as a powerful and free platform for graphic design, offering a robust suite of tools that rival professional software. Among its many capabilities, the shape tools provide a foundational element for creating vector graphics, from simple geometric figures to complex custom designs. By the end of this guide, you’ll be able to easily draw various shapes and utilize other design tools within Photopea.
Getting Started: The New Project and Basic Shape Creation
Upon opening Photopea.com, you are presented with three primary options. To begin your design journey, click on the first option: "New Project." This action will open a dialog box where you can set the dimensions, resolution, and background of your canvas. Once your project is set up, you'll be ready to explore the shape tools.
To create a basic shape, select one of the primary shape tools from the toolbar - typically found grouped together. These include tools for creating rectangles, ellipses, and lines. After selecting a tool, click and drag your cursor across the canvas. The duration and direction of your drag will determine the size and proportions of the shape. For instance, when drawing a rectangle or ellipse, dragging diagonally will create the shape. Holding down the Alt key while dragging will allow you to draw the shape from the center outwards, which can be incredibly useful for precise placement and symmetrical designs.
Navigating the Options Bar for Shape Customization
Before committing to drawing a shape, or even after it's created, you can fine-tune its properties using the Options Bar, which appears at the top of the interface when a shape tool is active. This bar is crucial for controlling the appearance and behavior of your shapes.
You can adjust the dimensions of a shape by modifying its width and height values in the corresponding input boxes labeled 'W' and 'H'. This is particularly helpful when you need to create shapes of exact measurements.
The Options Bar also offers settings for the shape's appearance. You'll find an option to add a "stroke" (the outline of the shape) beside the "fill" option. The fill determines the color inside the shape, while the stroke defines the color, width, and style of the outline.
For rounded corners, Photopea offers a straightforward approach. Within the shape's properties, you'll find options to adjust corner radii. Checking the "same radii" option will allow you to round all corners equally with a single adjustment. This is a quick way to soften the edges of rectangles and squares, giving them a more modern or friendly look.
Exploring Advanced Shape Creation: Custom Shapes and Paths
Beyond the basic geometric shapes, Photopea provides more specialized tools for intricate designs. The "Custom Shape" tool is located at the end of the list of shape tools in the toolbar. This tool unlocks a drop-down menu where you can choose from a pre-defined library of shapes, ranging from arrows and symbols to more abstract forms.
When using the Custom Shape tool, you can select a shape from the gallery. This tool allows you to add a complex shape from the current gallery of shapes. This tool can draw other exotic shapes, which require some parameters. Each character will become a path with knots, which you can modify manually. For example, if you select a star shape, it will be drawn with a specific number of points and an inner and outer radius that can often be adjusted within the Options Bar before or after drawing.
Photopea also offers several tools for creating vector graphics, including the Pen, Free Pen, Rectangle, Ellipse, and Polygon tools. The Pen tool, in particular, is a cornerstone of vector illustration. This tool allows you to create paths knot - by - knot. Press the mouse in the image area to add a knot. Then drag and release to add handles, or release immediately to keep handles collapsed. Clicking again on the first knot in the path will close the path, creating a complete shape. If there is one knot already selected, the new knot is added right after that knot (into the same path). Since each new knot is selected after adding, the next knot is added right after it.
The Free Pen tool, also known as the Pencil tool in some contexts or a freehand drawing tool, lets you draw a path by clicking and dragging your mouse. Click with the mouse and draw some shape. Then, release the mouse. Your stroke will be converted into a smooth vector curve. This method is ideal for organic shapes and freehand drawing where precise geometric forms are not required. Alternatively, you can click and drag with a mouse to draw a path with a specific geometric shape, offering a blend of freeform drawing with geometric control.
Editing and Manipulating Shapes: Fine-Tuning Your Designs
Once a shape is created, Photopea provides a versatile set of tools for editing and refining it. When you select the shape tool, the properties bar will appear at the top, where you can adjust the shape settings before or after drawing. Settings like fill type, fill color, stroke, etc., can be modified at any time.
There are multiple methods to edit shapes; Photopea offers several ways to achieve this. One fundamental method involves using the Direct Selection tool. Choose the Direct Select tool from the toolbar and drag a selection over the shape. All the points (or knots) of the shape will be selected. With these points selected, you can move them individually or in groups to reshape the object. You can also click on any point with the Pen tool, and it will be deleted, effectively removing a segment of the path and altering the shape's form.
The Properties panel in Photopea is designed to be straightforward and minimal, offering quick access to essential shape adjustments. Within this panel, you can fine-tune parameters like corner rounding, which we discussed earlier. If you need to round all corners equally, you can check the "same radii" option.
For more extreme transformations, the "Warp" feature is available. In Warp, you can freely distort the shape in any way you want, bending and manipulating it into unconventional forms. This is particularly useful for creating dynamic and stylized graphics.
Master Three Shapes Techniques in Photopea for GREAT Designs
Beyond Shapes: Complementary Tools for a Complete Design Workflow
While shape tools are central to vector creation, Photopea offers a host of other tools that complement the design process and enhance your ability to work with colors and existing elements.
The Eyedropper tool is an invaluable asset for color management. Use the Eyedropper tool to sample colors directly from your canvas or from imported images. This is especially helpful if you are using a color palette for colors in your design. You can import a color palette, keep it in a corner of your workspace, and then choose the colors you need with the eyedropper tool, ensuring color consistency across your project. Keep in mind that the eyedropper tool, when sampling from raster layers, functions by capturing the color data of pixels.
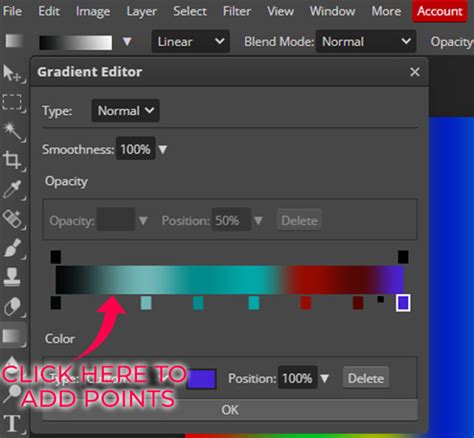
The Gradient tool is another powerful feature for adding depth and visual interest. The gradient tool creates cool-looking gradients. When you select the gradient tool, the properties bar will appear on top. In the first option, you have to choose two or more colors you want in the gradient. You can then define the type of gradient (linear, radial, angle, etc.) and its direction, creating smooth transitions between colors that can add a professional polish to your designs. We have also discussed the gradient tool in detail, highlighting its various applications.
For raster image manipulation, the Magic Eraser tool can be surprisingly useful. This tool removes a similar color from an image with a single click, making it efficient for isolating subjects or cleaning up backgrounds.
When it comes to adding text to your designs, the Text tool is your primary instrument. Select the text tool from the toolbar or use the keyboard shortcut 'T'. A bar with text options will appear at the top. You can adjust the font, size, color, alignment, and other text properties in this text options bar, seamlessly integrating typography into your vector-based creations.
Photopea also includes fundamental artistic tools like the Brush tool and Pencil tool. Each brush tool creates some stroke. The Brush tool is a basic artistic tool. It lets us draw strokes with a foreground color onto an existing layer. The Pencil is very similar to the Brush tool, but it creates sharp edges, which is useful for crisper lines. The Eraser tool erases the pixels from an existing layer, and the Clone Stamp tool lets us copy the content from one part of the layer into another part. First, we hold the Alt key and click on the layer to choose the source of cloning, which are filled with the content from the source part.
Mastering the shape tools in Photopea, along with all their associated settings, can present a learning curve. However, with consistent practice and exploration of the various tools and options available, you can become highly proficient in creating sophisticated designs. Photopea's free accessibility and comprehensive feature set make it an exceptional choice for anyone looking to engage in graphic design.