If you're just getting started with video editing, you might find yourself overwhelmed with the number of tools and options available. One basic skill that you'll need to master is how to split a clip in DaVinci Resolve. Luckily, it's a simple process that can be accomplished using just a few keyboard shortcuts or right-clicking your mouse. Splitting a clip can be useful in a variety of scenarios, from trimming footage to creating a split-screen effect. In this tutorial, we'll take you through the step-by-step process of how to split a clip in DaVinci Resolve, whether you're using version 17 or the latest 18. We'll cover everything from basic tools like the blade tool and zooming in on the timeline to more advanced features like joining clips and working with audio and video together. So whether you're a beginner or just looking to brush up on your skills, keep reading to learn how to split a clip in DaVinci Resolve like a pro.
Whether you are an experienced video editor or just starting with DaVinci Resolve, learning how to split clips is a necessary skill that can improve your editing efficiency. By splitting a clip, you can remove unwanted parts of your video and create a more polished final product. Whether you're a beginner or an experienced editor, learning how to split clips in DaVinci Resolve is an essential skill that you'll use frequently in your editing workflow.
What is Clip Splitting in DaVinci Resolve?
Clip splitting is a fundamental technique used in video editing that allows you to divide a video clip into two or more parts. This is a useful technique when you want to remove a section of a clip, or when you want to insert other video clips or images in between the original clip. DaVinci Resolve is a popular video editing software that provides several ways to split video clips in your project.
Splitting clips in DaVinci Resolve 20 allows you to:
- Cut unnecessary footage and refine your edits.
- Rearrange clips for better storytelling.
- Apply effects or transitions to specific parts of a video.
- Separate audio and video tracks for advanced editing.
Splitting clips efficiently improves video pacing and keeps your audience engaged.
Why Splitting Clips is a Useful Skill
Splitting and rejoining clips in DaVinci Resolve is helpful for video editors. First, don’t confuse splitting clips with DaVinci Resolve’s split-screen effects, which typically work with multiple clips rather than dividing a single one. Using DaVinci Resolve to split clips lets you break up long videos into smaller pieces - like cutting a giant cake into slices. This makes your work easier to manage and puts less pressure on your device and hardware, too. You can focus on each small part one at a time instead of dealing with the whole video.
Additionally, when you know how to use DaVinci Resolve to split clips, you can remove parts you don’t want. Maybe there’s a mistake in your video, a scene goes on for too long, you have excess film you shot around your intended sequence, or you uncover a boring section that no longer works for you. You can cut these out easily and replace them with dramatic effects and high-value editing.
Rejoining clips is also very important. After you split the clips and remove the sections you don’t want, you need to put the good parts back together. You may also want to roll back a split you don’t need anymore. This skill helps you create a smooth, flowing video: It’s like putting puzzle pieces together to make a full picture. These skills will help you be more creative. You can move parts of your video around, trying different orders - a scene may look better at the start instead of the end, for example. Lastly, these are basic skills that help with more advanced editing. As you get better at splitting and rejoining, you’ll find learning other cool editing tricks easier. It’s like learning to walk before you run. Even as you improve your editing skills and get confident with DaVinci Resolve, you’ll return time and again to the basic split and rejoin to power up your creative goals.

How to Split a Single Clip
To split a single clip in DaVinci Resolve, you first need to select the clip in the timeline by clicking on it. Then, move the playhead to the point where you want to split the clip. You can use the arrow keys to move the playhead frame by frame or use the zoom function to get a closer look at the frame you want to split.
Once you have the playhead in the right position, you can use the blade tool to cut the clip into two separate pieces. You can access the blade tool by clicking on the icon in the toolbar or using the keyboard shortcut Ctrl+B (Cmd+B on macOS). Alternatively, you can right-click on the clip and choose "Blade" from the context menu.
With the blade tool active, simply click on the clip at the point where you want to split it. You can then use the cursor keys or zoom function to move the playhead to the point where you want to make the second cut, and repeat the process. You now have two separate clips, and you can edit them independently as needed.
If you want to split a clip at the in or out point, you can use the keyboard shortcuts Ctrl+Alt+B (Cmd+Opt+B on macOS) to split at the in point, or Ctrl+Shift+B (Cmd+Shift+B on macOS) to split at the out point. This is a quick way to split a clip without having to move the playhead manually.
Method 1: Splitting Video Clips Using the Blade Tool
- Open DaVinci Resolve and go to the Edit tab.
- Drag your video onto the Timeline.
- Select the Blade Tool (Shortcut: B) from the toolbar.
- Move the playhead to the frame where you want to split the clip.
- Click on the clip to cut it into two separate sections.
Pro Tip: Press "Ctrl + B" (Windows) or "Cmd + B" (Mac) to make a quick cut at the playhead position without switching tools.
Method 2: Splitting Clips Using DaVinci Resolve Split Shortcut (Fastest Way)
For faster editing, you can use split shortcuts instead of switching to the Blade Tool.
- Select the clip in the Timeline.
- Move the playhead to the point where you want to split the clip.
- Press Ctrl + B (Windows) / Cmd + B (Mac) to split the video instantly.
Pro Tip: Use this shortcut when making quick cuts across multiple clips.
Using the Blade Edit Mode
The most intuitive way to split a clip in DaVinci Resolve is by using the Blade Edit Mode.
- Activate Blade Mode: Look for the razor blade icon in the toolbar at the top of the Edit page. Clicking this icon activates Blade Mode.
- Make the Cut: Once Blade Mode is active, your mouse cursor will transform into a blade. Simply hover over the clip on your timeline where you want to make the split. Click once, and voilà!
- Return to Selection Mode: After you've made your cuts, you'll likely want to move, trim, or adjust the newly separated clips. To do this, you need to switch back to the standard Selection Mode.
Using the Split Clip Command
The Split Clip command is another efficient way to cut your clip at the playhead.
- Ensure your clip is on the timeline.
- Move the playhead to where you want to make the split.
- Click the Timeline menu and select "Split Clip". Alternatively, press Ctrl/Command + B (on Windows) or Ctrl/Command + \ (on Mac).
After that, you can do whatever you want and work with each segment separately.
How To Cut Video Footage Like a PRO! - DaVinci Resolve
How to Split Multiple Clips at Once
In DaVinci Resolve, you may sometimes want to split multiple clips at once. Perhaps you have a long sequence and want to split all of the clips at a certain point to insert another clip or apply an effect. Fortunately, splitting multiple clips in DaVinci Resolve is a simple process.
First, you'll need to select all the clips you want to split. You can do this by clicking and dragging over the clips in the timeline or by using the shift key to select multiple clips at once.
Once you've selected the clips, you can use the blade edit mode to split them all at once. To enter blade edit mode, simply click on the blade tool in the toolbar or press the B key on your keyboard. With the blade tool active, click on the timeline where you want to split the clips. This will create a cut in all of the selected clips.
If you want to split all of the clips at the same point in the timeline, you can also use the "split at playhead" command. To do this, simply place the playhead where you want to make the cut and press Ctrl+B on Windows or Cmd+B on macOS. This will split all of the selected clips at the same point.
Splitting Multiple Clips on Different Tracks
If you need to cut all tracks (video and audio) at the same time:
- Move the playhead to the desired cut point.
- Press Ctrl + Shift + B (Windows) or Cmd + Shift + B (Mac).
- This will split all clips on all active tracks at the playhead position.
Pro Tip: This is useful for multi-camera editing and cutting dialogue with synchronized audio and video tracks.
How to Rejoin Split Clips in DaVinci Resolve
Rejoining split clips in DaVinci Resolve is a simple process that can be done in just a few clicks. Once you have split a clip, you can easily join it back together again to create a seamless transition between the two sections.
To rejoin split clips, simply select the two clips you want to join together in the timeline by clicking and dragging over them with your mouse.
Next, right-click on one of the clips and select the "Join Clip" option from the drop-down menu. You can also use the keyboard shortcut "Ctrl + J" (Windows) or "Cmd + J" (Mac) to quickly join the clips together. This will merge the two selected clips into a single clip.
If you need to trim the joined clip further, simply use the blade tool or any other editing tools available in DaVinci Resolve to make the necessary cuts. You can also apply any audio or video effects to the joined clip as needed.
The Rejoin Clip Shortcut
If you want to merge two clips back together after splitting them:
- Select the two clips you want to join.
- Press Ctrl + Shift + J (Windows) or Cmd + Shift + J (Mac).
- This will reconnect the split clips into a single clip.
Pro Tip: You can only join clips that were originally split from the same source file.
How to Split Audio from a Video Clip in DaVinci Resolve
Splitting audio from a video clip can be a useful technique when you want to make adjustments to the audio track separately from the video. DaVinci Resolve provides several ways to split audio from a video clip.
First, select the video clip that you want to split the audio from in the timeline or the media pool. Then, right-click on the clip and select "Detach Audio" from the drop-down menu. This will create a new audio clip in the media pool that is separate from the video clip.
Another way to split audio from a video clip is to use the blade edit mode. Simply select the clip in the timeline and switch to the blade edit mode by clicking the icon on the toolbar or by using the shortcut key "B". Then, move the playhead to the point where you want to split the audio and press the shortcut key "Ctrl + B" to split the clip. This will split both the video and audio into two separate clips.
Once you have split the audio from the video clip, you can make adjustments to the audio separately in the Fairlight page. This is where you can use DaVinci Resolve's editing tools and special effects to enhance the audio quality. When you're finished editing the audio, you can rejoin the audio and video clips by dragging them together in the timeline or by using the "Join Clips" command from the right-click menu.
Separating Audio from Video After Splitting
After splitting a clip, you may want to edit the audio track separately for better control over voiceovers, background music, or sound effects.
Step 1: Unlink Audio from Video
- Right-click the clip in the timeline.
- Select Unlink from the dropdown menu.
- Now, you can move, delete, or edit the audio track independently from the video.
Pro Tip: Use this method to replace bad audio with external sound recordings or to clean up background noise.
How to Create a Split-Screen Effect in DaVinci Resolve
A split-screen effect is useful for comparisons, interviews, and multi-perspective storytelling.
Step 1: Import Multiple Clips into the Timeline
- Drag two or more video clips onto different video tracks in the timeline.
- Make sure the clips are stacked on top of each other in different layers.
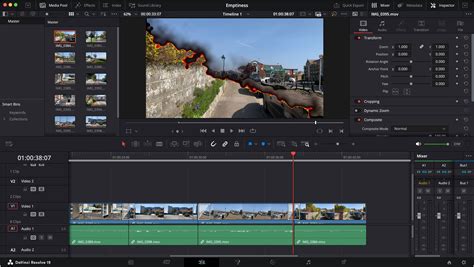
Step 2: Resize and Position the Clips for a Split-Screen Look
- Click on the first clip and open the Inspector panel (top right).
- Under Transform, adjust the Zoom and Position to fit one side of the screen.
- Repeat for the second clip, placing it on the other side of the screen.
Pro Tip: Use custom cropping and keyframes to create dynamic split-screen transitions.
Best Practices for Splitting Video Clips in DaVinci Resolve
- Use the Blade Tool for precise cuts when refining edits.
- Use the Split Shortcut (Ctrl/Cmd + B) for quick edits without switching tools.
- Split multiple clips at once using Ctrl/Cmd + Shift + B for efficiency.
- Use Ripple Delete (Shift + Delete) to automatically close gaps in the timeline.
- Experiment with split-screen techniques to create engaging side-by-side visuals.
Pro Tip: Use markers (shortcut: M) to highlight important split points in long video projects.
For creative editing techniques beyond simple cuts, you can also learn how to reverse a clip in DaVinci Resolve to create unique motion effects.
Is DaVinci Resolve Easy to Use for Splitting Clips?
Yes! DaVinci Resolve offers both beginner-friendly and advanced tools for cutting and managing clips. DaVinci Resolve is by far one of the best video editing programs you can find anywhere on the market. It comes with everything you need to create professional edits, even if you are new to video editing. The Cut Page is one of DaVinci’s revolutionary innovations in editing. It has many features that make editing your clips a breeze, including the DaVinci Resolve split clip functionality.
Is DaVinci Resolve Worth It?
- The free version of DaVinci Resolve offers professional-grade editing tools with no watermarks.
- DaVinci Resolve Studio ($295 one-time) adds AI-powered editing, noise reduction, and multi-user collaboration.
- If you need Hollywood-level editing without a monthly subscription, DaVinci Resolve is a great choice.
Pro Tip: If you’re unsure whether to upgrade, try the free version first-it’s powerful enough for most editors!
Why Splitting Clips is Essential in DaVinci Resolve
Splitting clips in DaVinci Resolve allows you to:
- Cut unnecessary footage and refine your edits.
- Rearrange clips for better storytelling.
- Apply effects or transitions to specific parts of a video.
- Separate audio and video tracks for advanced editing.
Pro Tip: Splitting clips efficiently improves video pacing and keeps your audience engaged.
You can also apply timing effects to specific sections of your edit - for example by learning how to speed up footage in DaVinci Resolve to create dynamic pacing.
Final Thoughts: Mastering Video Splitting in DaVinci Resolve
DaVinci Resolve makes splitting video clips simple and efficient with tools like the Blade Tool, keyboard shortcuts, and multi-track splitting. Whether you're creating quick jump cuts, seamless transitions, or advanced split-screen effects, mastering these techniques will improve your editing speed and video quality.
FAQ: Split Video Clips in DaVinci Resolve
How do I split a video clip in DaVinci Resolve?To split a video clip, move the playhead to the point where you want to cut, then press Ctrl + B (Windows) or Cmd + B (Mac). Alternatively, use the Blade Tool (B) and click on the clip to create a split.
What is the shortcut to split a clip in DaVinci Resolve?The shortcut to split a clip is Ctrl + B (Windows) or Cmd + B (Mac). To split all tracks at the playhead position, use Ctrl + Shift + B (Windows) or Cmd + Shift + B (Mac).
How do I join split clips in DaVinci Resolve?To join split clips, select the clips you want to merge and press Ctrl + Shift + J (Windows) or Cmd + Shift + J (Mac). This will reconnect the split clips if they originate from the same file.
Can I split multiple clips at once in DaVinci Resolve?Yes, you can split multiple tracks at the same time by pressing Ctrl + Shift + B (Windows) or Cmd + Shift + B (Mac) while the playhead is positioned at the desired cut point.
What is the difference between Razor and Split Clip in DaVinci Resolve?The Razor (Blade Tool) allows you to manually cut clips by clicking on them, while Split Clip (Ctrl + B / Cmd + B) instantly cuts at the playhead position for a faster workflow.
How do I separate audio from video after splitting in DaVinci Resolve?Right-click on the split clip and select Unlink. This allows you to move, edit, or delete the audio separately from the video.
How do I delete part of a split clip without affecting the timeline?After splitting the clip, select the section you want to remove and press Backspace. To automatically close the gap, press Shift + Delete (Ripple Delete).
Can I split a video into multiple segments automatically in DaVinci Resolve?Yes, you can use Scene Cut Detection in the Cut Page to analyze and split a long video into multiple segments based on scene changes.
How do I create a split-screen effect in DaVinci Resolve?To create a split-screen effect, place two video clips on different tracks, adjust the Zoom and Position settings in the Inspector panel, and use the Crop tool to refine the split view.
What is the best way to split clips for YouTube videos?Use quick jump cuts by applying Ctrl + B / Cmd + B to remove pauses, unnecessary content, and make the video more engaging.
Is DaVinci Resolve free for splitting clips?Yes, DaVinci Resolve Free includes all necessary tools for splitting, cutting, and rearranging clips. DaVinci Resolve Studio ($295) adds AI-based enhancements, noise reduction, and high-end effects.
Which is better: DaVinci Resolve or DaVinci Resolve Studio for splitting clips?The free version is sufficient for most editing tasks, including splitting clips, but DaVinci Resolve Studio includes advanced editing features like motion blur, AI-powered scene detection, and faster rendering.
Is DaVinci Resolve easy to use for beginners?Yes, DaVinci Resolve is beginner-friendly, especially with tools like the Blade Tool and split shortcuts.