In the realm of digital art and design, sometimes it's the unexpected that truly captivates and inspires. Understanding how to manipulate colors within an image is a fundamental skill for any creative professional. One of the most powerful, yet sometimes misunderstood, tools in Adobe Photoshop is the "Invert" function. This guide will delve into the intricacies of using Photoshop's invert feature, explaining why it might appear "greyed out" and exploring its diverse applications beyond a simple color flip. We will navigate through the process, from basic inversion to advanced techniques, ensuring clarity for users of all skill levels.
The Core of Color Inversion: Understanding Complementary Colors
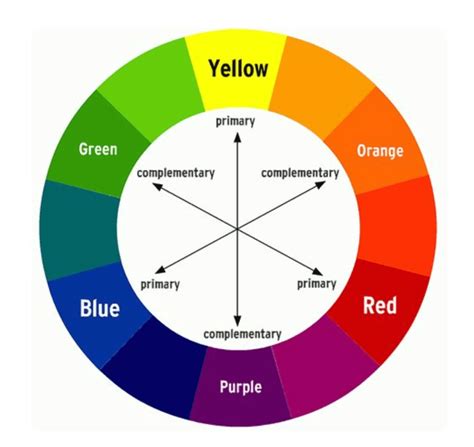
At its heart, color inversion in Photoshop is about replacing each color with its complementary color. The exact opposite of any color can be found directly across from it on the color wheel. When you invert a color in Photoshop, the software automatically replaces each color with its complementary color from the color wheel. This process creates a visually striking effect, transforming an image into its photographic negative.
Why Is "Invert" Greyed Out? Navigating Layer Masks and Selections
A common point of confusion arises when the "Invert" option in Photoshop's menu appears greyed out, rendering it unusable. This typically occurs when the action is attempted on an inappropriate layer or selection. For instance, if you have a layer with a mask and wish to change the colors, direct inversion of the entire layer might not yield the desired result, or the option may be unavailable depending on the active selection.
A user might encounter this issue when trying to change the colors of a layer with a mask. The goal is to retain the image while altering specific color values, such as making black a light grey and grey image elements darker or black, effectively an inversion of the current colors. This scenario often leads to frustration when the "Invert" command doesn't behave as expected.
If only the white is selected, for example, only the white areas will change when you invert. This implies that to achieve a full inversion, a specific selection might not be necessary, or a more comprehensive selection strategy is required. The user's experience of CTRL+I causing the white area to turn black but not turning the black white, resulting in an all-black screen, highlights a misunderstanding of how selections interact with the invert function. In such cases, it sounds like you don't need to make a selection if the intention is a full image inversion.
Practical Applications of Color Inversion
Color inversion isn't just a fun trick; it's a powerful tool with a range of applications across various fields:
Graphic Design: Fresh Perspectives
Inverting colors can give a fresh and unexpected look to logos, brochures, web graphics, and more. This technique can be used to create striking visual contrasts or to achieve a specific aesthetic that stands out from conventional designs. For example, a logo that typically appears in dark colors might be inverted to create a vibrant, eye-catching version for a specific campaign.
Photography: Artistic Transformations
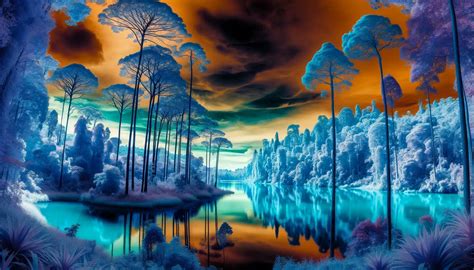
Color inversion can transform an ordinary photo into a striking piece of art, giving it an ethereal or otherworldly quality. This is particularly effective for landscapes or abstract photography, where the inverted colors can reveal hidden nuances and create a dreamlike atmosphere. Photographers might use this to emulate the look of old photographic processes or to create abstract compositions.
Accessibility: Enhancing Readability
Many digital platforms offer a "dark mode" or "night mode" where the color scheme is inverted to reduce eye strain. This is a direct application of color inversion, making screens easier to view in low-light conditions by reducing the overall brightness and increasing contrast between text and background. This is a practical and widely adopted use case that benefits a large user base.
The Photoshop Invert Process: Step-by-Step
Now that we've covered the basics of color inversion and its applications, let's dive into the specifics of how to invert colors in Photoshop.
Basic Inversion
- Launch Adobe Photoshop: Begin by opening the software.
- Work on a Duplicate Layer: It's always a good idea to work on a duplicate layer when making significant changes. To duplicate your layer, go to the Layers panel (usually on the right side of the screen), right-click on the layer you want to invert, and select "Duplicate Layer." This preserves your original image.
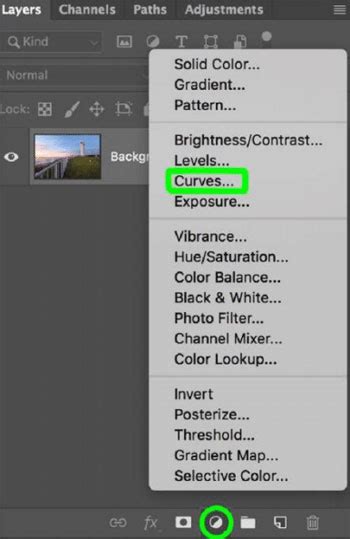
- Apply the Invert Command: With the duplicate layer selected, go to the top menu and click on
Image > Adjustments > Invert. Alternatively, you can use the keyboard shortcutCtrl+Ion Windows orCommand+Ion Mac.
This will immediately invert the colors of the selected layer.
Fine-Tuning and Creative Control
While the basic inversion process is simple, there's plenty of room for creativity in the fine-tuning stage.
- Adjusting Opacity: You can adjust the opacity of your inverted layer to create a blend of the original and inverted colors. This allows for subtle inversions or unique color effects.
- Layer Blending Modes: Experiment with different blending modes for your inverted layer. Modes like "Color," "Overlay," or "Soft Light" can produce interesting and artistic results by how the inverted layer interacts with the layers below.
- Adjustment Layers: Instead of applying adjustments directly to your image layer, use adjustment layers. This non-destructive approach allows you to easily modify or remove the inversion effect later. For example, you can add an "Invert" adjustment layer, which functions similarly to the direct command but offers greater flexibility.
How to Invert Colors in Photoshop
Selective Color Inversion
Instead of inverting the entire image, you can select specific areas for color inversion. This involves making a selection (e.g., using the Marquee tool, Lasso tool, or Quick Selection tool) before applying the Image > Adjustments > Invert command. Only the selected area will be inverted, allowing for targeted color manipulation.
Advanced Techniques: Beyond Basic Inversion
For more nuanced control, especially when dealing with complex images or specific color goals, advanced techniques are invaluable.
Inverting Color Negatives with Precision
The process of inverting color negatives in photography is a classic example of where precise color inversion is crucial. Tim Parkin, a notable figure in landscape photography and co-founder of On Landscape magazine, has developed and refined techniques for this purpose. His approach emphasizes starting with raw scans and then applying targeted adjustments in Photoshop.
The core logic involves opening 'auto options' and setting specific clipping levels. For instance, setting the clipping to 9.99 and the black and white level to 30% grey and 70% grey respectively can provide a good starting point for most images. These settings can be tweaked based on the scanner's output. Crucially, the scanner's adjustments should be turned off, and color management disabled to ensure a raw, unprofiled scan is imported into Photoshop.
When an image is opened in Photoshop, it should appear without a color profile. This can be confirmed by going to Edit > Assign Profile and ensuring "Don't color manage this document" is selected. Photoshop's 'Color Settings' should be set to 'preserve embedded profiles' or 'off' to avoid unintended color conversions.
The next step often involves either inverting the scan directly or adding an invert adjustment layer. Following this, a curve adjustment layer is added. By Alt-clicking (or Option-clicking on Mac) on the 'Auto' button within the Curves properties, you can access clipping settings. Setting the clipping levels to 9% for both black and white, and then using the 'Shadows' and 'Highlight' color samplers to select the desired grey levels, can produce an image with minimal shadow blocking or highlight clipping.
However, achieving a "full histogram" might require further adjustments. Adding another curves or levels layer allows for setting the black and white points without clipping.
Targeted Adjustments with Multi-Point Curves
Making targeted adjustments to highlights and shadows in Photoshop can be challenging with default tools. Tools like "Color Balance" offer broad selections, but for finer control, creating custom curves presets is more effective. This involves dividing the RGB curves into multiple sections, allowing for adjustments to specific tonal ranges.
This can be done roughly by hand, followed by tweaking the numeric values for precision. An overall contrast curve adjustment can then be applied to bring the image into the desired tonal range. Broad color balance adjustments can also be made at this stage, either by using the middle eyedropper in a Curves adjustment layer to sample areas around the picture or by using the "Color Balance" tool itself.
To neutralize color casts, select the color correction layer and make the necessary curves adjustments. Similarly, highlights can be managed by dramatically darkening the image using curves. Applying changes to very deep shadows can be achieved by selecting the bottom point in a multi-point curve.
Comparison with Standard Techniques
These advanced methods are often compared to standard techniques like the basic 'set black and white point' conversion. While the standard method can sometimes yield acceptable results, it is often found to be unsatisfactory, particularly when dealing with color casts in highlights and shadows. For example, the old method might neutralize a red cast in extreme highlights by adding cyan, but this cyan can then affect the rest of the highlights. The same issue can occur in shadows, where neutralizing a blue cast by adding yellow might inadvertently affect the entire shadow region.
Tools to Enhance Your Workflow
For those deeply involved in Photoshop and looking to streamline their editing process, specialized controllers can be highly beneficial. The TourBox, for instance, is a versatile controller designed specifically for graphic design, image editing, and digital artistry. Such tools can offer tactile control over Photoshop functions, allowing for quicker and more intuitive adjustments, especially during complex editing workflows.
Conclusion: Unleashing the Power of Inversion
Mastering the invert function in Photoshop, alongside advanced techniques for color correction and tonal control, opens up a world of creative possibilities. Whether you're aiming for a subtle color shift, an artistic transformation, or precise color negative inversion, understanding these methods empowers you to achieve professional-level results. With practice, you'll be able to use color inversion to add a new dimension to your creative projects, pushing the boundaries of your artistic vision.