Fonts are the visual voice of any design, playing a crucial role in enhancing the display of your product and conveying its intended message. Beyond simple characters, many fonts boast intricate glyphs, adding layers of detail and stylistic flair to your text. This comprehensive guide will walk you through the process of integrating and leveraging fonts within Inkscape, from basic installation to advanced glyph usage, ensuring your designs achieve a professional and captivating aesthetic.
Step 1: Acquiring and Installing Fonts for Inkscape
The versatility of Inkscape lies in its ability to utilize any font available on your system. Before embarking on your design journey within Inkscape, it is essential to have your desired fonts downloaded and installed. If you are new to font installation, numerous resources are available to assist you. For PC users, the process is typically straightforward: once a font file is downloaded, a simple double-click will open the installation utility. Within this utility, clicking the "Install" button, usually located at the top, will seamlessly integrate the font into your system. Mac users will find a similar, intuitive installation process.
For those who prefer to keep their font library organized externally or wish to avoid cluttering their system's default font directory, Inkscape offers a powerful feature. Within the Inkscape Preferences menu, you can designate a "Custom Fonts" directory. This allows Inkscape to load fonts directly from an external drive or a specific folder of your choosing. To enable this, navigate to the Preferences menu, locate the font settings, and paste the path address of your chosen font folder into the designated input box. It is crucial to restart Inkscape after making this change for the new font directory to be recognized. This "Custom Fonts" directory significantly enhances the convenience of font management, especially for users who have accumulated a large number of font files over time and want to use them across multiple computers without individual installation.
On Linux systems, fonts can be made available system-wide, ensuring they are accessible to core GUI resources like KDE or GNOME. In such cases, it is advisable to delete the font cache file, typically named fonts.cache-1, located in /usr/share/fonts. Following this, you will need to rebuild your font cache files so that other programs can effectively recognize and utilize the newly installed fonts. Most Linux distributions also provide a .fonts directory within your home directory. Copying font files into this directory will install fonts for your personal use only. Historically, GNOME's Nautilus file browser offered a special location called fonts:/// for font installation, though this functionality might vary across different versions.
It is important to note that in older versions of Inkscape, specifically prior to 1.0 (such as version 0.92), users might encounter issues with missing fonts. These bugs have been addressed and resolved in Inkscape versions 1.0 and later, ensuring a smoother font integration experience.
Step 2: Incorporating and Modifying Text in Inkscape
Once your fonts are installed, adding text to your Inkscape document is a simple yet powerful process. Utilize the "Create and edit text objects" tool, readily available on the left-hand side toolbar. Select this tool, then click anywhere on your document canvas to begin typing.

To change the font of your text, navigate to the top-left corner of the screen and click on "Select Font Family." This action will present you with a dropdown list of all the fonts currently installed and recognized by your system. You can either browse through this extensive list or directly type the name of the font you wish to use. It is important to remember that font changes can only be applied when you are in "text edit mode." If you have clicked away from your text, simply double-click on the text object to re-enter edit mode.
While you don't always need to highlight your text to change its font, there might be instances where the font does not update as expected. In such scenarios, ensure you are in edit mode and then precisely select or highlight the text you wish to modify by clicking and dragging your mouse cursor over it. Once the text is highlighted, proceed to select your desired font from the "Select Font Family" list.
A common troubleshooting tip, particularly if you are experiencing difficulties with a specific font, is to ensure that no extraneous font styles, such as "bold," are inadvertently selected. Some fonts, like the "Pretty Baby" calligraphy script font mentioned as an example, may not have a bold variant. Attempting to apply a bold style to such a font can lead to unexpected rendering issues or the font not appearing at all. It is also possible that a previously selected font remains active when you initiate typing with a new font. To mitigate this, try activating the font tool, selecting your desired font from the list, clicking on the canvas to create a text object, and then re-selecting the font from the list before typing. Carefully observe the font list as you perform these actions to confirm that the intended font is indeed active.
If your desired text still fails to appear with the selected font, a useful diagnostic step involves saving a blank Inkscape document with your desired font already selected. Subsequently, reopen this saved document and activate the text tool. Check if your desired font now appears correctly in the font list. This process can sometimes help Inkscape properly index and recognize the font. If problems persist, consider uninstalling the font, downloading a fresh copy, and reinstalling it. Additionally, checking the file permissions for the font file might reveal underlying issues preventing Inkscape from accessing it.
Step 3: Enhancing Text with Font Glyphs
Many modern fonts are enriched with a variety of glyphs, which are essentially alternative characters or decorative elements. These can include elegant swirls, intricate flourishes, unique ligatures, and various ornamental shapes that significantly elevate the aesthetic appeal of your text. A highly efficient and accessible method for incorporating these glyphs into your Inkscape designs is by utilizing the operating system's built-in "Character Map" utility.
The Character Map provides a visual representation of all available characters and glyphs within a selected font. To use it in Inkscape, open the Character Map application on your system. Navigate through the available glyphs for your chosen font. Once you identify a glyph you wish to use, such as a decorative initial for a word, select it within the Character Map and copy it. Then, switch back to your Inkscape document, ensure you are in text edit mode for the relevant text object, and paste the copied glyph directly into your text.
For instance, if you are using a calligraphy script font like "Pretty Baby" and want to add a decorative flourish to the beginning of a word, you would find that specific glyph in the Character Map, copy it, and paste it at the desired position in your Inkscape text. This process can be repeated for any character or glyph within the font, allowing you to meticulously craft visually rich and unique typographic arrangements.
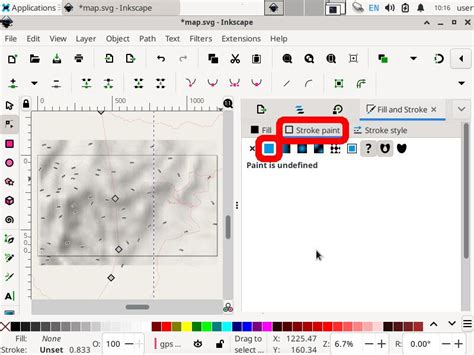
After successfully adding glyphs, you can further refine your text's appearance. To adjust the size of your text, click away from the text object to exit edit mode. Then, click back on the text to reveal the resizing handles, which allow you to scale the text proportionally. Color can be applied using the "Fill and Stroke" panel, accessible through the "Object" menu. Alternatively, a quicker method is to use the color palette located at the bottom of the Inkscape screen.
If you need to make more intricate modifications to elements like swirls or other decorative parts of a glyph, you will first need to convert your text object into a path. This is done by selecting the text object and going to "Path" > "Object to Path." Once converted, the text becomes a collection of vector shapes that can be manipulated individually, offering complete creative freedom over every curve and line.
Lettering Tips That Feel Like Cheating!
Now that you are equipped with the knowledge of how to effectively add and utilize fonts, including their decorative glyphs, in Inkscape, you can begin to experiment with more advanced typographic treatments. Consider exploring the application of gradients to your text for a dynamic visual effect, or combining different font styles to create compelling typographic hierarchies. The possibilities are vast, and with practice, you can transform your text from simple characters into a powerful design element.