Photoshop's Transform tool is a cornerstone of digital image manipulation, offering a versatile suite of functionalities to reshape, resize, rotate, and reposition elements within your creative projects. It empowers users to meticulously adjust images and objects, making it an indispensable skill for anyone working with visual media. The power of Transform lies in its two primary modes: Standard Transform and Free Transform. Standard Transform provides the foundation for basic adjustments such as scaling, rotating, and skewing. Free Transform, on the other hand, unlocks a more fluid and dynamic manipulation of objects, enabling advanced techniques like warping, distorting, and applying perspective shifts.
The Fundamentals of Transformation in Photoshop
At its core, the Transform feature in Photoshop is designed to give you granular control over your layers. Whether you need to resize an image, rotate it to a precise angle, or flip it horizontally or vertically, Transform has you covered. To initiate any transformation, the first step is to make a selection around the object or layer you intend to modify. This ensures that your changes are confined to the desired area.
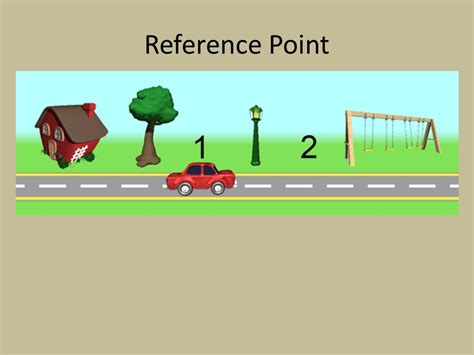
A crucial aspect of transforming elements while maintaining their original proportions is to press and hold the Shift key. As you drag the handles of the bounding box, the Shift key will lock the aspect ratio, preventing unwanted stretching or squashing. The "reference point" is another vital concept within Transform. This point acts as an anchor around which transformations like rotation or scaling occur. By default, it's often located at the center of the object, but it can be repositioned to alter the pivot point of your transformations.
Accessing and Utilizing Free Transform
The Free Transform command is where the real magic of image manipulation happens in Photoshop. It provides an intuitive and powerful way to manipulate images and layers through a variety of transformations, including scale, rotate, flip, and distort. To begin a Free Transform operation, it is essential to first select the desired layer from the Layers Panel.
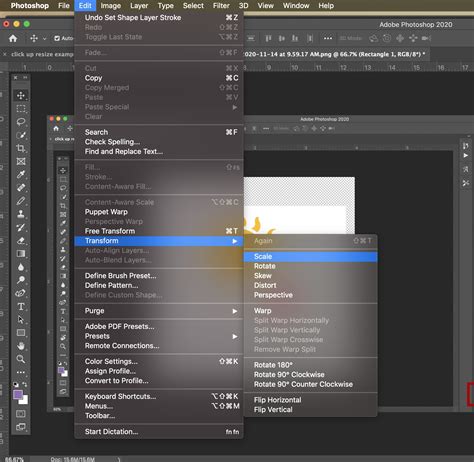
Once the layer is selected, you can activate Free Transform using the keyboard shortcut: Ctrl+T on Windows or Command+T on Mac. Alternatively, you can navigate to Edit > Free Transform in the menu bar. A bounding box with transformation handles will appear around your selected layer, signifying that you are in Free Transform mode.
Scaling and Resizing
Scaling is perhaps the most common transformation. You can resize an object by clicking and dragging any of the eight handles on the bounding box. To maintain the original aspect ratio while scaling, press and hold the Shift key. This will ensure that the image scales uniformly, preventing distortion. If you wish to scale from the center of the object, hold down the Alt (Windows) or Option (Mac) key while dragging any of the handles. For precise numerical scaling, you can enter percentages in the Width and Height text boxes within the Options bar at the top of the screen.
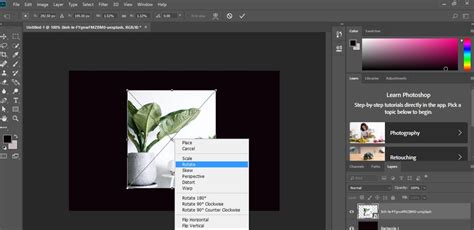
Rotating and Flipping
Rotating an image allows you to manipulate the angle at which it is displayed. To rotate manually, position your cursor just outside one of the corner handles of the bounding box. The cursor will change into a double-headed curved arrow. Click and drag to rotate the layer. For precise rotation, you can enter a specific angle in the Options bar. Holding the Shift key while rotating will constrain the rotation to increments of 15 degrees, allowing for perfectly straight rotations.
Flipping an object is also straightforward. While in Free Transform mode, you can flip horizontally or vertically by right-clicking within the bounding box and selecting the desired flip option. It's important to note that while direct manipulation of handles can sometimes lead to flipping, using the dedicated flip commands is generally more predictable.
Skewing and Distorting
Skewing involves tilting or sloping an image along the X or Y axis. To skew, activate Free Transform (Ctrl+T or Command+T), then hold down the Ctrl (Windows) or Command (Mac) key and drag one of the side handles. This will push or pull one side of the bounding box, creating a slanted effect.
Distorting offers even more freedom. Hold down the Ctrl (Windows) or Command (Mac) key and drag any of the corner handles. This allows you to independently manipulate each corner, pulling them in or pushing them out to create complex distortions. This is different from skewing, where the top and bottom or left and right edges move in parallel.
Photoshop Tutorial - How to use transform tool , skew, distort,warp and perspective
Advanced Transformation Techniques
Beyond the fundamental scaling, rotating, and skewing, Photoshop offers advanced transform techniques for more nuanced control.
Warping
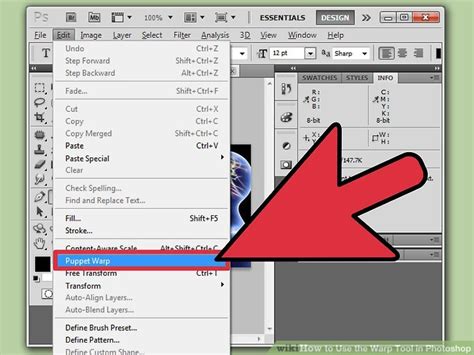
The Warp tool is a powerful feature that lets you distort an image by freely dragging its control points. After activating Free Transform, click the "Warp" icon in the Options bar. This divides your object into a grid. You can then drag individual control points or segments of the grid to bend, bulge, or twist the image. This is incredibly useful for making subtle adjustments to the shape of objects to match the contours of another surface, or for creating artistic effects. Photoshop also offers a variety of pre-defined warp presets (like Arc, Bulge, Fishtail, etc.) accessible from a dropdown menu in the Options bar, which can be a great starting point for many effects.
Perspective Transform
Perspective Transform allows you to simulate a third-dimensional viewpoint by adjusting the vanishing points of an image. This is particularly useful for architectural photography or graphic design when you need to align objects within a scene realistically. To apply perspective, activate Free Transform, then hold down Ctrl+Alt+Shift (Windows) or Command+Option+Shift (Mac) and drag a corner handle. This will allow you to manipulate the perspective of the object, making it appear closer or further away, or to align it with other elements in the scene.
Liquify Filter
While not strictly part of the Free Transform bounding box tools, the Liquify filter is another advanced transform tool that operates on a similar principle of pixel manipulation. It allows you to push, pull, bloat, and deflate pixels within an image with incredible precision. This is ideal for subtle retouching, such as smoothing skin, reshaping facial features, or creating dynamic, flowing effects.
Precision and Control: Options Bar and Preferences
The Options bar, located at the top of the Photoshop interface, plays a crucial role when using the Transform tool. It displays specific options relevant to the currently active tool or command. When Free Transform is active, the Options bar provides access to functions like:
- Maintain Aspect Ratio: This is the "link" icon. When enabled, it ensures that scaling is proportional. Clicking it toggles between proportional and non-proportional scaling.
- Warp Mode Icon: This button toggles the Free Transform into Warp mode.
- Warp Presets: A dropdown menu for selecting pre-defined warp styles.
- Numerical Input: Fields for entering precise values for Width, Height, X (horizontal position), Y (vertical position), and Rotation Angle.
- Reference Point Location: You can click on the grid to reposition the reference point, changing the center of transformation.
- Interpolation Method: When transforming, Photoshop needs to decide how to create new pixels or discard existing ones. The interpolation method affects the quality of the result. "Bicubic Automatic" is often a good choice as it intelligently selects the best method based on the transformation.
Preferences and Legacy Transform
Photoshop's preferences can significantly influence how tools behave. To access preferences, go to Edit (Win) > Preferences (Mac) or Photoshop (Mac) > Preferences (Win) > General. A key setting related to the Transform tool is the "Legacy Free Transform" option. Enabling this checkbox reverts the transform behavior to how it was before the CC 2019 update. Notably, in newer versions, dragging a corner handle scales proportionally by default, with the Shift key acting as a toggle for this behavior. In older versions, the Shift key was required to maintain aspect ratio. Understanding these preferences can be crucial for users accustomed to older workflows or for achieving specific results.
Tips for Optimal Transformation
To achieve the best results when using Photoshop's Transform tool, consider these tips:
- Smart Objects for Non-Destructive Editing: For critical work where you anticipate multiple transformations or want to preserve the original image quality, convert your layer to a Smart Object before transforming. Right-click the layer in the Layers Panel and choose "Convert to Smart Object." This allows for multiple transformations to be applied non-destructively, meaning you can always go back and re-edit them without losing quality. When you're done, you can rasterize the Smart Object if needed for further pixel-based editing. This is a fundamental technique to avoid the loss of clarity that can occur with repeated raster-based resizing.
- Maintain Quality with Vector Shapes: When transforming vector shapes or shape layers, their inherent scalability means quality is generally maintained. However, always be mindful of the interpolation method, especially if rasterizing later.
- Precise Movement: For fine adjustments to an object's position, use the Move Tool or the keyboard arrow keys. Holding Shift while using the arrow keys will move the object in larger increments.
- Alignment Aids: Enable "Snap to Grid" or "Snap to Guides" (View menu) for accurate alignment of transformed objects.
- Show Transform Controls: To always see the transformation handles, select the Move Tool and enable "Show Transform Controls" in the Options bar. This keeps the bounding box visible, even when other tools are active.
- Zooming While Transforming: Use Command+"+" (plus) to zoom in and Command+"-" (minus) to zoom out on a Mac, or Control+"+" and Control+"-" on Windows, while in Free Transform mode. This can be helpful when transformation handles are not fully visible due to the object extending beyond the canvas.
- Transforming Layers with Masks: By default, Photoshop transforms both the layer content and its associated layer mask proportionally. If you need to transform them independently, you'll need to un-link the mask from the layer in the Layers Panel first.
- Transform Again: The "Transform Again" command (Ctrl+Alt+T on Windows or Command+Option+T on Mac) is incredibly useful for repeating the last transformation applied to an object or layer. This is invaluable for creating patterns or applying consistent edits across multiple elements.
By mastering the various facets of Photoshop's Transform tool, from basic scaling and rotation to advanced warping and perspective adjustments, you unlock a powerful level of creative control. Understanding the interplay between these tools, preferences, and best practices like using Smart Objects will significantly enhance your ability to manipulate images with precision and achieve professional-looking results. The ability to seamlessly integrate elements, correct distortions, and reshape objects makes the Transform tool an indispensable asset in any digital artist's toolkit.