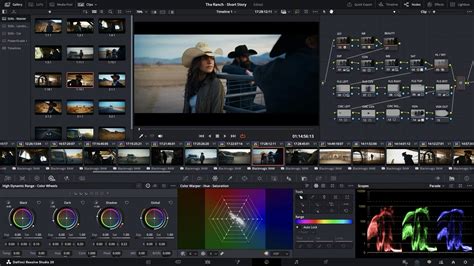
The demands of modern video editing, particularly with high-resolution footage and complex codecs, can push even powerful computers to their limits. When your system struggles to play back original media smoothly, DaVinci Resolve offers potent solutions to overcome these performance hurdles. Two primary methods are available: Proxy Files and Optimized Media. Both serve the crucial purpose of substituting your original, resource-intensive files with more manageable versions, thereby ensuring a fluid editing experience. This article delves into the intricacies of Optimized Media in DaVinci Resolve, explaining what it is, why it's beneficial, and how to effectively utilize it to streamline your workflow.
Understanding the Need for Performance Optimization
Many digital cameras, drones, and action cameras are designed to capture footage at high resolutions and frame rates. For instance, shooting in 4K at 60 or 120 frames per second (FPS), or 1080p at 120 or 240 FPS, results in a significant amount of data. Furthermore, codecs that offer high compression, such as H.265, or RAW media that requires debayering, are inherently taxing on processing power. When DaVinci Resolve attempts to play these files in real-time, the computer's processing load increases dramatically, often leading to stuttering playback. This situation is akin to trying to listen to a podcast with a broken internet connection - the audio cuts in and out, making it difficult to follow. Editing and reviewing media in such a state is problematic, hindering creativity and efficiency.
There may come a time when you’re editing on a sub-par laptop, or editing with RAW files, and you’ll see the frame rate counter in the top left corner of the viewer drop from green to red, letting you know that frames have been dropped - as Resolve cannot perform real-time playback. Of course, editing and reviewing media in this state is problematic, akin to recording sound without headphones.
Optimized Media vs. Proxy Files: A Comparative Look
DaVinci Resolve offers two distinct methods to substitute your original media for enhanced performance: Optimized Media and Proxy Files. While both aim to improve playback, they operate with slightly different philosophies and offer unique advantages.
Optimized Media: The Traditional Approach
The traditional method for improving playback performance in DaVinci Resolve has been to create Optimized Media. This process involves transcoding your original footage into a more editing-friendly codec and resolution. DaVinci Resolve's optimized media function is essentially its method of creating proxy files.
An advantage of Optimized Media is that you can optimize partial segments in the timeline instead of full clips. This granular control can be particularly useful when dealing with very long source files where only specific sections require intensive processing. Optimized Media sits between your original media and Proxy Files in terms of quality and performance. If your computer is not exceptionally weak, Resolve can pre-render optimized media in the background, ensuring smooth playback.
Proxy Files: Flexible and Versatile
Proxy Files offer a more flexible approach to media substitution. They are low-resolution files generated by transcoding your original footage. The most obvious change when using proxy files is that the Viewer looks blurrier, but the clips play without stuttering. This significant reduction in resolution drastically lowers the processing load, leading to much smoother playback.
You can use Proxy Files in Resolve in flexible ways:
- Generate it directly in Resolve or externally: This offers flexibility in your workflow.
- Link and relink different versions: You can easily switch between different proxy versions or revert to original media.
- Search and filter for it in the Media Bin: This helps in managing your proxies efficiently.
Proxy files are only suitable for the editing stage because you can't see the image clearly enough for critical grading. If you use proxy media for editing, it's essential to switch back to optimized or original media before color grading.
Generating and Managing Optimized Media
To leverage the benefits of Optimized Media, you need to configure its settings and initiate the generation process.
Project Settings for Optimized Media
Before generating optimized media, it's crucial to set the appropriate parameters within DaVinci Resolve's Project Settings.
- Click the gear icon (Project Settings) located at the bottom right of the screen. The shortcut for this is Shift + 9.
- Navigate to the "Master Settings" panel.
- Halfway down this panel, you'll find an "Optimized Media and Render Cache" area.
- Within this section, you can define the "Optimized Media Format." For optimal performance on Windows, the DNxHR codec generally works best. On Mac systems, ProRes is the recommended choice.
- If you have limited storage space, it's advisable to select a low-resolution, low-bitrate option such as DNxHR LB (for Windows) or ProRes 422 LT (for Mac).
- In the same panel, you can also find the "Working Folders" area, where you can designate where cache files and optimized media will be stored.
How to use Proxy Files to Edit SUPER FAST in DaVinci Resolve!
Generating Optimized Media
Once your project settings are configured, you can proceed to generate the optimized media for your clips.
- In the Media Pool, select all the source files you want to convert to optimized media. You can select individual clips or entire bins.
- Right-click on the selected clips.
- From the contextual menu, choose "Generate Optimized Media."
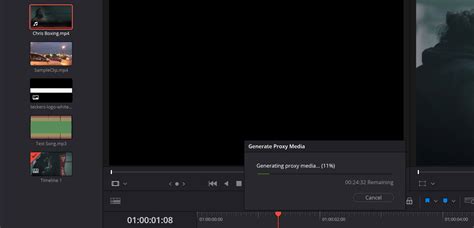
- DaVinci Resolve will then pop up a "Generate Optimized Media" window. This window displays the generation progress and an estimated remaining time.
The proxy files are now ready. This process is very handy for speeding up your workflow.
Using Optimized Media in Your Workflow
After the optimized media has been generated, DaVinci Resolve will automatically utilize it when "Prefer Proxies" or "Use Optimized Media If Available" is enabled.
To make Resolve use optimized media for smoother playback while editing:
- Click the top menu bar.
- Navigate to "Playback."
- Select "Proxy Handling."
- Choose "Prefer Proxies" or ensure "Use Optimized Media If Available" is checked. If you need smoother playback while editing, switch here to Prefer Proxies.
There are two essential factors to remember when using Resolve’s optimized media function. The first is that you will not have control over where the proxy files are generated. The optimized media will be produced in the same location as where the cache files are written. This means that you will need to manage your cache drive space accordingly. Secondly, remember to delete the optimized media when you no longer need it! You’re not creating incredibly compressed files that use next-to-no hard drive space; they still consume significant storage. Deleting them frees up valuable disk space.
After you’ve completed your edit, it isn’t necessary to uncheck the “Use Optimized Media If Available” setting for delivery; Resolve will automatically render the original file format.
The Role of Optimized Media in Fusion and Color Grading
Both Proxy Files and Optimized Media are valuable assets when working with effects processing in Fusion or on the Color Page. However, it's crucial to be aware of how these media types interact with these specific pages.
Fusion and Cache Management
When you enable or disable optimized media or proxy files, Fusion’s RAM cache does not automatically refresh. This means that at the moment you need to manually clear the cache and rerender the current frame to see the changes reflected accurately. This step is vital to ensure that the Fusion effects are being processed with the correct media version.
Fusion also provides its own proxy file method when you are using Fusion loader nodes. This feature is inherited from Fusion Studio and is also available in Resolve. These Fusion-specific proxy files are not managed by DaVinci Resolve itself but are manually provided within the loader nodes. This offers an additional layer of control for advanced Fusion workflows.
Color Grading Considerations
As mentioned earlier, proxy media, due to its significantly reduced resolution, is not suitable for color grading. You cannot accurately assess the nuances of color and detail when viewing a blurry image. Therefore, if you have been editing with proxy media, it is imperative to switch back to using your original media or optimized media before you begin the color grading process. This ensures that you are grading on the highest quality source material available.
You could change the proxy mode to half or one-quarter resolution for smoother playback, or alternatively, if you’re unable to obtain real-time playback due to an extensive color grade and effects processing, you can hit the bypass grade button that will remove all grade features.
Exporting with Optimized Media
By default, when you export a timeline that contains proxy media or optimized media, DaVinci Resolve will intelligently switch back to the original high-resolution files and export those. This ensures that your final output is of the highest possible quality, retaining all the detail from your original footage.
However, if for a specific reason you only want to export the proxy version of your timeline (perhaps for a quick preview or a low-bandwidth test), you can do so.
- Navigate to the Deliver page.
- Under the "Video" tab, click on "Advanced Settings."
- Check the box labeled "Use Proxy Media."
Troubleshooting Proxy and Optimized Media Generation Issues
Occasionally, you might encounter an error message indicating that proxy media or optimized media could not be generated. DaVinci Resolve typically won't provide a specific reason for the failure. The most common culprits are:
- Proxy Resolution Issues: If you encounter an error, the first step is to try changing the proxy resolution setting in Project Settings and then attempt generation again. Sometimes, the selected resolution might be incompatible with the source media or system resources.
- DaVinci Resolve Version Issues: While less common, an outdated version of DaVinci Resolve might have compatibility issues with certain codecs or media types. Ensuring you are running the latest stable version of Resolve can often resolve such problems.
- Storage Space or Permissions: Ensure that the drive designated for cache files and optimized media has sufficient free space and that DaVinci Resolve has the necessary read/write permissions for that location.
Conclusion: Optimizing Your Workflow for Success
Optimized Media and Proxy Files are indispensable tools in DaVinci Resolve for managing demanding footage and ensuring a smooth, efficient editing experience. By understanding the differences between these two methods and knowing how to configure and utilize them effectively, editors can overcome performance bottlenecks, even on less powerful hardware. Whether you're working with high-resolution cameras, drones, or heavily compressed codecs, these features empower you to focus on the creative aspects of your project rather than wrestling with playback issues. Remember to switch back to your original or optimized media for critical tasks like color grading and always manage your generated media files to maintain optimal storage space. This video is part of a longer series about performance in DaVinci Resolve. By clicking “Accept All”, you consent to the use of ALL the cookies. However, you may visit "Cookie Settings" to provide a controlled consent. If your computer is powerful enough, you may not need proxy media. One quick ad before we finish. Check out our TourBox. It gives you great control for editing and color grading at a more affordable price. It's more than a simple hotkey mapper. For example, our HoverAdjust feature for DaVinci Resolve lets you use TourBox's physical knob to control color wheels, curves, Color Warper, and other grading tools. Looking for more information on using DaVinci Resolve? Would you like to understand how to optimize and speed up DaVinci Resolve so that you can work easily on very heavy projects and have smooth playback even on older computers? If the answer is yes, you're in the right place!The secret I'm going to reveal to you will be of vital importance when you find yourself working, for whatever reason, on a machine that is not exactly recent and whose performance is not up to par by today's standards.Ready to get started?Great!