Achieving pristine audio quality is paramount for any content creator, whether you're producing podcasts, voiceovers, music, or video. Unwanted background noise, hum, clicks, and reverb can significantly detract from the listener's experience, making your content sound unprofessional and difficult to consume. Fortunately, Adobe Audition offers a powerful suite of tools designed to tackle these audio imperfections. This guide will delve into the various noise reduction and restoration effects available, providing a detailed understanding of their functionalities and how to leverage them effectively to produce high-quality audio content.
Identifying and Reducing Background Noise
Background noise, often referred to as broadband noise, can manifest as a persistent hiss, the hum of equipment, or ambient sounds like air conditioning or traffic. Adobe Audition provides several robust tools to combat this.
The Noise Reduction Effect: A Targeted Approach
The Noise Reduction/Restoration > Noise Reduction effect is a cornerstone for addressing background and broadband noise with minimal impact on the signal quality. Its effectiveness hinges on accurately capturing a "noise print" - a sample of the specific noise you wish to remove.
To begin, you first need to capture a noise print. This is achieved by selecting a portion of your audio that contains only the background noise you want to eliminate. Once this range is selected, you initiate the "Capture Noise Print" process. It's crucial that this selected range is sufficiently long; if it's too short, the "Capture Noise Print" option will be disabled. In such cases, you can either reduce the FFT Size or extend the selected noise range. If a longer range isn't readily available, you can duplicate the selected range by copying and pasting it to create a more substantial sample for the effect to analyze.
The Noise Reduction effect then uses this captured noise print to intelligently reduce similar noise throughout your audio. The blue control curve within the effect's interface is instrumental in fine-tuning the noise reduction across different frequency ranges. High and Low indicators on this graph show the highest and lowest amplitudes of detected noise at each frequency, respectively. These can overlap, and for more granular control over lower frequencies, selecting the "Logarithmic" option can be beneficial.
Several parameters within the Noise Reduction effect allow for precise adjustments:
- Noise Reduction (dB): This controls the percentage of noise reduction applied to the output signal, determining the amplitude reduction of the detected noise. Values typically ranging from 6 to 30 dB yield good results. The proper amount of noise reduction is a balancing act, depending on the type of background noise and the acceptable loss in quality for the remaining signal.
- Spectral Decay Rate: This setting specifies the percentage of frequencies processed when audio falls below the noise floor. Fine-tuning this allows for greater noise reduction with fewer artifacts. Effective values often fall between 40% and 75%.
- Smoothing: This parameter takes into account the variance of the noise signal within each frequency band. Bands that exhibit significant variation during analysis (like white noise) are smoothed differently than constant bands (such as a 60-Hz hum).
- Precision Factor: This control influences changes in amplitude. Values between 5 and 10 are generally considered best, with odd numbers often ideal for symmetrical processing. Using values of 3 or less can lead to the Fast Fourier Transform (FFT) being performed in large blocks, potentially causing audible drops or spikes in volume between these blocks.
- Transition Width: This defines the amplitude range between the noise and desirable audio. A width of zero acts like a sharp noise gate, where audio just above the threshold is retained, and audio below is silenced. Alternatively, you can set a range over which the audio fades to silence based on the input level.
- FFT Size: This is a critical parameter that determines how many individual frequency bands are analyzed. A higher FFT Size leads to more bands being analyzed, allowing noise to be removed with finer frequency detail. Good settings typically range from 4096 to 8192. The FFT Size dictates a trade-off between frequency and time accuracy. While higher FFT sizes can very accurately remove noise frequencies, they might also introduce undesirable artifacts like swooshing or reverberation.
- Noise Print Snapshots: This setting determines the number of noise snapshots included in the captured profile. An optimal value of 4000 is often recommended for producing accurate data. Very small values can significantly impact the quality of noise reduction, and a higher number of snapshots might lead to a 100% noise reduction level cutting out more original signal along with the noise.
For optimal results with the Noise Reduction effect, it's advisable to apply it to audio that has no DC offset. A DC offset can cause this effect to introduce clicks in quiet passages.
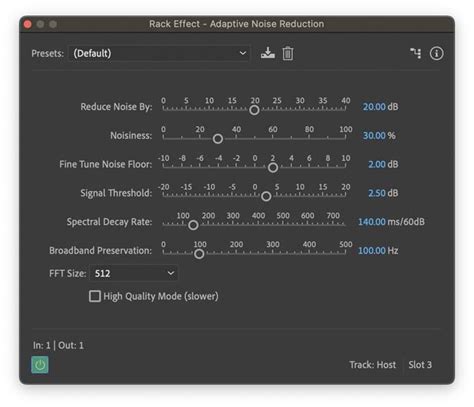
Adaptive Noise Reduction: Real-Time Background Noise Removal
The Noise Reduction/Restoration > Adaptive Noise Reduction effect offers a dynamic approach to removing variable broadband noise, including background sounds, rumble, and wind. Its key advantage is its real-time operation, allowing it to be combined with other effects in the Effects Rack and applied directly within the Multitrack Editor. This contrasts with the standard Noise Reduction effect, which is primarily an offline process in the Waveform Editor.

For the best outcomes with Adaptive Noise Reduction, it's recommended to apply it to audio selections that begin with a segment of noise followed by the desirable audio. This effect also requires significant processing power.
Key parameters for Adaptive Noise Reduction include:
- Noise Reduction Level: Similar to the standard Noise Reduction effect, this parameter determines the level of noise reduction, with values between 6 and 30 dB being effective.
- Decay Rate: This setting dictates how quickly noise processing drops by 60 decibels. Fine-tuning this can achieve greater noise reduction with fewer artifacts.
- Bandwidth: This parameter retains desirable audio within specified frequency bands between identified artifacts. For instance, a setting of 100 Hz ensures that no audio is removed within 100 Hz above or below the detected artifacts.
- FFT Size: This determines the number of individual frequency bands analyzed, directly impacting the quality of the noise removal. Higher settings increase frequency resolution for more detailed noise removal, while lower settings improve time resolution. Good settings often fall between 4096 and 8192.
The Sound Remover: Eliminating Specific Audio Sources
Beyond general background noise, the Sound Remover effect (found under Effects > Noise Reduction/Restoration) is designed to remove specific, unwanted audio sources from a recording. This could be anything from a persistent cough to a distinct mechanical sound.
The Sound Remover works by learning a "sound model" of the unwanted audio. You select an area of the waveform that contains only the sound you want to remove and then initiate the "Learn Sound Model" process. The complexity of this model can be adjusted, with higher complexity requiring more refinement passes but yielding more accurate results. You can also save these learned sound models for later use.
Important parameters for the Sound Remover include:
- Complexity: This indicates the complexity of the sound model. A more complex or mixed sound benefits from a higher complexity setting, though this will increase processing time.
- Refinement Passes: This defines the number of passes the effect makes to remove the sound patterns identified in the sound model. Increasing this value makes the removal algorithm more aggressive.
- Strength: This parameter can be modified to control the aggressiveness of the sound removal.
- Speech: This option ensures that when the audio includes speech, the effect is careful not to remove audio patterns that closely resemble spoken words.
- FFT Size: Similar to the Noise Reduction effect, this determines the number of individual frequency bands analyzed, impacting the detail of noise removal. Settings between 4096 and 8192 are generally effective.
Tackling Clicks, Pops, and Hiss
Transient noises like microphone pops, clicks from vinyl records, and general hiss are common audio annoyances. Adobe Audition offers specialized tools to address these with precision.
Automatic Click Remover: Quick Fixes for Transient Noise
The Noise Reduction/Restoration > Automatic Click Remover effect is designed for quickly removing crackle and static from sources like vinyl recordings. It shares many options with the DeClicker effect, allowing you to specify which detected clicks should be addressed.
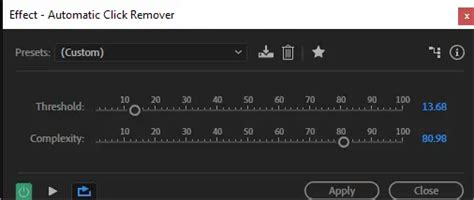
Since the Automatic Click Remover operates in real time, it can be integrated into the Effects Rack and used in the Multitrack Editor. Key parameters include:
- Sensitivity: This setting determines how sensitive the effect is to noise. Lower settings will detect more clicks and pops but might also flag audio you wish to keep.
- Complexity: This parameter indicates the complexity of the noise. Higher settings apply more processing but can potentially degrade audio quality.
- Interval: This specifies the number of milliseconds in each processed interval, influencing the overall processing speed.
- FFT Size: This determines the FFT size used for click repair. While "Auto" is often sufficient, you can manually set values from 8 to 512 for specific scenarios.
- Oversamples: This parameter includes surrounding samples in the detection of clicks. If corrected clicks remain audible, increasing this value (starting with 8 and potentially going up to 30 or 40) can help.
- Run Size: This specifies the number of samples between separate clicks, with a good starting point around 25.
- Prevent Normal Peaks: This option helps prevent regular waveform peaks from being mistakenly identified as clicks.
- Process All Channels Equally: This ensures that stereo or surround balance is preserved.
- Remove Large Events: This option removes large unwanted events that might not be detected as clicks, such as significant pops from vinyl scratches.
- Smooth Single Sample Errors: This smooths out one-sample errors, often reducing background crackle.
- Multi-Pass: This performs up to 32 passes to catch clicks that are too close together to be effectively repaired in a single pass.
Click/Pop Eliminator: Precision for Transient Artifacts
The Click/Pop Eliminator effect is another powerful tool for removing microphone pops, clicks, light hiss, and crackles, which are frequently encountered in older vinyl recordings and on-location audio capture.

This effect utilizes detection and correction settings to identify and resolve these transient artifacts. The core of its functionality lies in its ability to define threshold levels for amplitude. Adobe Audition uses values on a curve to process louder and softer audio differently.
Key settings within the Click/Pop Eliminator include:
- Threshold: This determines the level of clicks to detect. Lower values (e.g., 10) detect subtle clicks, while higher values (e.g., 20) target louder ones.
- Number of Clicks to Fix: Entering high values fixes very few clicks, preserving more original audio. Lower values (e.g., 20 or 40) are suitable for audio with a moderate number of clicks.
- Maximum, Average, Minimum Thresholds: These settings define unique detection and rejection thresholds for different amplitude levels of audio. For instance, the Maximum Threshold should align with the maximum RMS amplitude of your audio. Setting these thresholds correctly before adjusting "Detect" and "Reject" values is crucial.
- Rejects: This parameter filters out potential clicks identified by the detection algorithm. In certain audio types (like trumpets or female vocals), normal peaks might be misidentified as clicks. Adjusting this setting can prevent those peaks from being corrected, which could otherwise lead to muffled sound.
- Sensitivity: This determines the sensitivity to clicks and pops, with recommended values ranging from 6 to 60. Starting points can vary based on audio amplitude.
- FFT Size: As with other effects, this parameter influences the accuracy of frequency analysis. The "Auto" setting is generally effective, but manual adjustments can be made.
- Pop Oversamples: This setting dictates how many surrounding samples are included when a click is corrected. Increasing this value can help if corrected clicks are still faintly audible.
- Run Size: This specifies the number of samples between separate clicks. A value that is too large can lead to more noticeable corrections as larger blocks of data are processed.
- Prevent Normal Waveform Peaks: This option aims to prevent genuine waveform peaks from being flagged as clicks.
- Remove Large Events: This option is for removing very large unwanted events, similar to the Automatic Click Remover.
- Smooth Single Sample Errors: This helps smooth out minor errors, reducing background crackle.
- Multi-Pass: Similar to the Automatic Click Remover, this performs multiple passes to address closely spaced clicks.
Adobe Audition - How To Remove POPS and CLICKS In Audio
Addressing Hum and Reverb
Specific types of noise, like electrical hum, and unwanted reverberation, also have dedicated tools within Adobe Audition.
DeHummer: Eliminating Electrical Hum
The Noise Reduction/Restoration > DeHummer effect is specifically designed to remove narrow frequency bands and their associated harmonics. The most common application for this effect is to eliminate the persistent hum often produced by lighting and electronic equipment.
The primary parameters for the DeHummer are:
- Hum Frequency: This sets the fundamental frequency of the hum you wish to remove.
- Hum Width: This determines the width of the fundamental frequency and its harmonics that will be affected.
DeReverb: Controlling Unwanted Echoes
Reverberation, while sometimes desirable for adding depth and space, can become problematic when it obscures dialogue or other critical audio elements. The Noise Reduction/Restoration > DeReverb effect estimates the reverberation profile of your audio and allows you to adjust its amount.
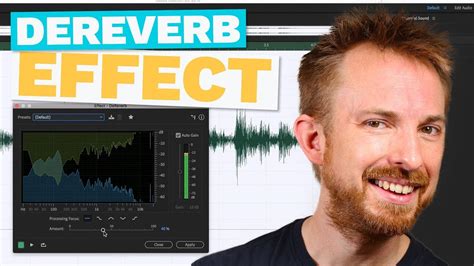
Applying the DeReverb effect can sometimes lead to lower output levels compared to the original audio due to a reduction in dynamic range. The Output Gain serves as a make-up gain, enabling you to adjust the output signal level to compensate. You can manually adjust this gain using a slider.
The DeReverb effect also offers focus options for targeting specific frequency ranges:
- All frequency focus: Addresses reverberation across the entire frequency spectrum.
- Hi frequency focus: Primarily targets reverberation in the higher frequencies.
- Hi/low frequency focus: Addresses reverberation in both high and low frequencies.
- Mid frequency focus: Concentrates on reverberation in the mid-frequency range.
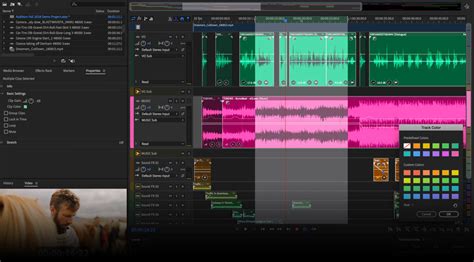
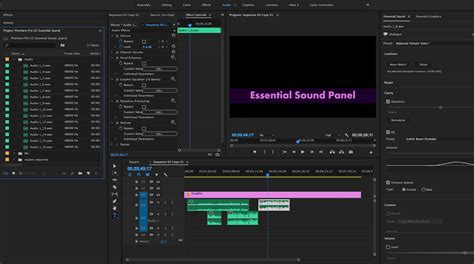
Advanced Audio Editing in Adobe Premiere Pro and Essential Sound Panel
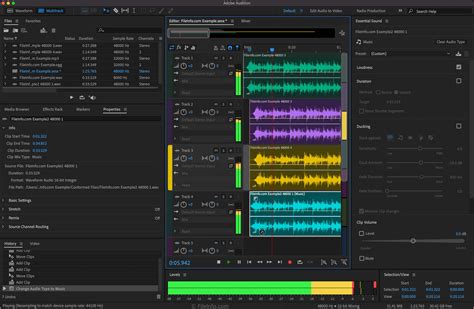
While Adobe Audition is a dedicated audio powerhouse, its integration with Adobe Premiere Pro offers streamlined workflows for audio restoration within video projects. The Essential Sound panel in Premiere Pro provides a user-friendly interface with essential tools for adjusting and enhancing challenging audio.
Within Premiere Pro, you can:
- Reduce background noise and reverb: Access noise reduction and de-reverb tools directly within the editing timeline.
- Adjust audio levels: Easily modify the volume of audio tracks or ensure consistent levels across multiple clips.
- Create presets: Save custom audio processing settings as presets for quick application to other clips.
- Use Auto Ducking: This feature intelligently lowers the volume of background music or sound effects when dialogue is present, ensuring clarity.
- Access Adobe Stock Audio: Browse and preview a vast library of royalty-free audio tracks directly within the application.
The advanced controls available in the Premiere Pro Audio workspace provide granular control over noise reduction. The Essential Sound panel, while simplifying many tasks, offers powerful features to bolster your audio editing skills, making it easier to manage challenging audio situations and create polished, professional-sounding content.
tags: #adobe #remove #background #music