Embarking on a creative journey with Procreate often leads artists to explore ways to streamline their workflow and inject unique elements into their artwork. One such powerful tool that artists frequently seek to master is the creation of custom stamp brushes. While some might refer to these as "assets," a term that can feel a bit too corporate for a hobby driven by joy, their value in artistic creation is undeniable. Stamp brushes offer a versatile way to add detail, texture, and flair to your digital art, whether for preliminary sketches or as integral components of a final piece. This tutorial will guide you through the process of building your own stamp brushes in Procreate, unlocking a new level of creative control and efficiency.
Understanding the Concept of Stamp Brushes
At its core, a stamp brush in Procreate is a brush that, instead of drawing a continuous line, places a single, pre-defined image or shape with each tap of the stylus. This is fundamentally different from brushes designed for line work or texture. Think of it like a digital rubber stamp. You create the image you want to stamp, and then you configure Procreate to use that image as the "stamp" for a particular brush. This allows for rapid application of complex elements, whether it's a detailed botanical illustration, a playful sprinkle pattern, or a recurring motif in your artwork. The user-provided examples highlight this versatility, from a luna moth stamp that forms the basis of a larger illustration to botanical stamps used in a negative painting technique, and even fun shapes stamped directly onto digital mug designs.
The Building Blocks: Creating Your Stamp Image
The first crucial step in making a stamp brush is to design the image you want to use as your stamp. This can be anything from a simple geometric shape to an intricate illustration. For this tutorial, we will focus on creating a basic shape that will serve as our initial stamp.
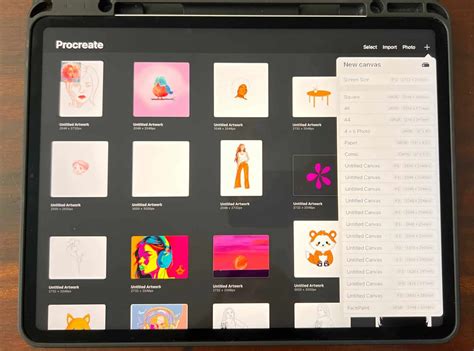
Canvas Setup: Begin by creating a new canvas in Procreate. A square canvas is generally recommended for stamp brushes to ensure consistent scaling and rotation. A size of 10 or 12 inches at 300 DPI is a good starting point, providing ample resolution for detailed stamps.
Drawing Your Shape: On this new canvas, draw the shape you intend to use as your stamp. This could be a hand-drawn element, a digitally created graphic, or even a scanned image. The user shared an example of a dragonfly stamp, perfect for a beginner-friendly lesson. Another example showcased a luna moth stamp, which the artist then used as a base for their own drawing. The key is to create a clear, distinct image.
Copying the Shape: Once your shape is ready, you need to copy it. A convenient method in Procreate is to use the three-finger-swipe down gesture. This brings up a menu where you can select "Copy All." This action copies the entire content of your canvas, which in this case, is your stamp image.
Configuring Your Brush to Be a Stamp
With your stamp image copied, the next step is to create a new brush and configure its settings to function as a stamp.
Accessing the Brush Studio: Navigate to the Brush Library in Procreate. Tap the "+" icon in the top right corner to create a new brush. This will open the Brush Studio, where all brush settings are managed.
Importing the Shape: In the Brush Studio, go to the "Shape" tab. Here, you'll find the "Shape Editor." Tap "Import" and then select "Paste." Since you previously copied your shape using the "Copy All" gesture, it will now be pasted into the Shape Editor, becoming the fundamental image for your brush.
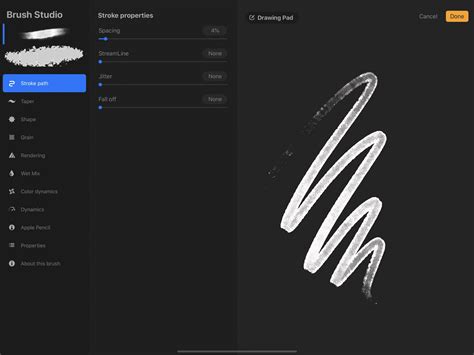
Adjusting Stroke Path Settings: For a stamp brush, the "Spacing" setting in the "Stroke Path" tab is critical. Increase the Spacing significantly. If the spacing is too low, Procreate might try to render multiple instances of the stamp in close proximity, creating a texture rather than a distinct stamp. A high spacing value ensures that each tap of the stylus produces only one stamp.
Refining Your Stamp Brush: Advanced Settings
While the basic shape and stroke path adjustments create a functional stamp brush, Procreate offers a wealth of settings to further customize its behavior and appearance. Experimenting with these settings is key to unlocking the full potential of your custom brushes.
Use Stamp Preview: Within the "Properties" tab, you'll find an option to "Use Stamp Preview." Enabling this setting is highly recommended for stamp brushes. It ensures that when you browse your brush library, you see a single, clear preview of your stamp shape, rather than a repeating pattern that might be generated by other brush types. This makes it easier to identify and select your custom stamps.
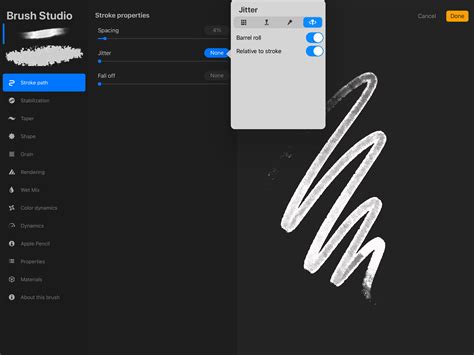
Jitter and Scatter for Dynamic Effects: To add an element of randomness and visual interest, you can delve into settings like "Jitter" and "Scatter."
- Stroke Path Jitter: In the "Stroke Path" tab, increasing the "Jitter" can make the stamps deviate slightly from a perfect line. This can be useful for creating a more organic or scattered feel, as seen in the example of sprinkles on whipped cream.
- Shape Scatter: Within the "Shape" tab, you can increase the "Scatter" value. This causes each stamp to rotate a bit randomly as it's placed, adding variation and preventing a repetitive look.
- Shape Count: Also in the "Shape" tab, the "Count" setting determines how many instances of the shape are used in the brush. Increasing this can sometimes lead to more complex patterns or textures when combined with other settings.
Size Dynamics for Variable Sizing: The "Dynamics" tab allows you to control how the size of the stamp varies. By adjusting the "Jitter Size," you can make each stamp appear at a slightly different size. This is particularly effective for creating natural-looking clusters of objects or for simulating effects like random dot sizes in a dot brush. The user's mention of a "dot brush with random dot sizes" perfectly illustrates this application.
Color Dynamics for Varied Hues: For even more creative control, explore the "Color Dynamics" tab. Adjusting the "Stamp Color Jitter" can introduce variations in hue, saturation, or brightness to your stamps. This is excellent for creating painterly effects, adding subtle color shifts to patterns, or achieving the kind of varied color effects seen in the user's examples.
Practical Applications and Creative Exploration
The true power of stamp brushes lies in their diverse applications across various artistic styles and projects. As demonstrated by the user's examples, these brushes can be integrated into your workflow in numerous ways:
Sketching and Ideation: Stamp brushes can be invaluable for quickly laying down foundational elements in a sketch. For instance, a flower-layout stamp or bird stamps can rapidly populate a scene, allowing the artist to focus on composition and overall form before refining individual elements. The user mentions turning off the stamp layer in their sketches so it doesn't appear in the final illustration, a clever way to leverage stamps for efficiency without compromising originality.
Adding Detail to Illustrations: Beyond sketches, stamps can be used to add intricate details to final artwork. The luna moth example shows how a stamp can serve as a starting point, with the artist drawing the rest of the illustration around it, blending the stamped element seamlessly with their original art.
Textural and Pattern Elements: Stamp brushes are excellent for creating unique textures and patterns. The botanical stamps used in a negative painting watercolor class exemplify how stamps can be used as a base for further artistic manipulation. Similarly, the "sprinkles on the whipped cream" are a clear indication of how scattered, jittered, and colorful stamp brushes can create dynamic visual elements.
Design Elements for Products: Stamp brushes can also be used for more applied design work. The example of creating "cute, fun stamp shapes to stamp right onto the mugs" demonstrates their utility in designing merchandise or digital assets for products. The user even mentions assembling various mug shapes with different toppings and handles, highlighting the modularity that stamp brushes can offer.
Newsletter Freebies and Community Building: Many artists, like the user, offer custom stamp brushes as freebies to their subscribers. The mention of "luna moth stamps are a newsletter freebie" and "mug stamps and the sprinkle stamp brush" from "way back to the 2022 newsletter freebies" showcases this practice. These freebies not only provide value to the audience but also serve as a great way to build a community and showcase the artist's skills.
Continued Learning and Practice
Mastering the art of brush making in Procreate, including stamp brushes, is an ongoing process that rewards patience and experimentation. Spending time in the Brush Studio, tweaking settings, and observing the results will build your confidence and intuition. As the user wisely advises, "Keep playing, experimenting, and practicing! When you spend enough time doing this, you will more easily remember what the settings do so you can make brushes more confidently!"
For those seeking more structured guidance and a supportive environment, consider exploring membership options that offer dedicated brush-making classes, Zoom calls, and private communities. These resources can provide invaluable insights and personalized help, accelerating your learning curve and helping you on your creative journey with Procreate, no matter where you are in your artistic development. The journey of creating custom brushes is as rewarding as the brushes themselves, empowering you to infuse your digital art with your unique style and vision.