Photoshop offers a versatile toolkit for graphic designers and digital artists, and creating precise or stylized arrows is a common requirement. Whether you're directing attention to a specific element in an image, creating infographics, or designing complex artwork, understanding the various methods to draw an arrow in Photoshop is crucial. This tutorial delves into multiple techniques, from leveraging built-in shapes to utilizing the Line tool and even custom brushes, providing a foundation for creating an extensive array of arrow designs. The key takeaway is that there is never only one way to complete a task in Photoshop, and exploring these methods will unlock a world of possibilities for custom arrow creation.
The Power of the Shapes Panel: Pre-Designed Arrows
One of the most straightforward ways to incorporate an arrow into your design is by utilizing Photoshop's pre-defined custom shapes. This method is particularly beneficial for beginners or when speed is of the essence.
Accessing and Utilizing Arrow Shapes
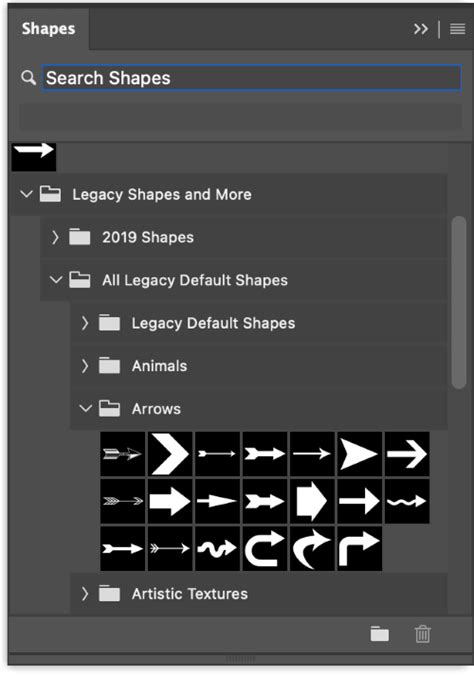
To begin, locate the Shapes panel by navigating to the "Window" menu in the top toolbar and selecting "Shapes." If you don't see it immediately, click on the hamburger menu (an icon that looks like four horizontal lines) in the top-right corner of the Shapes panel and choose the "Legacy Shapes and More" option. This action will load a comprehensive set of older shape sets, including the "Arrows" folder.
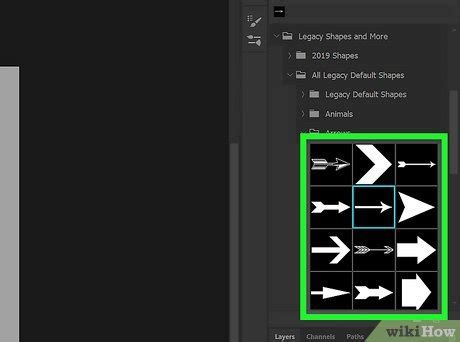
Once you've accessed the "All Legacy Default Shapes" folder, you'll discover a set of approximately 20 custom arrow shapes. Select the arrow shape that best suits your needs by clicking on it. Then, simply click and drag on your Photoshop project canvas to add the chosen arrow to your design.
Customizing Shape Tool Arrows
When using the Custom Shape tool, you have immediate control over the arrow's appearance. After selecting an arrow shape from the panel and clicking on your canvas to place it, focus on the Options bar at the top of the screen. Here, you'll find "Fill" and "Stroke" options. The "Fill" option allows you to select the main color for the interior of your arrow, while the "Stroke" option lets you define the color and thickness of its outline.
As you click and drag your mouse on the canvas, you'll see a live preview of the arrow being created. Holding down the "Shift" key while dragging is highly recommended, as it ensures the arrow maintains its proportional size and shape, preventing unwanted distortions.
Adjusting Orientation and Size
Often, the default orientation of a custom shape arrow might not align with your intended direction. To rectify this, you can use Photoshop's Free Transform command. Select the arrow layer, then go to the "Edit" menu and choose "Free Transform" (or use the keyboard shortcut Ctrl+T on Windows or Command+T on Mac). A bounding box will appear around your arrow. Hovering over the corner handles will transform your cursor into a curved line with two arrows, indicating rotation. Click and drag to spin the arrow to your desired direction. You can also resize the arrow by dragging the corner handles, again holding "Shift" to maintain proportions. Press "Enter" to confirm the transformations and apply the arrow to your image as a new layer.
The Versatile Line Tool: Building Arrows from Scratch
The Line Tool, while seemingly simple, offers a powerful and flexible approach to creating arrows, especially when you need precise control over dimensions and arrowheads.
Setting Up the Line Tool for Arrows
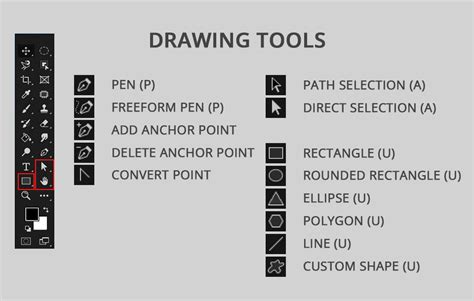
To access the Line Tool, click and hold on the Rectangle tool in the toolbar until a menu pops up, then select the Line Tool. Alternatively, you can repeatedly press "Shift + V" on your keyboard until the Line Tool is active.
Once the Line Tool is selected, focus on the Options bar at the top. Here, you'll find settings for "Stroke," "Weight," and importantly, "Arrowheads." To create a one-directional arrow, you'll need to check the "End" checkbox within the "Arrowheads" section. This section allows you to define the dimensions of your arrowhead, including its width and length. You'll need to guesstimate how large an arrowhead you need and enter these values in the respective input boxes.
Drawing and Refining Lines with Arrowheads
With your arrowhead settings configured, click on the workspace where you want the start of your arrow to be. Hold down the mouse button and drag your cursor to where you want the arrow to point. As you drag, an outline of the line with the arrowhead will be created. The "Stroke" setting determines the thickness of the line itself. If you don't require a visible outline, you can set the stroke to "0px" and transparent.
The "Mode" option in the Options bar determines how the line interacts with existing layers. For most arrow creation, "Shape" mode is recommended, as it creates a vector shape layer that is easily editable. Ensure your "Fill" is set to transparent if you only want a stroke.
Advanced Line Tool Customization: Concavity and Path Options
The Line Tool offers further customization through its "Path Options" dialogue box, accessible by clicking the Cog icon on the right-hand side of the Options bar. This is where you can enter a value in the box beside "Concavity." While not directly related to standard arrowheads, concavity can be used to create unique, inwardly curved arrow shapes.
For more complex line segments that form multi-angled arrows, you can add multiple connected line segments with the Line tool. Each segment can be adjusted independently, allowing for intricate arrow designs.
How to make an arrow and curved arrow in Photoshop using Line Tool
The Brush Tool: Freehand and Stylized Arrows
For a more organic or hand-drawn feel, the Brush Tool provides a direct and intuitive method for creating arrows. This is where drawing tablets truly shine, offering greater control over line weight and texture.
Selecting Brushes for Arrow Creation
Select the Brush Tool (B) from your toolbar. The key to creating effective arrows with the Brush Tool lies in selecting the appropriate brush preset. Photoshop offers a vast library of brushes, ranging from hard-edged, precise lines to soft, textured, or even artistic brushes. Explore the brush presets to find one that matches the desired aesthetic for your arrow. You can adjust the size of the brush using the slider in the Options bar or by using the bracket keys ([ and ]).
Drawing Your Arrow
Once you've selected your brush and adjusted its size, position your cursor on the canvas where you want the arrow to begin. Click and hold the mouse button down to start drawing. Drag the cursor across the screen to draw the main line of your arrow. For a straighter line, you can hold down the "Shift" key while drawing, which will constrain the brush strokes to perfectly horizontal, vertical, or 45-degree angles.
Adding Arrowheads with Brushes
Creating a distinct arrowhead with the Brush Tool might require a bit more finesse. You can either:
- Draw it Freehand: Carefully draw the arrowhead shape at the end of your line.
- Use a Separate Brush: Select a different brush specifically designed for creating arrowheads or sharp points and draw it as a separate stroke.
- Combine with Other Tools: Draw the line with the Brush Tool and then use the Custom Shape tool or Line tool to add a pre-defined arrowhead.
Leveraging Hand-Drawn Arrow Brush Packs
For an extensive collection of unique arrow styles, consider exploring pre-made brush packs. Websites like Envato Elements offer millions of design resources, including numerous hand-drawn arrow brush sets. These packs provide a wide variety of shapes, styles, and textures, saving you time and offering creative inspiration. Downloading these brushes from their owners' pages often provides additional information and usage tips.
Adding Photoshop Arrow Feathers: Enhancing Detail
Once you have a basic arrow shape, you can significantly enhance its visual appeal by adding "feathers" to the tail end. This technique adds a touch of realism or a stylized flourish.
Creating Basic Feathers
Feathers can be created using simple, thin rectangles positioned at the other end of the arrow, typically at a 45-degree angle.
- Create Feather Shapes: Use the Line Tool or Rectangle Tool to draw thin rectangular shapes.
- Position and Rotate: Place these rectangles at the tail of your arrow. Use the Free Transform tool (Ctrl+T or Cmd+T) to rotate them to a 45-degree angle.
- Mirroring: For symmetrical feathers, create one feather, duplicate it, and then use the "Edit" > "Transform" > "Flip Horizontal" command to mirror it across the arrow's axis.
The smart guides in Photoshop will prove incredibly useful for alignment, showing vertical and horizontal alignment as you move the feather shapes.
Locking Layers for Easier Feather Placement
To make the process of adding feathers smoother, it's advisable to lock the main arrow shape. Select the main arrow layer in the Layers panel, then go to the "Layer" menu and select "Lock Layers," choosing "All." This prevents accidental modifications to your primary arrow while you focus on adding details.
Exploring Diverse Feather Styles
The concept of "feathers" can be interpreted broadly. You can create wavy ones, curved ones, or even attempt to replicate the look of actual bird feathers. The smart guides will continue to assist in aligning these more complex shapes.
Advanced Techniques: Brushes, Patterns, and Styles
With a well-crafted arrow, the possibilities extend far beyond simple drawing. You can transform your arrow into reusable assets like custom shapes, brushes, and patterns, or apply various styles for unique effects.
Defining Custom Shapes, Brushes, and Patterns
If you've created an arrow using vector tools (like the Custom Shape tool or Line tool set to "Shape" mode), you can define it as a custom shape. This allows you to quickly recall and reuse your arrow design from the Custom Shape tool's preset menu.
To create an arrow brush:
- Ensure your arrow has a transparent background. If you are using the "Define Brush Preset" command and have a background layer, delete it to avoid including the background in your brush.
- Go to "Edit" > "Define Brush Preset."
- Name your brush and click "OK." Your arrow is now a reusable brush.
To create an arrow pattern:
- Similarly, ensure your arrow has a transparent background.
- Go to "Edit" > "Define Pattern."
- Name your pattern and click "OK." You can then use this pattern to fill shapes or create seamless backgrounds.
Applying Styles and Effects
Photoshop's layer styles offer a quick and non-destructive way to add sophisticated effects to your arrows. You can apply styles like:
- Metallic Finish: Using gradients and bevel effects to create a shiny, metallic look.
- Rusty Look: Employing textures, noise, and color overlays to simulate rust.
- Blur and Smudge: Adding depth or a sense of motion.
- Colorization/Discolorization: Modifying the arrow's hue, saturation, or applying monochromatic effects.
Using Arrows as Displacement Maps
For advanced users, a saved arrow artwork can be used as a displacement map. By going to "Filter" > "Distort" > "Displace," you can use the grayscale information of your arrow to distort other layers, creating interesting textural effects.
Combining and Transforming Arrows Infinitely
The true power of Photoshop lies in its ability to combine and manipulate elements. Once you have created one or more arrow shapes, you can:
- Combine Shapes: Duplicate and layer your arrows, transforming and rotating them in countless ways to create complex arrow artworks, arrows with multiple arrowheads, or intricate directional graphics.
- Apply Effects and Plugins: Extend the creative possibilities by applying additional effects and third-party plugin effects to your combined arrow compositions, leading to abstract and unique visual outcomes.
- Create Arrow Artworks: By repeating the process of creating new arrows, adding more, and transforming them throughout the image, you can generate sophisticated abstract artwork where arrows are the primary visual element.
The journey of creating an arrow in Photoshop is a testament to the software's flexibility. From simple shapes to intricate designs, each method offers a unique approach, empowering you to communicate direction and emphasis with precision and style. Whether you're a beginner or an experienced user, mastering these techniques will undoubtedly enhance your graphic design capabilities.