Creating visually appealing graphics in Adobe Photoshop often involves the nuanced use of color and light. Gradients, which are smooth transitions between two or more colors, are fundamental tools for achieving these effects. While Photoshop offers a plethora of pre-made gradients, the true power lies in the ability to craft unique, custom gradients tailored to specific design needs. The Gradient Editor is the central hub for this creative process, allowing users to dive deep into the mechanics of gradient creation and manipulation. This tutorial will guide you through the essential features and functionalities of Photoshop's Gradient Editor, from understanding its interface to fine-tuning complex color and transparency transitions.
Initiating Your Gradient Journey: Document Setup and Tool Access
Before embarking on gradient creation, it's standard practice to begin by creating a new Photoshop document. This action prompts the New dialog box, where initial document settings are configured. For most gradient work, leaving the Resolution set to its default of 72 pixels/inch and ensuring the Background Contents are set to White is a practical starting point.
Once the canvas is prepared, the Gradient Tool is the primary instrument. As previously discussed, there are two main avenues for selecting a gradient: choosing from Photoshop's extensive library of ready-made preset gradients via the Gradient Picker, or delving into the more intricate process of creating and editing your own using the Gradient Editor. To access the Gradient Editor, a direct click on the gradient preview bar within the Options Bar is required. It's important to distinguish this from clicking the small arrow to the right of the preview bar, which, as covered in prior tutorials, opens the Gradient Picker.
The Gradient Editor: A Two-Step Foundation
The Gradient Editor operates on a fundamental two-step principle: you don't actually build a gradient from absolute scratch. Instead, the process begins with selecting a preset gradient that will serve as your foundational element. This chosen preset is then meticulously edited to evolve into your unique, custom gradient.
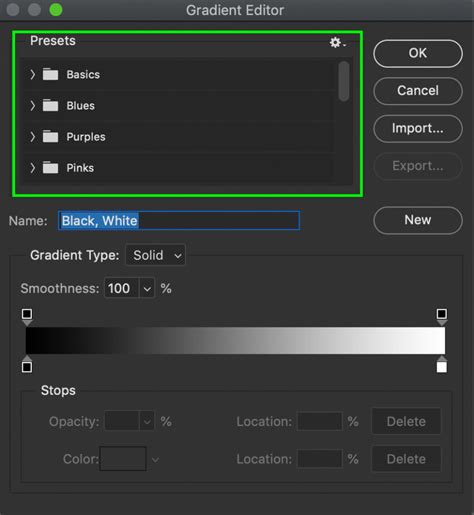
The Gradient Editor interface itself is logically divided into two primary sections: the Presets area, situated at the top, and the more detailed editing section positioned below it. The Presets area functions identically to the Gradient Picker, presenting a collection of thumbnails representing all the preset gradients available for selection. Simply clicking on a thumbnail selects that gradient.
Initially, Photoshop presents a limited selection of preset gradients. However, the software includes numerous other gradient sets that can be loaded into the Gradient Editor, mirroring the functionality of the Gradient Picker. These additional gradient sets are typically found in the lower half of the menu that appears when you interact with the preset options. Each set is thematically organized, encompassing categories such as Color Harmonies, Metals, Pastels, and more.
To integrate one of these sets, click on its name within the list. Photoshop will then inquire whether you wish to replace the currently displayed gradients with the new set. If the intention is to expand the existing library rather than overwrite it, selecting "Append" will add the new gradients below the current ones, preserving your existing selections. Photoshop may also prompt you about replacing current gradients with defaults.
The rationale behind offering such an extensive array of presets within the Gradient Editor, especially when the Gradient Picker already provides access to them, is rooted in efficiency. As previously noted, creating gradients entirely from scratch is not the intended workflow. The Gradient Editor's vast preset library is designed to facilitate the process by allowing users to select a preset that is already closely aligned with their desired outcome. This significantly reduces the editing effort required. For instance, if the goal is to create a gradient transitioning between three distinct colors, starting with a preset that already incorporates three colors can save considerable time. Similarly, for gradients moving from a solid color to transparency, initiating with a preset that already features transparency can be a time-saver.
However, the reality of working with the Gradient Editor is that it's so versatile and intuitive that users often find themselves beginning with the most fundamental gradient available: the Black, White gradient, which is included among the default presets.
Crafting Your Gradient: Colors, Midpoints, and Stops
The core tools and options for gradient editing are located in the lower portion of the Gradient Editor. Once a preset gradient is selected, it is displayed in a prominent gradient bar, which serves as your primary workspace for "building" the gradient.
It's crucial to ensure that the Gradient Type option, positioned above the gradient bar, is set to "Solid." If, instead of a smooth transition, you observe what appears to be a random arrangement of colored lines within the gradient bar, verify this setting. The "Noise" gradient type, which produces different visual effects and requires distinct creation steps, will be explored in a separate tutorial.
Beneath the gradient bar, you will find "color stops." These are small, square color swatches, each with an arrow pointing upwards towards the gradient above them. Each color stop corresponds to one of the main colors within the gradient. In the case of the Black, White gradient, there are two color stops: one filled with black on the left and another filled with white on the right.
To modify an existing color, the first step is to click on its corresponding stop to select it. Subsequently, click on the color swatch within the "Stops" section at the bottom of the Gradient Editor to choose a different color. For example, to change the black in the gradient to red, you would click the black stop, then click the color swatch, which opens Photoshop's Color Picker. The same procedure applies to the other color; changing white to yellow can be achieved by clicking the white stop, then the color swatch. A more expedited method for changing a color is to simply double-click the color stop, which directly opens the Color Picker.

Directly between any two color stops, you will notice a small diamond-shaped icon. This is the "midpoint icon." It signifies the precise center of the transition between the two adjacent colors - the point where both colors are mixed in equal measure. The position of this midpoint can be adjusted by dragging the icon closer to one color or the other. For instance, dragging the midpoint icon towards the left, closer to the red stop, will visibly alter the gradient's appearance. As the midpoint icon is moved, the "Location" option, situated below the gradient bar, updates to display the exact percentage at which the midpoint is positioned between the two colors. The default location is typically 50%, representing an equal distance from both colors. After dragging the midpoint to the left, the Location value might now show 25%, indicating it's closer to the left color stop.
While dragging the midpoint icon offers a visual method for repositioning it, the exact location can also be set by entering a specific numerical value into the "Location" field.
Expanding Your Palette: Adding and Arranging Colors
The Gradient Editor empowers users to introduce additional colors into their gradients with ease. To add a new color, simply click directly below the gradient bar at the desired location where the new color should appear. Photoshop will automatically insert a new color stop at that precise spot. Following this, select a different color from the Color Picker. Upon clicking "OK" to close the Color Picker, a previously two-color gradient can transform into a three-color gradient.
Beyond adding new colors, the Gradient Editor allows for the rearrangement of existing colors and even the alteration of their sequence within the gradient. There are several methods for moving color stops. One straightforward approach is to click and drag a color stop either left or right along the gradient bar. For instance, clicking the blue stop in the center and dragging it closer to the yellow stop will reposition it. Another technique involves selecting a color stop, then entering a desired value directly into the "Location" field. Clicking the yellow stop to select it and then modifying its location value achieves this.

Removing a color from a gradient is equally intuitive. Click on the color stop to select it, then drag downwards and away from the gradient bar until the stop visually disappears. This action effectively removes the color from the gradient. For example, dragging the blue stop downwards and away would eliminate the blue color, leaving only the red and yellow hues.
A useful technique for duplicating colors involves pressing and holding the Alt key (on Windows) or the Option key (on Mac) while clicking and dragging an existing color stop. Instead of moving the original stop, this action creates a copy of it, which can then be positioned anywhere along the gradient. This is particularly helpful if, for example, the desired gradient is from red to yellow and then back to red. With the initial red stop already on the left, creating a copy of it and placing it on the right would achieve this effect.
Incorporating Transparency: Mastering Opacity Stops
Directly above the gradient bar, you will find what appear to be additional color stops. These are, in fact, "transparency stops," which are instrumental in controlling the opacity of different sections of the gradient. While some of Photoshop's preset gradients inherently include transparency, others do not. However, transparency can be easily added wherever needed.
For instance, to create a gradient that transitions from a solid color on the left to complete transparency on the right, begin by clicking on the transparency stop located above the right side of the gradient. This action activates the transparency options within the "Stops" section below the gradient bar. To introduce transparency, click the arrow to the right of the current opacity value and then lower the value by dragging the slider towards the left. Setting this value to 0% will render the right side of the gradient completely transparent.
Observe that the color of the transparency stop changes from black to white. Black signifies an opacity value of 100%, meaning full opacity. White indicates an opacity value of 0%, signifying complete transparency. Intermediate shades of gray represent partial transparency. Concurrently, the gradient bar will now display a transition from a solid color on the left to a checkerboard pattern on the right, the visual cue for transparency in Photoshop.
Just as color stops can be repositioned, transparency stops can also be moved. If, for example, the desire is for the transition into transparency to commence at the yellow color in the middle rather than at the red on the left, there are multiple ways to achieve this. One method is to simply click on the transparency stop on the left and drag it to the middle of the gradient, positioning it directly above the yellow color.
Alternatively, the two existing transparency stops can be retained in their original positions, and a third stop can be added above the middle of the gradient. To do this, click above the gradient bar in the location where the new stop should appear. Photoshop will insert a new transparency stop. Its Opacity value will likely default to 100%, but this can be adjusted to any value between 0% and 100%. Similarly, its Location will default to 50%, but this can also be modified by dragging the stop itself or by entering a different value into the "Location" field.
Existing transparency stops can be duplicated using the same method as with color stops: press and hold the Alt (Win) / Option (Mac) key while clicking and dragging the transparency stop left or right. This creates a copy that can then be precisely positioned. Like color stops, midpoint icons will appear between each pair of transparency stops, allowing for fine-tuning of opacity transitions.
To remove a transparency stop, click on it to select it, then drag upwards and away from the gradient bar until the stop vanishes. Deleting the stop on the right, for instance, by clicking and dragging it upward, would remove that transparency effect.
How To Make Transparent Gradients In Photoshop - The Complete Guide
Refining Transitions: Smoothness and Saving Presets
A final, important option within the Gradient Editor is "Smoothness." This setting dictates how gradual the transitions appear between the main colors of your gradient. At its default value of 100%, the transitions are distributed as evenly as possible, creating a smooth blend. As this value is reduced, more of the transitional shades are pushed towards the main colors, resulting in fewer shades in the middle. This can lead to harsher transitions and more noticeable "banding," which is usually an undesirable effect.
When the appearance of your gradient meets your satisfaction, it can be saved as a new preset. This is achieved by first entering a descriptive name for your new gradient into the "Name" field.
The "Gradient Editor" dialog box in Photoshop serves as a comprehensive tool for creating new gradients, modifying existing preset gradients, or deleting unwanted gradients. To access this dialog box, one can click on the Gradients panel's tab name or navigate through the Menu Bar by selecting "Window" > "Gradients" to reveal the Gradients panel. Subsequently, clicking the panel options button in the upper-right corner of the Gradients panel and choosing the "New Gradient Preset…" command will open the "Gradient Editor" dialog box.
To create a new gradient pattern based on one of the preset patterns available in Photoshop, select the preset gradient you wish to edit from the "Presets" list at the top of the "Gradient Editor" dialog box. The type of gradient pattern can be chosen by selecting either "Solid" or "Noise" from the "Type" drop-down menu. Noise gradients introduce random, linear color and opacity variations using a selected range of colors and opacity. In contrast, solid gradients apply linear opacity and color transitions at user-defined locations within a gradient pattern. The "Solid" gradient type is the most frequently utilized. Depending on the selection made in the "Type" drop-down, certain settings within the "Gradient Editor" dialog box will dynamically change.
To adjust the smoothness of a solid gradient, select a percentage from the "Smoothness" drop-down menu or input a desired percentage directly into its field. Color stops in a solid gradient define the specific colors that will appear within the gradient. To introduce a new color stop, click within the gradient pattern strip's bottom row at the desired location for the new color stop. To remove a color stop, click it to select it. To modify the color associated with a color stop, double-click the color stop to open the "Color Picker (Stop Color)" dialog box.
Changing the position of a color stop is achieved by clicking and dragging it left or right along the gradient. Alternatively, after selecting a color stop, its location can be precisely set by entering a value into the "Location" field, which is situated to the right of the "Color" label in the "Stops" section. To adjust the location of a color midpoint, which determines where the color transition occurs between two adjacent color stops, first click to select one of the adjacent color stops associated with the midpoint. The color midpoint icon(s) will then appear as small gray diamonds between the two selected color stops. As an alternative, after selecting the color midpoint whose position needs adjustment, a new relative value between 5 and 95 can be entered into the "Location" field within the "Stops" section. A value of 5 positions the midpoint as close as possible to the left color stop, while a value of 95 places it as close as possible to the right color stop.
Should you wish to incorporate transparency into a gradient, it is necessary to edit the opacity stops located at the top of the gradient pattern. To add a new opacity stop, click within the top row of opacity stops in the gradient pattern strip at the desired location. To remove an opacity stop, click it to select it. To alter the opacity level of an opacity stop, select it and then click the "Opacity" drop-down menu in the "Stops" section, adjusting the opacity percentage using the slider.
Modifying the position of an opacity stop involves clicking and dragging it left or right along the gradient. Alternatively, after selecting an opacity stop, its location can be precisely set by entering a value into the "Location" field to the right of the "Opacity" label in the "Stops" section. To adjust the location of an opacity midpoint, which defines where the opacity transition occurs between two adjacent opacity stops, click to select one of the adjacent opacity stops for the midpoint adjustment. The opacity midpoint icon(s) will then appear as small gray diamonds between the two selected opacity stops. As an alternative, after selecting the opacity midpoint whose position needs adjustment, a new relative value between 5 and 95 can be entered into the "Location" field within the "Stops" section. A value of 5 positions the midpoint as close as possible to the left opacity stop, while a value of 95 places it as close as possible to the right opacity stop.
The tutorial "Learn How to Use the Gradient Editor in Adobe Photoshop: A Training Tutorial" specifically demonstrates the application of the Gradient Editor for creating custom gradients. The "Gradient Editor" dialog box in Photoshop provides the functionality to create new gradients, edit existing preset gradients, or remove gradients.
Should you opt to edit a noise gradient in Photoshop, select the "Noise" gradient type from the "Type" drop-down menu. To control the roughness of the noise gradient, click the "Roughness" drop-down menu and select the desired percentage using the accompanying slider, or type the percentage directly into the "Roughness" field. To specify the color model used for the range of colors displayed in the noise gradient, select a choice from the "Color Model" drop-down menu, which typically includes "RGB," "HSB," or "LAB." To prevent the colors within the noise gradient from becoming oversaturated, check the "Restrict Colors" checkbox in the "Options" section. To add transparency to the noise gradient, check the "Add Transparency" checkbox in the "Options" section.
To save the current gradient as a new custom gradient preset, which can then be accessed from the Gradient Picker panel, type the desired name for the gradient into the "Name" field within the "Gradient Editor" dialog box. If the "Gradient Editor" dialog box was opened by clicking the gradient pattern in the Options bar Control panel (for creating a custom gradient with the "Classic gradient" version of the Gradient Tool in Photoshop 24.5 or later, or any older version of Photoshop) and you wish to apply the pattern to the classic Gradient Tool, click the "OK" button in the "Gradient Editor" dialog box.
In scenarios where exporting your current gradient presets as a file for import into another Photoshop instance is necessary, click the "Export…" button within the "Gradient Presets" dialog box to open the "Save As" dialog box. To import a saved gradient preset file at a later time, open the "Gradient Editor" dialog box within the target Photoshop copy and click the "Import…" button to open the "Load" dialog box. Utilize this dialog box to locate the saved gradient presets export file, select it, and then click the "Load" button.
Noise gradients apply random, linear color and opacity changes using a selected range of color and opacity, whereas solid gradients apply linear opacity and color transitions at specified locations. The available settings within the "Gradient Editor" dialog box adapt based on the selection made in the "Type" drop-down menu.