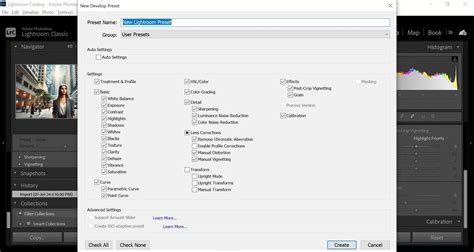
As a professional wedding photographer, you know that capturing the perfect moments is only half the battle. The other half happens in post-production, where you transform beautiful RAW images into a breathtaking, cohesive story that your clients will cherish forever. This editing process is where your signature style truly comes to life. For years, photographers have relied on Lightroom presets to streamline this crucial stage. But as technology evolves, so do our tools, ushering in an era of AI-powered editing that promises unprecedented efficiency and personalization.
The Foundation: Understanding Lightroom Presets
A Lightroom preset is essentially a saved combination of editing settings. Think of it as a recipe. With a single click, you can apply a specific set of adjustments-exposure, contrast, highlights, shadows, colors, and more-to a photo. But the appeal of presets goes beyond just speed.
Consistency: A wedding gallery needs to feel cohesive. From the getting-ready shots in a dimly lit hotel room to the sun-drenched outdoor ceremony, a consistent editing style ties the entire day together. This visual coherence is key to building trust and brand recognition. Clients often recognize a photographer by the unique feeling their edits evoke.
Style Development: For photographers who are still honing their signature look, presets can be an excellent educational tool. They offer a starting point to understand how different adjustments affect an image, helping you develop your own artistic voice.
Workflow Efficiency: The sheer volume of photos from a wedding can be daunting. Applying a preset to a batch of images provides a solid foundation, allowing the photographer to focus on fine-tuning individual shots rather than starting from scratch every single time. For every hour of shooting, you’ll need to allow around four hours of editing. This can be incredibly time-consuming, especially if you’re booked every weekend with events! Using presets can slash your editing time by 75% or more, allowing you to deliver galleries in days instead of weeks.
Choosing the Right Presets: A Personal Journey
With thousands of presets available online, how do you find the right ones for you? Before you even start browsing, take some time to think about your brand. What kind of feelings do you want your images to evoke? Your chosen style should resonate with the type of clients you want to attract.
Style is Personal: Choosing the right preset is about more than just a popular look; it’s about finding a style that reflects your artistic vision and brand identity. Are you drawn to a light and airy aesthetic? Do you love the timeless quality of film? What story do you want your images to tell? Romantic and dreamy? Bold and dramatic?
Versatility: A good preset pack should work well in a variety of lighting situations. A wedding day is a fluid, ever-changing environment. You move from a dark church to a bright, open field in a matter of minutes. A preset that looks stunning on one photo might look terrible on the next.
Skin Tones: This is one of the most important factors. Poorly made presets can leave skin looking orange, washed out, or unnatural. Many photographers offer sample presets for free or for a small fee. This is a great way to test out a style on your own images before investing in a full pack.
The Limitations of Static Presets
While presets are a fantastic tool, they are not a magic bullet. Why? Because presets are static. This means you will always have to make manual adjustments after applying a preset. You’ll need to correct the exposure, tweak the white balance, and adjust the contrast for each individual photo to achieve true consistency.
The "One-Size-Fits-All" Problem: A preset is just one fixed set of instructions. It doesn’t know that the getting-ready room was lit by a small window, the ceremony was under the harsh midday sun, and the reception was lit by candles and colorful DJ lights.
The Endless Tweaking Cycle: Because of this lack of adaptability, photographers often find themselves spending a huge amount of time re-adjusting photos after applying a preset. You might have to drastically change the white balance, recover blown highlights, or lift crushed shadows. Maintaining consistency becomes a chore. For a gallery of 1,000 images, that still amounts to a significant amount of work.
The AI Revolution: A Smarter Approach to Editing
What if you could have the consistency and style of a preset, but with the intelligence to adapt to each individual photo? The AI Revolution is Here. While presets are static, AI-powered tools offer a dynamic and personalized editing experience.
AI Editing and Culling Software Comparison | NOT SPONSORED!!!
Imagen vs. Presets: Imagen provides a more intelligent approach to editing. Instead of applying a static set of rules like a preset, Imagen uses artificial intelligence to learn your unique editing style and apply it intelligently to your photos.
The Core of the Imagen Experience: The Personal AI Profile
This is where the magic happens. To build your Personal AI Profile, you need to show Imagen how you edit. You do this by uploading at least 3,000 of your previously edited photos from your Lightroom Classic catalogs.
AI Training: Once you’ve uploaded your photos, Imagen’s powerful AI gets to work. It analyzes every single adjustment you’ve made across thousands of images. It learns how you handle exposure in different lighting conditions, how you treat colors, how you adjust white balance, and how you approach contrast.
Your Profile is Ready: Once the training is complete, your Personal AI Profile is ready to use. Now, when you upload a new wedding gallery to Imagen, the AI edits each photo individually, making decisions based on what it learned from your style. The result? A fully edited gallery that looks just like you edited it, but in a fraction of the time.
Dynamic Adjustments: This is the most significant difference. A preset applies the same -0.5 exposure and +20 contrast to every photo. Imagen, on the other hand, looks at a photo, analyzes its histogram and content, and decides, “This photo needs +0.2 exposure and +15 contrast to match the photographer’s style,” while the next photo might need completely different adjustments.
It Evolves With You: Your style isn’t static, and your tools shouldn’t be either. As your editing style evolves, you can continue to feed your new work back into your Personal AI Profile. This process, called Fine-Tuning, ensures that your AI assistant is always up-to-date with your latest creative vision.
Popular Wedding Photography Editing Styles and Presets
Today, wedding photo presets in Lightroom are more than just time-savers-they’re creative tools that shape mood, style, and consistency across entire galleries. This article explores the most widely used and influential wedding photography editing styles today. For each style, we’ll show how wedding Lightroom presets help bring the look to life-and why these aesthetics remain so popular with both photographers and couples.
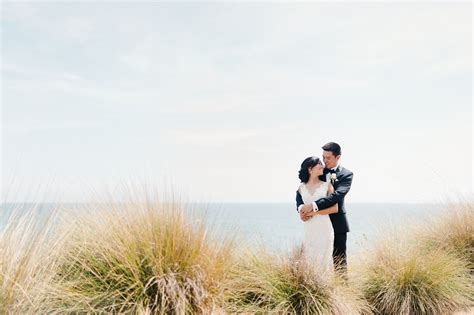
Light & Airy
This remains a timeless favorite in wedding photo editing. It’s the signature look of fine-art weddings and continues to be a standout on social media. The aesthetic is built around soft whites, pastel palettes, bright exposure, and a gentle, dreamlike mood. It’s especially popular for spring and summer weddings, often taking advantage of natural light in open-air or garden venues.
To achieve this look using wedding photo presets in Lightroom, photographers typically:
- Increase exposure by +0.5 to +1.0
- Slightly warm the white balance to flatter skin tones
- Reduce contrast and clarity to soften the image
- Lift the black point in the tone curve for a subtle matte effect
- Use HSL adjustments to mute overpowering tones and shift greens toward warmer hues
For an authentic filmic Light & Airy look, pay special attention to muting greens - this step makes the biggest visual difference after exposure and contrast adjustments. Skin tones are delicately brightened while avoiding blown highlights, creating a luminous yet balanced result. This aesthetic is often inspired by classic film stocks like Fuji 400H, known for its soft pastels and natural rendering. A standout example is the "Tuscany Wedding Light & Airy" preset by Stefano Casati, crafted to emulate the glow of fine-art film with soft greens, organic warmth, and graceful tonal transitions.
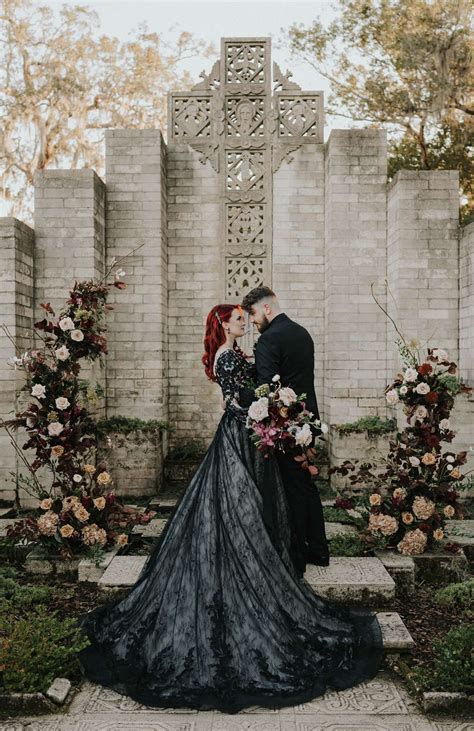
Dark & Moody
The Dark & Moody style has become a favorite for photographers who want to convey depth, intimacy, and drama. This style is ideal for rustic venues, elopements, and fall or winter weddings-settings where shadows and atmosphere enhance the storytelling. It's a cinematic approach that adds gravity to emotional moments without overpowering them. Wedding presets in this category emphasize strong contrast and atmospheric tones.
In Lightroom, you’ll often:
- Lower exposure slightly (by around -0.3 to -0.5)
- Deepen blacks while reducing highlights
- Shape the tone curve into an S-curve for midtone strength
- Add warm shadows (amber, copper) and cool highlights (teal or blue) via color grading
- Use subtle grain (around 10-20%) to add texture, and a light vignette to draw focus toward the subject
- Enhance clarity and texture in key details like wood grain, fabrics, or architectural features
Be sure to apply the cool tone selectively in the highlights - this contrast between warm shadows and cool highlights is key to achieving the cinematic look without making the image too warm overall. The key is contrast without harshness-rich tones and detail balanced by a softness that keeps the image natural. Many Dark & Moody presets also include subtle grain and vignetting to introduce a filmic, analog aesthetic. Great examples of this style include “Chai” by The Picks and “The Great Wedding” by Bart Boodts. These SmartPresets offer cinematic depth, rich tonal warmth, and emotional nuance-perfect for capturing the mood of autumn light, cozy interiors, and intimate vows with artistic intensity.
Filmic Look
As digital photography becomes increasingly crisp and technically precise, many wedding photographers are rediscovering the charm and emotional depth of analog aesthetics. The filmic look blends the nostalgic appeal of classic film with the control and flexibility of a digital workflow. This style offers warmth, character, and timeless elegance.
In Lightroom, the filmic style is built using careful tonal and color adjustments:
- Contrast is reduced slightly to soften the dynamic range
- Shadows are lifted subtly for an organic, matte texture
- The tone curve is shaped to preserve highlight detail and avoid harsh transitions
- Grain is added to mimic the tactile quality of film
- Consider also shifting green hues toward olive for an even more cohesive filmic palette
- Colors-especially reds, yellows, and blues-are desaturated to mimic the softer palette of film
Skin tones remain central to this aesthetic-warm, smooth, and delicately balanced. The look favors emotion over perfection and is more effective in storytelling-focused or editorial-style galleries. A beautifully executed example is the “Film Fine-Art Wedding” SmartPreset by Christophe Serrano. Modeled after Kodak Portra 400, it delivers creamy highlights, rich midtones, and elegant tonal transitions-perfect for photographers who want to combine modern detail with filmic soul.
Editorial & High-Fashion
The editorial look is for photographers who approach weddings with the polish and precision of a magazine shoot. This style emphasizes clean lines, natural skin tones, and technical excellence. It’s less about romanticizing the moment and more about honoring it-presenting each scene with refined elegance and visual clarity.
To create this high-fashion aesthetic using Lightroom and the right wedding photo presets, the following adjustments are key:
- Exposure is corrected precisely for balance and neutrality
- White balance is adjusted to remove any color cast, often landing at a true neutral point
- Skin tones are refined with care using HSL adjustments-kept balanced, not flat or overly saturated
- Sharpness and clarity are selectively enhanced on elements like fabric, jewelry, or architectural detail
- The tone curve remains mostly linear with subtle contrast in midtones
The result is minimal but luxurious: skin tones are luminous yet authentic, colors are refined but not stylized. This style excels in upscale urban weddings, museum venues, or fashion-forward editorial shoots where lighting and detail are paramount. A standout preset for this approach is “Be Timeless” by Béatrice de Guigné. It delivers neutral hues, smooth tonal transitions, and meticulous color control-perfect for photographers aiming for sophisticated, print-ready wedding reportage.
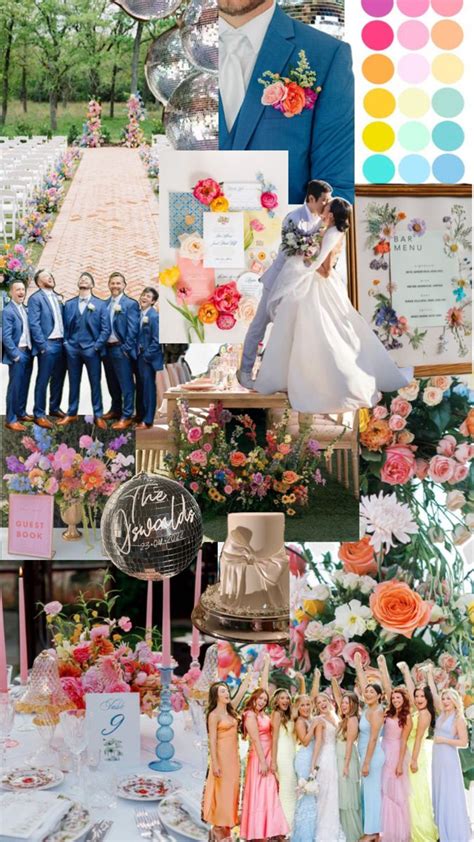
Vibrant & Bold
The Vibrant & Bold look is all about energy, saturation, and joyful celebration. Perfect for cultural weddings, beach ceremonies, and colorful receptions, this style brings out the full dynamic range of the wedding day. It tells the story with vivid emotion and makes color the star.
In Lightroom, creating this aesthetic requires thoughtful intensity. With the right wedding presets in Lightroom, you can achieve:
- Enhance contrast and clarity to give structure and depth
- Apply targeted vibrance and saturation for impactful color-especially in warm and cool tones like oranges, pinks, and blues
- A tone curve that adds micro-contrast in the midtones for crispness
- Protected skin tones using the red and orange HSL sliders
- Clean shadows and restrained highlights to avoid losing detail
What makes this style effective is not just making colors pop-but amplifying them thoughtfully while preserving balance. Strong tones in wardrobe, décor, or lighting are embraced, not toned down. Every adjustment is made to enhance what’s already visually powerful. Originally developed for stage and concert photography, the “Concerts” SmartPreset by Kay-Uwe Fischer adapts beautifully to color-rich wedding scenes. It intensifies bold palettes while keeping skin tones true-making it ideal for beach weddings, multicultural celebrations, and high-energy dance floors.
Soft Pastel
The Soft Pastel look creates a romantic, airy mood with gentle tones and a dreamy, storybook aesthetic. Unlike Retro styles that evoke specific eras, this approach focuses on soft emotion and timeless serenity. This editing style is often chosen for boho weddings, countryside ceremonies, and couples who value a softer visual language.
This style isn’t about vintage imitation-it’s about creating softness, sentiment, and a timeless, fairytale-like mood. In Lightroom, this wedding photo editing style is achieved through a series of delicate refinements:
- Lower contrast and lifted blacks via the tone curve for a faded, film-like effect
- Pulled-back highlights to preserve texture in whites
- Carefully desaturated colors, especially in greens and blues
- Shifted hues toward rosier, warmer tones to enhance softness
- A warm, but restrained white balance-never veering into overly orange or yellow tones
Skin tones are rendered creamy and soft, often with ivory or peach undertones. Split toning or the Color Grading panel can add gentle warmth in highlights or a magenta wash in shadows. A subtle touch of grain can add warmth and texture, softening the digital edge without mimicking film. Radial filters and gentle vignettes guide the eye and add intimacy. The goal is balance: softness without flatness, warmth without heaviness. The “Vintage Sunbeam” preset by Neurapix is an excellent example, delivering faded pastels, light grain, and soft contrast-perfect for crafting an album that feels like a cherished memory.
Warm & Natural
The Warm & Natural style has become one of the most requested wedding photography editing styles in recent years. It celebrates soft light, grounded tones, and genuine emotion. This approach avoids heavy stylization and instead enhances the beauty already present in the scene. It’s an excellent match for vineyard weddings, backyard celebrations, and golden-hour portraits.
To build this aesthetic using wedding photo presets in Lightroom, photographers often:
- Warm the white balance to around 6000-7000K for that golden glow
- Tone curve remains soft with a gentle roll-off in highlights and slightly lifted shadows
- Apply minimal contrast for a balanced tonal curve
- Shift greens toward olive and enrich oranges for natural skin tones
- Use HSL controls to manage saturation while retaining depth
A subtle touch of grain can add an organic feel, enhancing the timeless warmth of the image. Clarity is applied selectively-typically to hair, foliage, or fabric-while skin remains smooth and luminous. Shadows are left clean and untinted to preserve the image’s authenticity and emotional sincerity. A fitting example of this style is the “Portrait Outdoor” SmartPreset by Nicole Zausinger. It’s designed around natural light and subtle warmth, with a focus on soft transitions and true-to-life skin rendering. The result is an emotionally grounded, honest visual narrative-ideal for photographers who want their images to feel both real and radiant.

True to Color
The True to Color style is all about faithful representation. It’s favored by photographers who want to maintain authenticity across lighting conditions and client expectations-especially when working with multicultural weddings, vibrant décor, or architectural venues where accurate color is essential.
Lightroom makes it possible to achieve this look with precision-focused editing:
- White balance is carefully calibrated using neutral tones or color checkers
- Highlights and shadows are preserved rather than pushed for effect
- The tone curve remains subtle and clean-no matte finish or exaggerated contrast
- Skin tones are managed through fine-tuned HSL adjustments, especially in red and orange channels
- Saturation is kept balanced across the image, avoiding oversaturation or flatness
This editing approach ensures that cobalt suits stay crisp blue, red florals remain rich without bleeding, and golden-hour light enhances without distorting skin tones. It’s especially valuable for photographers working in documentary, luxury, or cross-cultural contexts where authenticity builds trust. The “Portrait Outdoor” preset by Nicole Zausinger is also an excellent fit for this style. It offers minimal interference while gently refining color and tone-helping to capture the moment exactly as it was, with subtlety and emotional honesty. True to Color may not call attention to itself-but that’s precisely its power. It lets the people, details, and emotions speak for themselves.
Clean & Classic
The Clean & Classic style is the embodiment of timeless wedding photography. It’s built on neutrality-no extreme warmth or coolness, no heavy saturation or desaturation. This style suits formal events, traditional venues, and couples who want their wedding gallery to feel elegant and ageless for decades to come.
In Lightroom, Clean & Classic wedding presets are defined by restraint and balance:
- White balance is kept neutral, typically around 5500K with a touch of magenta (+5) for healthy skin tones
- A light S-curve is used to enhance midtone contrast without overemphasizing blacks or highlights
- Clarity is applied locally, refining only where needed (like lace or details)
Many people overlook the amount of preparation, planning, and editing that goes into capturing and creating the perfect wedding gallery. As any professional photographer will tell you, the REAL magic happens during the editing process. Beautiful imagery is created with your camera, but editing allows you to breathe life into the moments you captured. The only downside? Editing can take a really long time and requires a certain amount of expertise. The best presets for wedding photography are a wonderful way to achieve elevated, beautiful imagery…every time.
Key Lightroom Editing Tips for Wedding Photographers
Lightroom is a powerful tool designed specifically for photographers. Unlike other photo editing software, Lightroom offers a comprehensive suite of tools that cater to the entire workflow-from organizing and cataloging photos to detailed editing and final output.
1. Embrace Presets for Consistency and Speed: Presets can significantly speed up your workflow and ensure consistency across your wedding photos. Many photographers create or purchase presets tailored for weddings, including skin tone adjustments, lighting, and color grading.
2. Master Exposure and White Balance: Proper exposure is fundamental. Adjust the exposure slider to ensure the image is well-lit but not overexposed. White balance is crucial for wedding photos, especially when dealing with mixed lighting conditions. Use the White Balance selector tool (eyedropper) to click on a neutral gray area in the photo.
3. Perfect Skin Tones: Skin tones can make or break a wedding photo. Use HSL adjustments, particularly for the red and orange channels, to ensure natural and flattering skin tones.
4. Enhance Details with Sharpening: Sharpening enhances the details in your photos. In the Detail panel, increase the Amount slider to sharpen the image. Be mindful not to over-sharpen, which can lead to artifacts.
5. Subtle Vignettes for Focus: Adding a subtle vignette can draw attention to the center of the photo, guiding the viewer's eye to the main subject.
6. Utilize the Tone Curve: The Tone Curve is a powerful tool for fine-tuning your image. It allows for precise control over highlights, midtones, and shadows.
7. Split Toning for Creative Color: Split Toning allows you to add different colors to the highlights and shadows, adding a creative and artistic touch to your images.
8. Camera Calibration for Global Adjustments: Camera Calibration is often overlooked but can drastically affect your photo’s final look. It allows you to adjust the primary color channels and can be used to subtly alter the overall color cast of an image.
9. Lens Corrections for Distortion Control: Enable Lens Corrections to fix any distortions or vignetting caused by your lens. This ensures your images are technically sound.
10. Local Adjustments with Filters: Graduated Filters, the Radial Filter, and the Adjustment Brush are excellent for local adjustments. They allow for precise control over specific areas of your photo, enabling you to enhance skies, create spotlight effects, or refine specific details.
11. Batch Editing for Efficiency: Batch editing is a lifesaver when dealing with large numbers of photos. Apply your preset and then make minor adjustments to a group of similar images simultaneously.
12. Virtual Copies for Experimentation: Virtual copies allow you to create different versions of the same photo without duplicating the file. This is perfect for experimenting with different editing styles or presets on a single image.
13. Handling Mixed Lighting and Color Casts: Weddings often involve mixed lighting conditions, such as tungsten, fluorescent, and natural light. Despite your best efforts, some photos may end up overexposed or underexposed. Color casts can occur due to various lighting conditions. Lightroom’s tools are designed to help you correct these issues.
14. Client Preferences and Backup: Understanding your client’s preferences and vision for their wedding photos is crucial. Before you start editing, discuss their expectations and any styles they love. Always back up your photos before and after editing. This protects your work and ensures you can recover files if anything goes wrong.
The Future of Wedding Photography Editing: AI-Powered Workflows
For years, the “one-click” promise of presets was the dream. And while they delivered on speed, professional photographers quickly discovered their limitations. A single, static preset just can’t handle the dynamic and unpredictable nature of a wedding day.
This is where artificial intelligence changes everything. AI editing isn’t about a robot taking over your creative vision. Unlike a static preset that just copies settings, an AI-powered editing engine analyzes the unique characteristics of every single photo. It looks at the available light, the colors, the subjects, the ISO, and dozens of other data points.
Imagen: A Complete Workflow Solution
Imagen is a desktop app designed to work seamlessly with Adobe Lightroom Classic. It’s more than just an editor; it’s a complete post-production solution.
- AI Culling: Before you even start editing, Imagen can cull your entire shoot, identifying blurry shots, closed eyes, and duplicates, and grouping your best photos for you to review.
- Personal AI Profile: This is where the magic happens. Imagen learns your unique editing style and applies it intelligently to your photos.
- Dynamic Adjustments: Imagen makes intelligent decisions for each photo, adapting to its specific needs.
- It Evolves With You: As your editing style evolves, you can continue to feed your new work back into your Personal AI Profile for continuous improvement.
- Talent AI Profiles: If you’re a newer photographer, you can leverage AI profiles created by leading international photographers to start with a professional, polished look.
Imagen vs. Traditional Presets:
| Feature | Traditional Lightroom Preset | Imagen Personal AI Profile |
|---|---|---|
| Nature | Static, fixed set of editing instructions | Dynamic, adaptive AI model that learns your unique style |
| Adaptability | Low; requires significant manual adjustments per photo | High; intelligently adjusts for each photo's unique characteristics |
| Consistency | Can be challenging across varied lighting | High; ensures a consistently styled gallery regardless of lighting |
| Workflow Speed | Faster than manual editing, but still requires tweaking | Dramatically faster; up to 96% reduction in editing time reported |
| Learning Curve | Moderate; involves understanding preset limitations | Low; integrates with existing Lightroom workflow, AI does the heavy lifting |
| Personalization | Limited to the preset's predefined style | Highly personalized; learns and replicates your exact editing style |
| Evolution | None; static file | Continuous learning and fine-tuning as your style evolves |
Can I still make my own adjustments after Imagen edits my photos? Absolutely! Imagen is designed to give you a highly accurate starting point. You always have full creative control to make final tweaks in Lightroom.
What happens to my photos after I upload them to Imagen? Your privacy and security are a top priority for Imagen. Your photos are uploaded to secure servers for the AI to analyze and edit them. For a Personal AI Profile, the AI learns from your adjustments, not by storing your images indefinitely.
The Best Wedding Lightroom Presets and AI Tools
While AI is transforming the editing landscape, traditional presets still hold value. Here are some highly regarded options:
- G-Presets (Photobug Presets): Created with a timeless and natural aesthetic in mind, avoiding drastic changes. The Super 8-styled presets are particularly noteworthy.
- Archipelago Presets: Designed to enhance all styles of photography without compromising original elements, simplifying the editing process.
- Honey Presets: Allow photographers to tap into their creativity and better develop their own style.
- HD Presets: Help photographers establish consistency in their editing workflow, aiming to reflect warmth and calmness.
- Noble Presets: Known for its bright, airy, and film-inspired aesthetic, excelling in the fine art wedding photography market.
- Slate & Ivory 2.0 presets: Add a sense of timelessness and nostalgia with muted highlights and earthy tones.
- PS Presets: Enhance photos without overprocessing, providing a unique style while retaining natural skin tones.
- DC Presets: Prioritize the natural-natural skin tones and colors that add a dreamy and golden feel.
- Dirty Boots Presets: Created for adventurous photographers to spend less time editing and more time capturing.
- KT Merry Preset Collection: Editorial-inspired presets that elevate photos with gorgeous skin tones and luminous, unforgettable colors.
- Tec Petaja Preset Pack: Offers a clean and classic aesthetic for destination or outdoor weddings with a modern vibe.
- Caroline Tran Presets: Offer spectacular color saturation for vibrant and bright wedding photos with a luminous, dreamy quality.
- REFINED II & III Preset Collections: Provide versatility, from light and airy to dark and moody, with options to adjust intensity.
- VSCO Presets: Famous for beautiful and artistic film emulation.
- Mastin Labs Presets: Hyper-focused on accuracy and authentic film replication.
- Goodlight Presets: Focus on creating true-to-life color and a polished, professional finish.
For modern wedding photographers, the process is no longer just about applying a filter. With a tool like Imagen, your workflow can be transformed. Imagine coming home from a wedding, uploading your photos, and letting Imagen cull and edit the entire gallery while you sleep. The next morning, you open Lightroom Classic, and your photos are ready for your final creative touches and review. You’ve just saved yourself 10, 15, maybe even 20 hours of work. This is the future of photo editing. It’s personal, it’s intelligent, and it’s designed to give you your life back.