Procreate, the powerful digital art application for iPad, empowers artists not only with a vast array of pre-made tools but also with the ability to sculpt their own unique digital instruments. Have you ever found yourself wishing for a specific texture, a peculiar stroke, or a unique artistic effect that the default brushes just can't quite capture? The answer lies in the creation of custom Procreate brushes. This tutorial will guide you through the intricate yet rewarding process of making your own Procreate brushes, transforming your digital drawing and painting experience. Whether you prefer a visual learning style and are keen to learn how to make a brush in Procreate through a video, or you're ready to dive deep into the settings, this guide is for you. For this tutorial on how to make a pattern brush in Procreate, we are using an Apple Pencil on an iPad Pro.
Understanding the Procreate Brush Ecosystem
Before embarking on the journey of brush creation, it's essential to grasp the fundamental structure of Procreate's brush library. In your main work area, you'll notice controls for Brush Size and Brush Opacity. Sliding these up and down allows you to alter your Brush Size and Opacity as you work, directly impacting the stroke's appearance. The Color of your brush can be changed in the upper left-hand corner, offering immediate visual feedback on your selections.
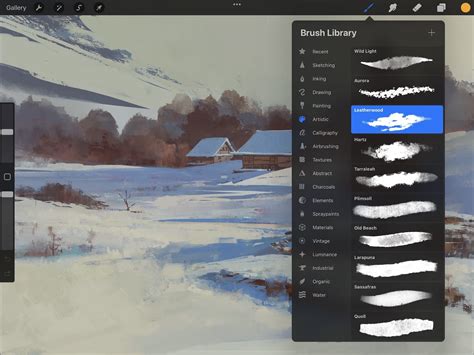
Let's begin by looking at the default Procreate brushes. Switch to Paint Mode and tap on the paintbrush icon. You can then swipe through the list of brushes to browse them. Each category, known as a Brush Set, contains a number of default brushes available for the user. These sets, as well as the brushes within them, can be rearranged by tapping and dragging them within their respective lists. To duplicate a brush, swipe left on its name and select "Duplicate." This is a great way to start experimenting without altering the original brush.
You also have the flexibility to organize your brushes into your own Custom Set. To create a Custom Set, swipe downwards when viewing the available Sets. This action reveals a plus icon. Tapping this icon initiates the creation of a new, empty set ready for your personalized collection. To delete a Custom Set, tap on its name and then choose "Delete." You'll notice that your new Brush Set is empty until you add content to it. This organizational feature is crucial for managing your growing library of custom tools.
Deconstructing the Brush Settings: The Heart of Customization
Procreate brushes are remarkably versatile, boasting a wide variety of settings that allow for intricate customization. The best approach to understanding these settings is to freely experiment with them. This hands-on exploration is a great way to get a feel for how each parameter influences the final brush stroke.
To begin customizing, tap on your desired brush to open the Procreate Brush Settings panel. This is where the magic happens. At the top of the Procreate Brush Settings, you'll find the Drawing Pad. Tapping the icon and the word "Drawing Pad" opens a dedicated space where you can test your adjustments in real-time. This immediate feedback loop is invaluable for refining your brush.
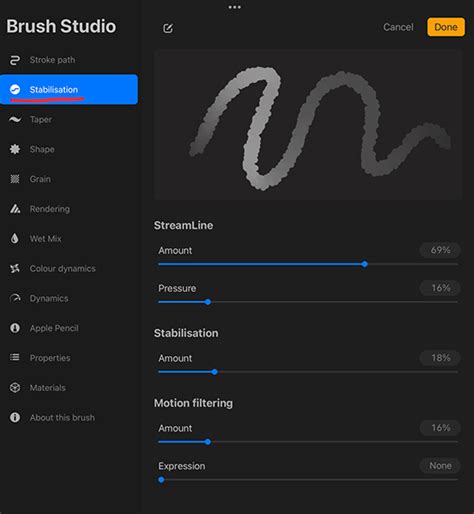
Let's start with Stroke Path, the first option on the left-hand side. Spacing refers to the distance between each individual shape that constitutes the brush stroke. If you're new to digital drawing, think of the stroke you draw as a repeated series of shapes. When the Spacing is increased, you'll visibly see these shapes spaced further apart. StreamLine is a crucial setting for line stabilization, smoothing out jittery movements. The Jitter setting functions somewhat like a different kind of spacing, introducing randomness or variation in the placement or properties of the brush's stamp. Fall Off affects the length or intensity of the stroke's end, often influencing how the brush tapers off.
Next, let's examine the Taper Settings, a significant enhancement introduced in Procreate 5. The Pressure Taper Settings dictate the taper applied when using an Apple Pencil, allowing you to adjust how the stroke's width or opacity changes with varying pressure. This can be fine-tuned to best suit your preferred drawing style. The Touch Taper Settings are a particularly welcome addition. Since we cannot draw with a finger in Procreate with the same pressure sensitivity as an Apple Pencil, these settings can apply an artificial taper to strokes drawn with a finger, offering a more controlled experience.
Now, let's look at the Shape Settings. Your Brush Stroke is essentially a series of shapes, and the Shape Source is the fundamental building block of your brush. Think of your brush stroke as a series of shapes, and this is the core element. You can tap to select a new shape from Procreate's library or import your own custom shapes. There are two Shape Properties that can be toggled on and off: Randomized and Azimuth. With Randomized Off, your shape properties will be directly dependent on your stroke's path. If toggled on, Procreate will introduce additional variation in how the shape is applied. Finally, we have Shape Filtering, offering three settings: None, Classic, and Improved. These filters can affect how the edges of your shape are rendered.
The Grain is the second primary component of your brush's composition. As discussed, the brush is largely composed of a Shape. In Procreate 5 and later, we have Moving and Texturized tabs to choose from within the Grain settings. Select Moving if you want your grain to be integrated into the overall texture of the brush, allowing it to shift and flow with the stroke. Movement helps determine how the Grain behaves. With Movement at 100%, you'll see the texture fill and repeat dynamically within the stroke. Turned down to 0%, however, the texture will not repeat, offering a static pattern. The Depth Settings will dictate how visible the grain is, controlling its intensity and impact on the overall texture.

Rendering, Dynamics, and Beyond: Fine-Tuning Your Brush
We then move on to Rendering Options, another new section introduced in Procreate 5. It's highly recommended to use the Drawing Pad above these options to test them out in real-time. Simply toggle between them and draw to observe the differences. While some rendering modes offer subtle variations, others can dramatically alter the brush's behavior, especially when strokes overlap.
Wet Mix settings mimic traditional painting techniques. Dilution controls how much "water" is in your brush, affecting how colors blend and spread. Charge represents how much "paint" has been loaded onto the brush. Experimenting with High Dilution and Low Charge, then adding significant Pull (how much paint is "pulled" with your stroke), can result in a brush that pushes color around and dilutes it, creating a watercolor-like effect. Don't be afraid to test out these Procreate Brush Settings extensively; it's the most effective way to become comfortable with their impact.
Color Dynamics represent a more recent addition to the Procreate Brush Settings. Here, you can adjust the Hue, Saturation, Brightness, and Intensity of a secondary color that can be incorporated into your brush strokes. While this might sound overwhelming, remember that trying them out is the best way to learn. For example, you can turn up the Stamp Color Jitter's hue and test it in the Drawing Pad to see how it affects the color variations in your strokes. Dynamics are generally independent of the pencil's input. For instance, Speed settings can determine the appearance of your brush based on how quickly you draw the stroke. The Size Limits dictate the brush's maximum and minimum available size, offering control over the scale of your strokes.
Building Your First Custom Brush: A Practical Example
Now, let's put this knowledge into practice by creating a simple custom brush. We'll start with a new, "Untitled Brush."
Change the Shape Source: Tap on Shape Source to alter the brush's fundamental form. Tap Import and then choose Source Library. Navigate to a source image. For this example, let's select the "Flower" image.
Initial Appearance: Right now, your brush might appear as a tightly packed line of flower shapes, which is likely not the desired effect.
Naming Your Brush: In the About this Brush section, give your brush a name. Tap on the default name to edit it. Let's call this one "Flower Chain."
Adjusting Stroke Path: Go to the Stroke Path Settings and adjust the Spacing until the flowers display in a row, rather than overlapping. This will create a more deliberate, connected pattern.
Modifying Shape Behavior: Your brush is starting to take shape, but the flower shapes are currently uniform. To introduce variation, go to the Shape Settings. Here, you can change the Rotation. Turn the Rotation all the way up until it says "Follow Stroke." This will make each flower rotate along the path of your stroke, adding a dynamic and organic feel.
Advanced Customization: Texture and Beyond
Let's say you want to further modify your brush and explore a completely different aesthetic.
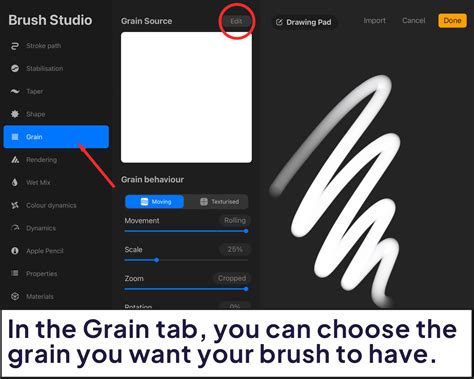
Changing the Grain: Start by changing the brush's Grain. Go to the Grain Settings and tap on Grain Source. Tap Import and select Source Library. Notice how selecting and applying a new grain dramatically alters your brush's appearance, adding a new layer of texture.
Refining Stroke Path: Return to your Stroke Path Settings and lower the Spacing to "None." This will create a continuous stroke rather than individual stamps.
Adjusting Shape Settings: Go to your Shape Settings and set the Scatter to 199%. This will distribute the shapes randomly around the stroke path, creating a more dispersed and textured effect.
Rendering Changes: Next, navigate to Rendering and change some settings. For instance, selecting Uniform Blending can produce a different visual outcome compared to other blending modes.
You've now learned how to make a brush in Procreate and have created two distinctly different results using the same base brush shape. Experimenting with these Procreate custom brushes will reveal the vast differences achievable through thoughtful adjustments.
Crafting Your Own Brush Assets: Shapes and Textures
To truly make your custom brushes unique, you'll want to create your own brush shapes and textures. This process often involves using real-world materials and then digitizing them.
Materials Needed:
- Materials for a brush shape & texture (e.g., black crayon, ink, paint)
- White surface
- Good lighting
- iPad, Scanner, or Camera
You can use almost any material to create unique textures and brush shapes. For example, a black crayon can be used to draw a circle for a brush shape, and a square filled in with ink can serve as a texture. It's best to create your shape and texture on a white surface to ensure a clear contrast between the material and the background.
Use your iPad or any camera to take a picture in good natural lighting, or scan your shape and texture with your printer. Even if the initial photo doesn't look perfect, it can be edited in Procreate.
Preparing Your Assets in Procreate
Create a Square Canvas: It is crucial to create a new canvas in Procreate that is square. If your canvas isn't square, you'll encounter distortions when you start to add a brush shape or texture. A canvas size of 1800x1800 px or larger is recommended to ensure your brush or texture doesn't appear blurry or pixelated in larger artwork. For projects intended for print media or very large digital pieces, a 3600x3600 px or larger canvas is advisable.
Editing Your Photo: Import the image of your brush shape or texture. Go to the Actions panel (Wrench Icon) at the top left. Depending on how you captured the image, select "Insert a file" or "Insert a photo" and locate your image.
Sizing the Image: Re-size your image to fit nicely within your square canvas.
- Brush Shape: Size your brush shape to fit centrally on the canvas. If it's not centered, your stroke position will be off. Ensure the brush shape doesn't touch or go past the edges of the canvas, leaving a bit of space on all sides to prevent cut-off edges.
- Texture: For textures, you want them to fill the entire canvas. Unintentional blank spaces can look messy once applied.
After resizing, tap the Transformation tool (Mouse pointer).
Adjusting Saturation and Brightness: To make your image monochrome and ensure the light areas are white for better definition, open your Adjustments panel (Magic wand icon). Tap on "Hue, Saturation, Brightness" and select "Layer." Slide the "Saturation" toggle to "None" and slightly increase your brightness. Tap the "Adjustments" icon when done. Repeat this for both your brush shape and texture.
Adjusting Contrast Balance: Back in the Adjustments panel, tap on "Curves" and select "Layer." Ensure "Gamma" is selected. Adjusting the curves will make darks black and light areas white. For instance, to maximize black areas, press on the curve line and drag it all the way down. To make the light "paper" areas white, press on the curve line and drag it slightly upward. Play with the curves until you achieve the desired contrast. Tap the "Adjustments" icon when finished.
Important Note: Procreate interprets black as opaque, white as transparent, and grey areas as semi-transparent when creating custom brushes. To achieve full opacity, ensure your desired brush areas are as close to black as possible.
Exporting the Brush Shape and Texture: Once editing is complete, export your brush shape and texture as separate images. Tap the "Actions" wrench icon, then "Share," select JPEG as your format, and save the images.
Creating Your Custom Brush in Procreate's Brush Studio
With your brush shape and texture prepared and exported, you can now begin the process of making a custom brush and custom brush group.
Create a Custom Brush Group: Go to your brush panel. Press and scroll up. You will see a "+" tab pop up. Name your custom brushes group (e.g., "My Custom Brushes").
Create a New Brush: Tap the "+" icon in the top right corner to create a new brush. This will open the Brush Studio with all the settings.
Add a Shape Source:
- Tap on the Shape option in the left options panel.
- Tap the Edit button next to "Shape Source."
- Tap Import and select "Import a photo." Locate and select your saved brush shape image.
- Invert Your Image: This step is critical. Procreate treats white as the "color" area and black as the "blank space." If your shape is black on a white background, you need to invert it so the shape itself becomes white. Tap on the image with two fingers to invert it. Tap Done.
Shape Behavior: Use the drawing pad's preview window to adjust how your shape behaves within a stroke. Settings like Spacing, Jitter, and Rotation can be fine-tuned here.
Add a Grain Source (for Texture): If you want to add texture, tap on the Grain option in the left options panel.
- Tap the Edit button next to "Grain Source."
- Tap Import and select "Import a photo." Locate and select your saved texture image.
- Invert Your Image: Similar to the shape source, invert your texture image by tapping on it with two fingers.
- Auto Repeat: If you want a seamless repeat of your texture, tap "Auto repeat." Additional settings will appear to adjust how the texture is repeated. Tap Done.
Grain Behavior: The grain behavior settings are split into Moving and Texturized. "Moving" grain rolls onto the brush shape, allowing for overlapping and opacity build-up. "Texturized" grain is imprinted and doesn't change with overlapping strokes.
Brush Properties and Behavior:
- Stamp Preview: Toggle on to show an image of your brush shape in the library.
- Orient to Screen: This applies to brushes with a distinct up and downstroke, orienting the brush to your screen view.
- Preview: Adjusts the size of your stroke in the preview window.
- Smudge: Determines how the brush acts as a smudge tool.
Additional Settings: Explore other options like Stroke Path (adjust spacing, scatter, fading), Taper (control stroke width and opacity based on pressure), and Rendering (how strokes overlap).
Name Your Brush: Tap on About this Brush. Rename your brush by tapping "Untitled Brush" and entering your desired name. You can also add your digital signature and create a reset point for your brush. Tap Done when finished.
Exploring Brush Types and Inspiration
Understanding different brush types can guide your creation process:
- Texture Brushes: These are excellent for adding grit and depth to your work. Creating your own texture brushes ensures a unique artistic style. You can pull out analog art supplies like ink and paint to create messy, gritty textures that are far more unique and realistic than digitally generated ones.
- Scatter Brushes: These brushes place repeated elements around the canvas, saving you from redrawing the same shape multiple times. They are great for elements like leaves, trees, or branches, but can be used with any shape.
- Stamp Brushes: Perfect for repeating the same shape over and over, either at different sizes or a consistent size.
- Pattern Brushes: Ideal for filling the canvas with bold background patterns or adding intricate patterns to your illustrations.
If you're looking for inspiration or a starting point, consider exploring pre-made brush packs. For example, Envato Elements offers unlimited downloads of Procreate brushes. Some highly recommended packs include:
- Graphic Beats: A professional, quality Procreate texture brushes pack with over 300 high-resolution stamp brushes and PNG stamps.
- Flower Pattern Brush Set: Features over 100 Procreate pattern brushes and over 50 stamp brushes.
- Collection of Procreate Pattern Brushes: Offers 45 pattern brushes to add interest and whimsy.
- Hand-Drawn Procreate Brushes: Fun sketch brushes suitable for a wide variety of drawing needs.
- Procreate Brush Set (Foliage): A versatile set with many potential applications, particularly for creating beautiful foliage.
- Procreate Hair Brushes: A pack of ten brushes specifically designed to simplify the often difficult and time-consuming process of drawing hair digitally.
- Brick Brush for Procreate: A hand-drawn brush that eliminates the tedious task of drawing bricks in various sizes and alignments for realistic effects. This pack includes three texture brushes and one color swatch.
- Chain Brush for Procreate: A cool and useful brush for creating logos, illustrations, posters, and backgrounds.
- 3D Procreate Lettering Brushes: Over five different brushes and one swatch with modern color palettes to elevate digital lettering.
- Complete Procreate Brush Pack (Painting): Includes 20 Procreate hatch and spray brushes, plus ten grunge textures.
How To Make A Brush Folder In Procreate
Troubleshooting and Best Practices
- Square Canvas: Always use a square canvas for your brush shapes and textures to prevent distortion.
- Pure Black and White: For opaque stamps or textures, always use pure black and white. Gray or other colors will result in semi-transparent brushes.
- Procreate 5 Updates: Remember that Procreate 5 significantly updated the brush-making panel. The section previously called "Source" is now divided into "Shape" and "Grain." When importing a stamp shape, go to the Shape section. For texture brush grain, use the Grain section.
- Older Versions: While many tutorials might be filmed in older versions of Procreate, the steps are generally similar. When importing shapes or grains in Procreate 5+, you need to click on the brush, then click Shape or Grain, tap Edit, and then Import.
By diving into the Procreate Brush Studio and experimenting with the myriad of settings, you can unlock a new level of artistic expression. The ability to craft your own brushes not only adds unique textures and strokes to your artwork but also allows you to translate real-world textures and shapes into the digital realm, truly defining your artistic style and setting you apart from the crowd.