Sharpening an image in Photoshop is a crucial step in bringing out detail and clarity, transforming a soft image into one with crisp definition. While Photoshop offers a variety of built-in sharpening tools and filters, many users find them confusing or are unaware of the most effective techniques. This article delves into the nuances of image sharpening in Photoshop, moving beyond the conventional filters to explore more powerful and nuanced methods, with a particular focus on the versatile High Pass filter technique and the advanced capabilities of Smart Sharpen and Camera Raw.
The Core Principle of Sharpening: Enhancing Contrast
At its heart, sharpening an image in Photoshop is about increasing the contrast along the edges of objects and details. This added contrast creates the illusion of greater definition and focus, making an image appear sharper and more impactful. Whether your images originate from a digital camera, a scanner, or are even existing prints, most can benefit from some level of sharpening to counteract the natural softness introduced during capture or reproduction.
The Sharpen tool itself, found in the toolbar often alongside the Blur Tool, works by increasing the contrast of adjacent pixels. However, this basic tool offers limited control. Sharpen More is essentially an amplified version of the Sharpen tool, while Sharpen Edges attempts to be smarter by only applying the effect where it detects a significant shift in brightness, defining an edge. While these tools can be useful for quick touch-ups, they often lack the precision needed for professional results and can easily lead to oversharpening.
Oversharpening is a common pitfall, resulting in a grainy or "noisy" appearance, particularly noticeable as bright spots on eyes, glasses, or teeth in portraits. This happens because pixels become so distorted that they introduce a new type of blur, often a colorful noise. To avoid this, it's advisable to sharpen in small amounts, perhaps multiple times, and to judge the results by outputting the image or by carefully examining it at 100% zoom.
Traditional Sharpening Filters: Unsharp Mask and Smart Sharpen
The most commonly accessed sharpening filters in Photoshop are Unsharp Mask (USM) and Smart Sharpen. These filters offer more control than the basic Sharpen tool by introducing adjustable parameters.
Unsharp Mask (USM)
The Unsharp Mask filter, despite its seemingly counterintuitive name, is a traditional film technique adapted for digital imaging. It works by locating pixels that differ from their surrounding pixels by a specified threshold and then increasing their contrast by a given amount. USM offers three key sliders:
- Amount: This controls how much to increase the contrast of pixels. A higher value results in a stronger sharpening effect.
- Radius: This determines the number of pixels surrounding the edge pixels that will be affected by the sharpening. A lower value sharpens only the immediate edge pixels, while a higher value sharpens a wider band, potentially leading to halos or artifacts. For high-resolution images, a radius between 1 and 2 is often recommended.
- Threshold: This slider determines how different adjacent pixels must be before they are considered edge pixels and thus sharpened. A higher Threshold value means a greater contrast difference is required for sharpening to be applied, which helps to avoid sharpening noise in smooth areas. A Threshold of 0 sharpens all pixels. Experimenting with values between 2 and 20 can be beneficial, especially for images with flesh tones, to prevent noise introduction.
When using USM, a good starting point is to set both Radius and Threshold to 0, then increase the Amount to around 200%. Gradually increase the Radius until you begin to see "ringing" halos, then back it off slightly. Subsequently, reduce the Amount until the desired sharpness is achieved without introducing excessive noise or artifacts. It's important to remember that the effects of USM are often more pronounced on-screen than in high-resolution print output.
Smart Sharpen
Smart Sharpen is a more advanced filter that builds upon the principles of USM and offers additional controls for more precise sharpening. It should be considered a starting point for most sharpening tasks in Photoshop. Within Smart Sharpen, you'll find familiar Amount and Radius sliders. However, the Threshold control from USM is renamed "Reduce Noise" and functions differently, smoothing the sharpening effect rather than acting as a strict cutoff.
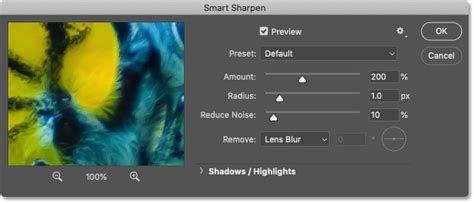
Smart Sharpen also introduces controls for Shadows and Highlights, which work similarly to the "Blend If" technique discussed later. These sliders provide a transition range, preventing harsh cutoffs and allowing for more nuanced application of sharpening in tonal extremes. The "Fade Amount" determines how much of the effect is applied to shadows or highlights, while "Tonal Width" defines the range of those tonal regions.
The "Remove" dropdown menu offers different algorithms: Gaussian Blur, Lens Blur, and Motion Blur. Lens Blur is often preferred for its ability to smooth out tiny specular highlights, while Gaussian Blur can sometimes oversharpen them. Motion Blur attempts to sharpen in a specific direction, but for motion-related issues, the dedicated Shake Reduction filter is usually a better choice.
The High Pass Filter: A Powerful Alternative for Sharpening
While not a sharpening filter by design, the High Pass filter is a remarkably effective tool for achieving precise and controlled sharpening, particularly when combined with layer blend modes. The High Pass filter is fundamentally an edge-detection filter; it reveals pixels that differ from their neighbors. When applied, it typically shows everything as a 50% gray background, with detected edges appearing in varying shades of gray.
The process for High Pass sharpening involves several steps:
- Duplicate and Desaturate: Duplicate your image layer (Layer > New > Layer via Copy). Then, desaturate this new layer (Image > Adjustments > Desaturate, or Shift+Ctrl+U / Shift+Cmd+U).
- Convert to Smart Object: Convert the desaturated layer into a Smart Object (Layer > Smart Objects > Convert to Smart Object). This allows for non-destructive application of the High Pass filter and enables future adjustments.
- Apply High Pass: Go to Filter > Other > High Pass.
- Adjust Radius: Start with the Radius slider at its lowest setting (0.1 pixels) and drag it to the right. Observe as edges begin to appear. A Radius value between 3 and 6 pixels often works well for general sharpening, but this is image-dependent. The Radius here controls the size of the features being detected, essentially selecting a "frequency" of detail. Smaller values target finer details, while larger values affect broader features and increase the risk of halos.
- Change Blend Mode: Change the blend mode of the High Pass layer to a contrast-enhancing mode such as Overlay, Soft Light, or Linear Light. Overlay and Soft Light are gentler, while Linear Light provides a more intense effect. As soon as you select a contrast blend mode, the gray areas disappear, revealing the sharpened image.
- Refine and Mask: You can now refine the sharpening by adjusting the Opacity of the High Pass layer. For selective sharpening, add a layer mask to the High Pass layer. To create a mask that hides the sharpening everywhere initially, press and hold Alt (Windows) or Option (Mac) while clicking the "Add layer mask" icon at the bottom of the Layers panel. Then, using a soft white brush (Hardness set to 0%), paint over the areas where you want to reveal the sharpening, such as the eyes, eyelashes, and eyebrows in a portrait.
This method provides excellent control, allowing you to isolate sharpening to specific areas and avoid undesirable effects on skin texture or smooth gradients.
Camera Raw Details Tab: Precision in a Familiar Interface
For users who process their raw files or prefer working within a familiar interface, the Camera Raw filter (accessible via Filter > Camera Raw Filter) offers a powerful sharpening capability within its Detail panel. This panel includes Amount and Radius sliders, similar to Unsharp Mask, but replaces Threshold with Detail and Masking sliders.
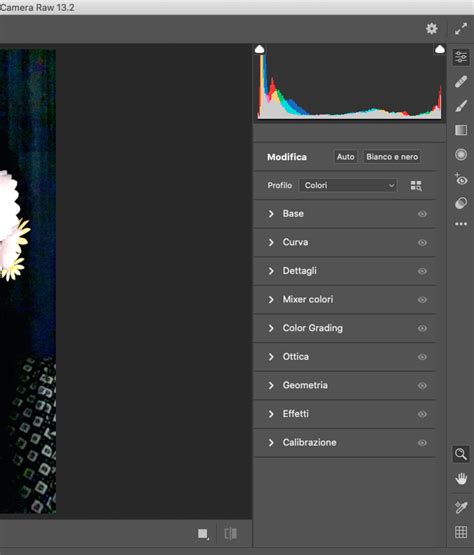
- Detail: This slider increases edge contrast without significantly altering the radius or overall power, designed to bring out fine textures without introducing artifacts.
- Masking: This is an edge-finding control. At 0, sharpening is applied everywhere. At 100, only the highest contrast boundaries of the smallest features are sharpened.
A particularly useful feature of the Camera Raw Detail tab is the ability to visualize the effect. By holding down the Alt (Windows) or Option (Mac) key while adjusting sliders, you can see a desaturated image, allowing your eyes to focus solely on luminosity changes. The Masking slider, when modified with the modifier key, shows a black and white representation of where sharpening is being applied. The Noise Reduction sliders (Luminance and Color) are also invaluable for preventing artifacts that can be exacerbated by sharpening, especially in darker or smoother areas. The algorithm in Camera Raw is generally more advanced, leading to fewer artifacts compared to older methods.
Shake Reduction: Correcting Motion Blur
When blurriness is a result of camera shake or subject movement during capture, the Shake Reduction filter is the specialized tool to address it. It employs a deconvolution filter to analyze the estimated movement of the camera and then attempts to reverse that motion.
The filter begins by analyzing a selected region of the image to estimate the blur path. You can guide this analysis by adjusting the "Blur Estimation Region" and its size. Photoshop then attempts to apply a correction based on this estimated path. Controls like "Blur Trace Bounds," "Source Noise," "Smoothing," and "Artifact Suppression" help to refine the result and prevent the introduction of new artifacts. Shake Reduction is most effective on images with subtle amounts of motion blur and works best when there's a clear, small detail like a specular highlight to analyze the movement.
The Philosophy of Sharpening: Perceptual vs. Technical
Beyond the technical execution, itâs important to consider sharpening from a perceptual standpoint. Sharpness is not merely a technical measurement but an element that influences how we perceive an image. While understanding the underlying math and algorithms is valuable, the ultimate goal is to present the image in a pleasing way that supports the photographer's intent.
Professional Sharpening Techniques in Photoshop
The question of "how much should you sharpen?" has a simple, yet profound answer: exactly enough, but not too much. Learning various methods provides choice, and choice empowers creativity. Rather than fixating on which tool is "best" or what "perfect" sharpening looks like, it's more beneficial to think about how the sharpening effect changes the viewer's perception of the work. Sharpening should be a conscious part of the creative process, not an afterthought or a compulsory step.
When sharpening for different mediums, consider the output. Images intended for web use require careful consideration of size and compression, which can affect the perceived sharpness. Print images, on the other hand, often require more sharpening due to the nature of the printing process. Raw images, by their very nature, tend to appear softer and benefit significantly from sharpening.
Ultimately, the best approach to sharpening in Photoshop involves understanding the strengths of each tool, experimenting with different techniques, and always keeping the final image and its intended purpose in mind. Whether you opt for the precision of the High Pass filter, the control of Smart Sharpen, the efficiency of Camera Raw, or the corrective power of Shake Reduction, the goal is to enhance your images without sacrificing their natural appeal.