Creating comic art, especially in the traditional pen-and-ink style, often begins with a foundational sketch. For many artists, this sketching phase is best handled with a light blue pencil. This choice isn't arbitrary; blue pigments possess a unique quality: they interact minimally with the blue channel of an RGB image. This characteristic makes them ideal for initial drafts, as they can be effectively removed later in the digital editing process without compromising the integrity of the inked artwork. This tutorial delves into the practical steps of leveraging this characteristic within Adobe Photoshop to efficiently eliminate those ubiquitous blue sketch lines, a process that, while seemingly technical, is fundamentally about understanding how Photoshop interprets color information.
The Foundation: Why Blue Pencils?
The effectiveness of using blue pencils for initial sketches in comic art and illustration hinges on a fundamental principle of color theory and digital imaging. In the RGB (Red, Green, Blue) color model, each color is represented by a combination of these three primary colors. Certain blue pigments are formulated to have a pigmentation that almost exclusively affects the blue component of the RGB image. This means that when you scan your artwork into Photoshop, the blue lines will be predominantly registered in the "Blue" channel, while the red and green channels will largely remain unaffected.
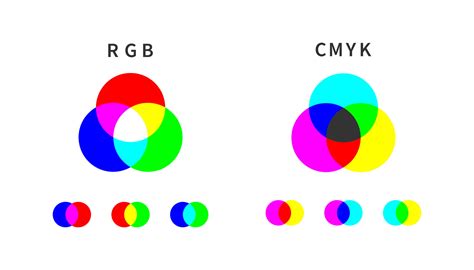
This selective interaction allows for a clean separation during the digital cleanup phase. Pencils that exhibit a broader spectrum of color, such as those with a hint of red that might lean towards violet, will not yield the same clean results. Their pigments would bleed into multiple color channels, making their isolation and removal more challenging. Therefore, when embarking on a traditional sketching workflow intended for digital refinement, selecting a pencil with a pure red, green, or blue pigment is crucial. Among these, blue is often the preferred choice. Its subtle nature means it tends to not draw attention too much, much like how blue is used in landscape painting to suggest distance or in film lighting to make backgrounds recede.
The Traditional Workflow: From Sketch to Scan
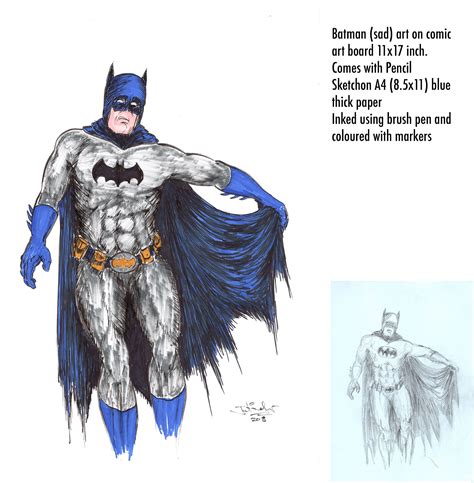
For artists who embrace the tactile experience of drawing on paper, the process typically begins long before the pixels come into play. This tutorial is geared towards those who are taking the traditional approach of paper and pencil on a comic tablet, such as a Comic Art Board. The quality of the paper is paramount; it should hold ink well without scratching or bleeding, ensuring a clean canvas for your artwork.
The creative journey often starts with thumbnail sketches. These are rapid, small-scale drawings that serve as the visual backbone for your script, helping to iron out compositional ideas and to sand out any rough spots in the artistic vision before committing to more detailed work. When creating these thumbnails and subsequent detailed sketches, using a light blue pencil is highly recommended. The goal is to match the color of the guidelines already present on the paper, which are known as "guidelines." Your own blue pencil work will then represent your thumbnails and eventual sketches.
While drawing your thumbnail, it's advisable to do so on the main layer of your digital canvas if working digitally from the outset, or on a separate layer if you're preparing for a scan. When ready to add your detailed sketches, create a new layer and significantly reduce the opacity of your thumbnail layer until it's barely visible. This allows you to sketch over your initial ideas without the thumbnail obscuring your refined lines.
The next critical step is to go over your blue pencil sketch with a darker medium, typically graphite pencil or directly with ink. The blue pencil lines will not affect this new layer, ensuring a clean separation. For detailed linework, a fine-tipped mechanical pencil is often preferred for its consistency. Personally, the Staedtler Mars Technico Lead Holder is a favored tool due to its reliability.
Once the pencil work is complete and you are satisfied with the page, the inking process begins. For larger, darker areas, a brush and Indian ink are excellent choices. However, caution is advised at the edges to prevent bleeding, which can be difficult to rectify.
The culmination of the traditional process is scanning the artwork. Ideally, use a scanner capable of high resolution, with 600 dpi being a good standard and higher resolutions like 4800 dpi offering even more detail. However, the common issue arises with standard scanner sizes (8.5 x 11.7 inches) and larger artboards (often 11 x 17 inches). This necessitates scanning the artwork in sections and then meticulously piecing them together in Adobe Photoshop. Ensuring these scans are perfectly aligned and straight is crucial, as rotating misaligned halves can be a tedious and frustrating task. Some artists opt for specialized wide-format scanners or create jigs to ensure stable, straight scans. For those working with digital tools like Procreate, the scanning step is bypassed, and the artwork can be directly transferred to Photoshop.
The Digital Cleanup: Unleashing Photoshop's Channel Power
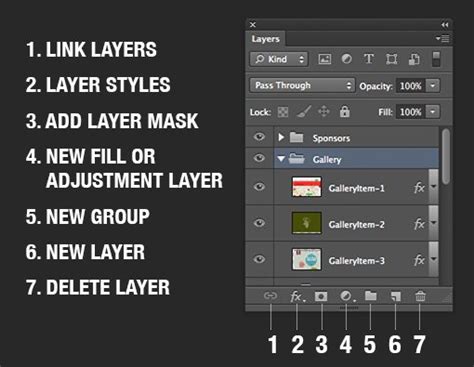
This is where the magic happens, and the reason for choosing blue pencils in the first place becomes apparent. Once your scanned artwork, pieced together if necessary, is open in Adobe Photoshop, you'll notice the layers panel. Photoshop uses channels to store color information about your image. For a standard RGB image, you'll typically see four options: RGB (all channels combined), Red, Green, and Blue.
The key to removing blue lines lies in manipulating these channels. Navigate to the "Channels" tab, usually located next to the "Layers" tab. You will see the individual Red, Green, and Blue channels. Select the "Blue" channel. You will immediately notice that the blue lines from your sketch have become significantly more prominent, appearing almost black, while the rest of your artwork, particularly the inked lines, will appear much lighter, often as shades of grey.

This visual change is because you are now viewing the image solely based on its blue color information. Since your sketch lines were predominantly blue, they are strongly represented here. The actual inked lines, which contain other color components, are less visible.
Now, here’s the crucial step: with the Blue channel still selected, click on the "eye" icon next to the Red and Green channels (or ensure they are not selected for visibility if they were). This effectively hides the red and green components, leaving only the blue information visible. Visually, the blue lines will appear to disappear from your canvas. However, it's important to understand that the blue pigment information hasn't been truly erased from the image yet; it's merely not being displayed when viewing the RGB composite. To make this removal permanent and to reintegrate the cleaned artwork, you need to flatten the image. Switch back to the "Layers" tab. Ensure your artwork layer is unlocked (click the lock icon if present). Then, go to Layer > Flatten Image. This merges all visible layers into a single background layer, effectively discarding the blue channel information that was not part of your final inked artwork.
Refining the Scan: Tackling Residual Scan Artifacts
Even after removing the blue lines, scanned artwork can sometimes retain subtle artifacts, such as light grey blotches or faint scanner lines. These are common and can mar the final appearance of your artwork. Fortunately, Photoshop offers tools to address these as well.
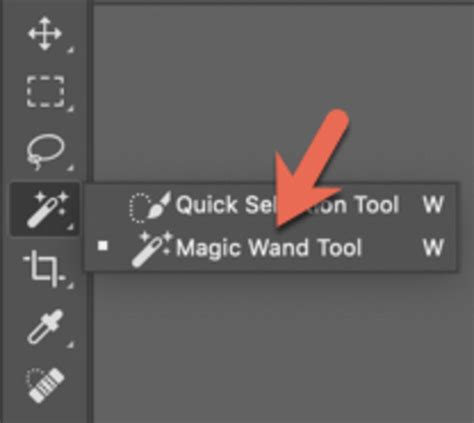
The "Magic Wand Selection Tool" is highly effective for this purpose. Set its "Tolerance" to around 50. This value determines how sensitive the tool is to color variations. Click within the areas containing these unwanted scan lines or blotches. The Magic Wand will create a selection around these areas. It's vital to ensure that this selection does not encompass any of your actual artwork. If it does, you may need to adjust the tolerance or use other selection tools like the Lasso Tool to refine the selection.
Once you have an accurate selection of the scan artifacts, simply press the "Delete" key. This will remove the selected areas, leaving you with a clean rendering of your inked artwork.
You might notice a grey checkered background after this process. This is the default transparency indicator in Photoshop. To present your artwork cleanly, create a new layer and place it underneath your artwork layer. Fill this new layer with white. This provides a solid, clean background for your artwork, ready for further editing, coloring, or preparation for print.
Beyond Blue: Understanding "Numberlines" and Guides
The user's query about "numberlines" likely refers to Photoshop's "Guides." These are non-printing lines that appear on your canvas, helping you align objects and position elements with precision. They are invaluable for maintaining consistency and accuracy in layouts, especially in multi-panel works like comic pages.
Guides can be created by clicking and dragging from the rulers at the top and left edges of the document window. If you don't see rulers, you can enable them via View > Rulers or by pressing Ctrl+R (or Cmd+R on Mac).
To remove guides, you can go to the View menu and select Clear Guides. If you want to temporarily hide them without deleting them, you can also find this option in the View menu. For those who have accidentally enabled specific guide-related features that result in persistent blue lines (which might be different from the sketch lines), the View > Show menu can be a helpful place to explore, looking for options related to guides or rulers that can be toggled on or off.
The "Optimize" menu mentioned in the user's input is more commonly associated with saving files for the web, particularly in older versions of Photoshop or when dealing with formats like GIF. For general image editing and cleanup, focusing on layers and channels is the primary approach.
How to Add Ruler Guides in Photoshop
The ability to manipulate color channels and leverage tools like the Magic Wand provides a powerful workflow for traditional artists transitioning their work into the digital realm. This method of removing blue sketch lines is not just a technical trick; it's an elegant solution that respects the artist's chosen medium while embracing the efficiency and flexibility of digital editing. By understanding the underlying principles of color channels and employing Photoshop's robust features, artists can achieve clean, professional-looking results, allowing their inked artwork to truly shine.