Working with digital art software can sometimes feel like navigating a maze of file formats and compatibility issues. A common question among digital artists, particularly those using Procreate on iPad, is whether Procreate can open and work with Adobe Photoshop's native file format, PSD. The answer is a resounding yes, but understanding the nuances of this compatibility is key to a smooth and efficient workflow. Procreate's ability to import PSD files opens up a world of possibilities for artists who utilize both Procreate and Photoshop, allowing for a more integrated and flexible creative process.
Understanding Procreate's PSD Support
Every artwork you create in Procreate is initially saved in its native .procreate file format. This format is optimized for Procreate's performance and features, automatically saving your progress as you draw. A unique aspect of the .procreate file is its ability to store video data, capturing your entire drawing process for time-lapse playback. While this native format is powerful, Procreate also offers robust support for importing and exporting Adobe Photoshop documents (PSD).
When Procreate imports an Adobe® Photoshop® document (PSD), it strives to preserve crucial elements of your Photoshop work. This includes locked layers, layer groups, compatible filters, and layer blend modes. This preservation is vital for artists who build their assets in Photoshop and then want to refine them further in Procreate, or vice versa. The ability to transfer these layered files without significant data loss is a significant time-saver and a cornerstone of efficient cross-application workflows.
Limitations of PSD Files in Procreate
Despite Procreate's commendable PSD support, it's important to be aware of certain limitations. Procreate does not natively support text layers from Photoshop. When a PSD file containing text layers is imported, Procreate will rasterize these layers. This means the text will be converted into pixels, and you will no longer be able to edit it as editable text within Procreate. Similarly, Procreate does not support Photoshop's smart objects. These limitations mean that while Procreate can open PSDs, it doesn't replicate every single feature of Photoshop. Artists should be mindful of these differences to avoid unexpected outcomes when transferring files.
Alternative File Formats for Procreate
While PSD files offer excellent interoperability with Photoshop, Procreate's native .procreate file format is optimized for the app's specific functionalities and performance. Using .procreate files can lead to a faster and smoother drawing experience. Furthermore, the .procreate format is where features like automatic time-lapse recording are inherent. Advanced Procreate features such as QuickShape and Streamline are also exclusively available when working within this native format. For artists who primarily work within Procreate, sticking to its native format might offer the best overall experience.
Importing PSD Files into Procreate
The ability to import layered PSD files directly into Procreate is a feature that many artists have eagerly awaited and is now a reality, significantly streamlining workflows. This capability allows for the seamless transfer of complex projects from Photoshop to Procreate, preserving the integrity of layers, groups, and blend modes.
Different Methods to Import PSD Files
There are several straightforward methods to import PSD files into Procreate, catering to different user preferences and device setups.
- Using the Files App: This is often the most direct method. Navigate to the PSD file within your iPad's Files app, tap on it, and it should automatically open in Procreate. If Procreate isn't your default app for PSDs, you might need to tap the share icon within the Files app and select "Open in Procreate" or "Copy to Procreate."
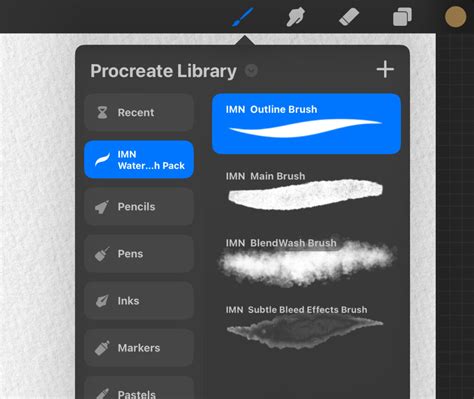
- Importing via Procreate's Actions Menu: Within Procreate, tap the wrench icon to open the Actions menu. Navigate to "Add" and then select "Insert a file." Browse to your PSD file and select it.
- Drag and Drop: If you have Procreate open in a split-screen or slide-over view alongside the Files app, you can often drag and drop the PSD file directly from the Files app onto your Procreate canvas.
Step-by-Step Guide to Importing PSD Files
Let's walk through the most common method using the Files app:
- Locate your PSD file: Open the Files app on your iPad and navigate to the folder where your PSD file is saved (e.g., iCloud Drive, On My iPad, or a cloud storage service).
- Tap the PSD file: Simply tap on the PSD file you wish to import.
- Automatic Import: Procreate should automatically launch and begin importing the PSD file. You will see a progress indicator as the file is processed.
- Canvas Creation: Once imported, the PSD file will open as a new canvas in Procreate, with its layers preserved.
Troubleshooting Common Import Issues
Occasionally, issues might arise during PSD import. Here are some common problems and their solutions:
- Missing Layers or Effects: If some layers or effects are missing, it's likely due to unsupported features. Procreate rasterizes text layers and does not support Photoshop's smart objects. Some complex layer effects or filters might also not translate perfectly. Check your PSD in Photoshop to confirm the original state of these layers.
- File Size Limitations: Procreate has canvas size and layer limits. Very large or complex PSD files might exceed these limits, leading to import failures or performance issues. Consider reducing the canvas dimensions or simplifying the layer structure in Photoshop before importing.
- File Corruption: If a PSD file won't import at all or appears corrupted, try opening it in Photoshop to verify its integrity. If it opens fine in Photoshop, try re-saving it as a new PSD file from Photoshop and then attempt to import it into Procreate again.
Exporting PSD Files from Procreate
The ability to export your Procreate artwork as a PSD file is crucial for artists who need to move their work into Photoshop for further editing, compositing, or finalization. This ensures that your layered artwork remains editable in a professional desktop environment.
Step-by-Step Guide to Exporting PSD Files
Exporting a Procreate project as a PSD is a straightforward process:
- Open your Procreate artwork: Launch Procreate and open the project you wish to export.
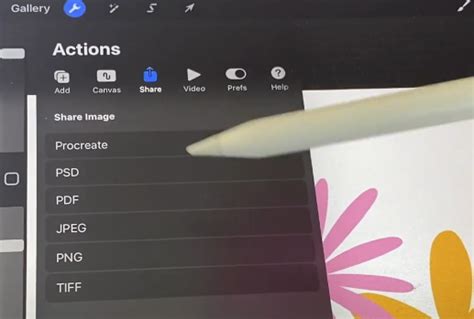
- Access the Actions Menu: Tap the wrench icon (Actions) located in the top-left corner of the screen.
- Select "Share": In the Actions menu, tap on "Share."
- Choose "PSD": From the list of available export formats, select "PSD."
- Choose your save location: A share sheet will appear, allowing you to choose where to save your exported PSD file. Options include saving to the Files app, AirDropping to a Mac or another iPad, or sending to cloud storage services like Dropbox or Google Drive.
- Save or Send: Tap "Save" or "Send" depending on your chosen destination. Your artwork will be exported as a layered PSD file.
Optimizing Export Settings for PSD Files
To ensure the best results when exporting PSD files from Procreate, consider these optimization tips:
- Layer Preservation: Always ensure you are exporting in a format that preserves layers. The PSD export option in Procreate does this by default, which is essential for continued editing in Photoshop.
- File Size Management: High-resolution artwork can result in large PSD files. While Procreate exports at the canvas resolution, be mindful of this if you need to share or transfer large files. If file size becomes an issue, consider exporting at a slightly lower resolution or using Photoshop to compress the file after export.
- Compatibility: To maintain seamless compatibility, avoid using layer effects or adjustments in Procreate that you know do not have direct equivalents in Photoshop. While Procreate does a good job of translating many effects, some advanced or proprietary Procreate features might not transfer perfectly.
Troubleshooting Common Export Issues
While PSD export is generally reliable, you might encounter a few common issues:
- Missing Layers or Effects: If layers or effects appear missing or altered in Photoshop, revisit the compatibility notes. Ensure all layers were visible and not locked in Procreate before exporting. Some blend modes or effects might need minor adjustments in Photoshop.
- File Size Limitations: If the exported PSD is too large for your needs or for the platform you're uploading it to, consider reducing the canvas size in Procreate before exporting, or use Photoshop's "Save for Web (Legacy)" or "Export As" options to create a more optimized version.
- Export Errors: If you encounter an error during export, ensure you have sufficient storage space on your device and in your chosen save location. Closing other background apps can also free up memory and potentially resolve export glitches. Restarting your iPad is also a good troubleshooting step.
Working with PSD Layers in Procreate
Once you've successfully imported a PSD file into Procreate, the real magic happens when you start working with its layers. Understanding how Procreate handles these layers, and how they interact with Photoshop's layer system, is key to a fluid cross-application workflow.
Managing Layers in Procreate
Effective layer management is fundamental to any digital art project, and Procreate offers intuitive tools for this:
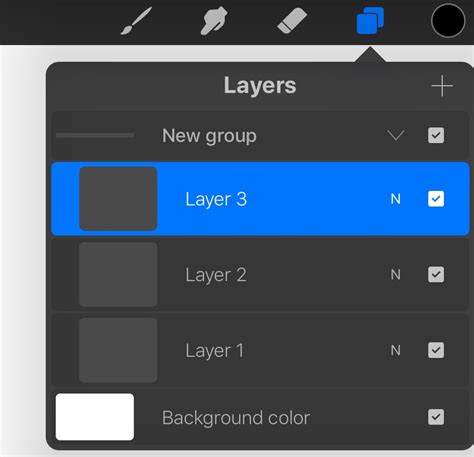
- Creating New Layers: Always create new layers for new elements or adjustments. This non-destructive approach ensures you can easily modify or remove elements without affecting other parts of your artwork.
- Renaming Layers: Give your layers descriptive names. When importing a PSD with numerous layers, clear naming conventions (which can be established in Photoshop beforehand) make it significantly easier to locate and manage specific elements within Procreate.
- Organizing Layers: Use layer groups to keep related elements together. You can create groups by swiping left on a layer and selecting "Group," or by dragging layers onto each other. This organization is maintained when exporting back to PSD.
Applying Layer Effects and Adjustments
Procreate provides a rich set of tools for manipulating layers:
- Blend Modes: Accessible by tapping the "N" icon on a layer, blend modes control how a layer interacts with the layers below it. Procreate supports many standard blend modes that are also found in Photoshop, ensuring consistency.
- Opacity: The opacity slider, located next to the blend mode setting, allows you to control the transparency of a layer.
- Masks: Layer masks are a powerful non-destructive editing tool. You can add a mask to a layer by tapping its thumbnail in the Layers panel and selecting "Mask." This allows you to selectively hide or reveal parts of the layer.
- Adjustment Layers: Procreate's "Magic Wand" icon provides access to various adjustments like Brightness/Contrast, Hue/Saturation, and Curves. While these can be applied directly to layers, be mindful of their compatibility when exporting to Photoshop.
Ensuring Layer Compatibility between Procreate and Photoshop
To ensure your work transitions smoothly between Procreate and Photoshop, keep the following in mind:
- Avoid Unsupported Effects: Some Procreate-specific effects or advanced filters might not have direct equivalents in Photoshop. If you rely heavily on these, test your PSD export in Photoshop to see how they translate. Features like Liquify or specific brush effects might require reapplication or adjustment in Photoshop.
- Rasterize Where Necessary: If you're using features like Procreate's text tool (which is rasterized upon import from PSD), understand that you're working with pixels. For editable text, it's always best to create or edit text directly in Photoshop.
- Test Compatibility: When in doubt, export a test PSD file after applying a specific effect or adjustment in Procreate and check its appearance and editability in Photoshop. This proactive testing can save a lot of frustration down the line.
Best Practices for PSD Files in Procreate
Maximizing the benefits of working with PSD files in Procreate involves adopting smart organizational habits and workflow strategies. These practices ensure that your creative process remains efficient and that your valuable artwork is always secure.
Organizing Your PSD Files
A well-organized file system is paramount for any digital artist. Implementing a clear structure for your PSD files will save you time and reduce stress.
- Folder Structure: Create a logical hierarchy of folders on your iPad's Files app or cloud storage. Categorize projects by client, project type, year, or status (e.g., "In Progress," "Completed"). This makes finding specific files effortless.
- Naming Conventions: Adopt a consistent naming convention for your PSD files. Include project names, version numbers (e.g.,
ProjectName_v03.psd), and dates where appropriate. This helps track revisions and easily identify the latest iteration. - File Cleanup: Periodically review your project folders. Archive older or unused versions of files to a separate backup location, and delete any redundant files. A clean workspace allows for better focus on current tasks.
Streamlining Your Procreate and Photoshop Workflow
The true power of Procreate's PSD support lies in creating a fluid workflow between the two applications.
- Leverage Strengths: Use Procreate for its intuitive drawing and painting experience, especially for sketching, concept art, and initial rendering. Then, transfer to Photoshop for advanced compositing, precise color correction, intricate retouching, and final output preparation.
- Utilize Cloud Sync: Services like iCloud Drive, Dropbox, or Google Drive are indispensable. Ensure your PSD files are synced to the cloud. This allows you to seamlessly switch between your iPad and your computer, always accessing the most up-to-date version of your work.
- Iterative Process: Don't be afraid to move back and forth between Procreate and Photoshop. Sketch in Procreate, refine in Photoshop, add details back in Procreate, and finalize in Photoshop. This iterative approach leverages the best of each software.
I Quit Photoshop for Procreate After 25 Years
Backing Up Your PSD Files
Protecting your work from data loss is non-negotiable. Implementing a robust backup strategy is essential.
- Cloud Storage as Backup: Beyond syncing, cloud storage services act as an excellent off-site backup. Regularly save your work to these services.
- External Drives: For an additional layer of security, regularly back up your important PSD files to an external hard drive or SSD. This provides a local copy in case of internet outages or cloud service issues.
- Automated Backups: Whenever possible, set up automated backup routines. Many cloud services and third-party software offer options to automatically back up specified folders. This ensures your work is protected without you having to remember to do it manually.
By embracing Procreate's PSD import and export capabilities, and by following these best practices, digital artists can create a powerful and efficient workflow that bridges the gap between mobile creativity and desktop power, ultimately enhancing their artistic output and creative freedom.