In the dynamic world of digital photography and image editing, the ability to meticulously refine an image without fear of irreversible errors is paramount. Photoshop's History Panel stands as a cornerstone of this creative freedom, acting as a comprehensive log of every action taken within an editing session. This powerful tool offers a robust safety net, allowing users to navigate back through their creative process, undo unwanted changes, and explore multiple editing paths with confidence.
Understanding the Fundamentals of the History Panel
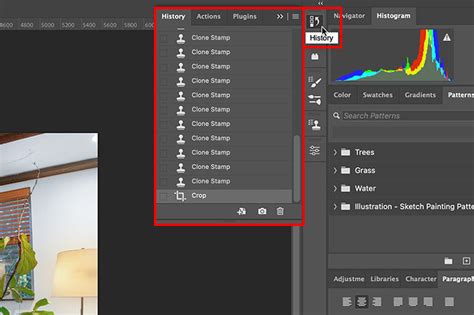
At its core, the History Panel in Photoshop is a chronological record of your editing session. Each modification, from a subtle brush stroke to a significant filter application, is captured as a distinct "History State." By default, these states are listed from oldest at the top to most recent at the bottom. This linear progression is what most users initially associate with the History Panel - a sophisticated version of the familiar "Undo" command.
The basic function of undoing an action is readily accessible. You can revert to the previous step by selecting "Edit" > "Undo" or by using the ubiquitous keyboard shortcuts: Ctrl+Z on Windows or Command+Z on Mac. Continuing to press these shortcuts will step backward through each recorded action. The History Panel visualizes this process, displaying each of these steps as a selectable state. Clicking on any state in the panel will instantly revert your image to its appearance at that specific point in time.
However, it's crucial to understand the implications of this linear nature. If you navigate back to an earlier state and then proceed to make a new edit, all the subsequent states that followed the earlier one will be permanently discarded. This means that any work done after the point you've jumped back to will be lost unless you've taken measures to preserve it.
Unlocking Non-Linear Editing with History Options
While the default linear behavior is straightforward for simple undo operations, it can be restrictive when exploring different creative directions. Photoshop offers a powerful feature to overcome this limitation: Non-Linear History. By accessing the History Panel's flyout menu (often represented by stacked horizontal lines or a similar icon in the top-right corner of the panel) and selecting "History Options," you can enable "Allow Non-Linear History."
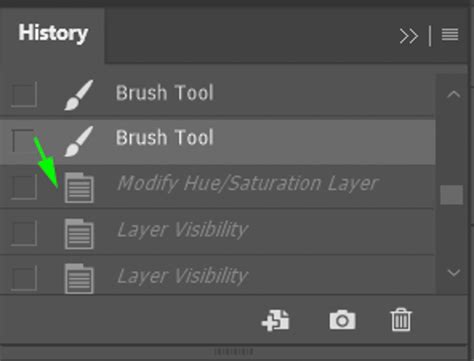
With this setting activated, you can click on any past state in the History Panel, and then continue to make new edits without automatically erasing the states that came after it. These subsequent states will still appear in the panel, albeit often "dimmed" or visually distinguished, indicating that they are no longer part of the current, active editing path. This opens up a world of possibilities for experimentation, allowing you to branch off from any point in your editing history. You can effectively create multiple versions of your image within a single session by simply jumping between states and continuing your work from there.
Managing History States: Performance and Preservation
Photoshop's ability to track your editing journey comes at a cost: memory. By default, Photoshop is configured to record a specific number of History States before older ones are automatically purged to conserve system resources. The default number of states is typically 20, though newer versions might default to 50. This limit can be adjusted to suit your workflow and system capabilities.
To modify the number of History States, navigate to "Edit" > "Preferences" > "Performance" (on Windows) or "Photoshop" > "Preferences" > "Performance" (on Mac). Within the Performance tab, you'll find a "History States" setting. You can increase this number, often up to a maximum of 1,000 states, using a slider or by directly typing in a value. It's important to strike a balance: a higher number of states allows you to backtrack further, but it also demands more RAM and potentially utilizes the scratch disk more heavily, which can impact overall Photoshop performance, especially on systems with limited resources. The type of edits also influences memory usage; complex operations like applying filters to an entire document consume more memory per state than localized edits like small paint strokes.
Snapshots: Saving Key Milestones
While the History Panel is invaluable for immediate undo and redo operations, its states are transient. Crucially, all History States and Snapshots are discarded when you close a Photoshop document. This means that even if you save your file, the detailed editing history is not preserved within the saved file itself.
To safeguard specific points in your editing process, Photoshop offers "Snapshots." When you first open a document, Photoshop automatically creates an initial snapshot of its original state, which appears at the top of the History Panel. You can create additional snapshots at any point during your editing session by clicking the "Create New Snapshot" button (often depicted as a camera icon) at the bottom of the History Panel.
How to History Panel and Snapshots on Photoshop
Snapshots act as permanent bookmarks within your current editing session. They are particularly useful when you want to experiment with significant changes, such as trying out different color grading techniques or applying complex retouching. By creating a snapshot before embarking on these potentially risky edits, you ensure that you can always revert to that saved state without losing your progress.
There are also options to customize snapshot creation. By default, a new snapshot is created when you save your document. This can be controlled via the History Options menu, allowing you to choose whether to "Show New Snapshot Dialog by Default" or to "Automatically Create New Snapshot When Saving." The latter option ensures that a snapshot of the saved state is always available, providing a fallback in case of accidental saves or the desire to revert to a precisely saved version.
Beyond Simple Undoing: Advanced History Panel Features
The History Panel's utility extends far beyond its basic undo functionality, offering several advanced features that can significantly enhance your workflow.
Duplicating History States
Sometimes, you might want to explore an edit from a specific past state but also want to retain that exact state as a starting point for another branch of edits. You can achieve this by duplicating a History State. While holding down the Option key (Mac) or Alt key (Windows), click on the desired history state (excluding the current active state). This will create an exact copy of that state, allowing you to branch your work from it without affecting the original.
Creating New Documents from States
For a more permanent record of a specific historical state, you can create a new document from it. Select the desired state in the History Panel, then click the "Create New Document from Current State" button (often depicted as a piece of paper with a plus sign). This action will generate a brand-new Photoshop document containing only the selected state, completely independent of the original document's history.
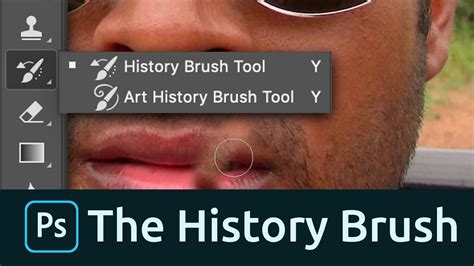
The History Brush and Art History Brush
Photoshop provides specialized tools that interact directly with the History Panel: the History Brush and the Art History Brush. These tools allow you to "paint" with a previous state onto your current image. You can select a specific state in the History Panel by clicking in the empty well next to it. Then, using the History Brush, you can paint over areas of your image to revert them to how they looked in that selected historical state. The Art History Brush offers a more artistic interpretation, applying brush strokes that mimic the appearance of the selected state with stylistic variations. For the Art History Brush, using a very small brush size can help maintain finer details.
Clearing History and History Log
To free up RAM and scratch disk space, or simply to clean up a cluttered History Panel, you can clear the history. Selecting "Clear History" from the History Panel's flyout menu will remove all states and snapshots. Notably, you can still undo this action immediately by selecting "Edit > Undo Clear History." However, if you hold down Option (Mac) or Alt (Win) while selecting "Clear History," the history will be permanently deleted without the option to undo, mimicking the effect of closing and reopening the file. This can be useful for privacy or to reclaim system resources.
For those who need a detailed audit trail of their editing process, Photoshop offers the "History Log" feature. Accessible via "Edit > Preferences > History Log" (or similar path depending on Photoshop version), enabling this option allows Photoshop to record a detailed log of all commands applied to a file. This log can be saved in various formats, providing a comprehensive record of every action taken.
Best Practices for Effective History Panel Usage
To maximize the benefits of the History Panel, consider adopting these best practices:
- Utilize Snapshots: Regularly create snapshots of key milestones in your editing process. This is especially important before undertaking significant or experimental changes.
- Adjust History States: Configure the number of History States in your Performance Preferences to match your typical workflow and system capabilities.
- Enable Non-Linear History: For flexible exploration of creative options, enable "Allow Non-Linear History." This empowers you to branch off from any past state without losing subsequent edits.
- Understand State Implications: Be mindful that making edits from a past state will discard all subsequent states unless Non-Linear History is enabled and you manage your branches effectively.
- Leverage Undo: While the History Panel provides more granular control, the simple Undo command (Ctrl/Cmd+Z) remains your fastest tool for correcting immediate mistakes.
- Clear History When Necessary: Periodically clear your history to free up system resources, especially on complex projects or less powerful machines.
- Explore Advanced Tools: Experiment with the History Brush and Art History Brush for unique creative effects.
- Consider Layer Masks: For non-destructive editing, many professionals prefer using Layer Masks over relying solely on the History Panel. Layer Masks allow you to selectively reveal or conceal parts of a layer without permanently altering pixels, offering a more flexible and controlled approach to undoing specific effects.
By understanding and effectively utilizing the features of Photoshop's History Panel, you gain an unparalleled level of control and confidence in your digital editing endeavors, transforming it from a simple undo tool into a powerful creative companion.