Clip Studio Paint, a robust digital art software, offers a suite of features designed to streamline the creative process from creation to dissemination. Among these, Clip Studio Share stands out as a powerful tool for artists looking to showcase their work to a wider audience. This platform facilitates the sharing of digital creations, offering a seamless way to connect with social media followers and the broader Clip Studio community. Whether you're an individual artist or part of a larger creative endeavor, understanding and utilizing Clip Studio Share can significantly enhance your reach and engagement.
Bridging the Gap: Cross-Platform Compatibility and Cloud Synchronization
One of the most significant advantages of Clip Studio's ecosystem is its commitment to cross-platform compatibility. CLIP STUDIO's cloud service is engineered to allow users to edit the same file across a diverse range of devices and operating systems. This means that whether you are working on an iPad, a Windows PC, a macOS device, or an Android tablet, your projects remain accessible and editable. This fluid transition between platforms is invaluable for artists who might switch between devices depending on their location or task.

The cloud service operates by synchronizing your work through its Projects screen. Works that are saved within this designated "Projects" area are automatically displayed and manageable through the cloud. It is important to note that works saved in other locations on your device will not be reflected on the Projects screen and therefore cannot be directly shared or synced via the cloud service. To enable synchronization for a specific work, navigate to the Projects screen, tap "In this app" (or "This Device" on the Windows/macOS version), locate the work you wish to share, and switch its syncing status to "Syncing On."
Downloading your works from the cloud is equally straightforward, allowing you to edit them on your chosen device. By tapping "Cloud" on the Projects screen, you can access your synchronized files. If a work has already been downloaded to your current device, you will see a "[Download and overwrite]" icon. Selecting this option will download the latest version of the work from the cloud and replace the existing data on your device, ensuring you are always working with the most up-to-date file.
However, users must be mindful of file naming conventions when utilizing the cloud service. If a file name contains certain symbols or character strings, such as / > < ? : " \ * | ; NUL, it may prevent the file from being used within the cloud service. This is a crucial detail to remember to avoid potential syncing issues.
Sharing Your Masterpieces: The Clip Studio Share Feature
Clip Studio Paint's "Share" feature, as highlighted by long-time user Liz Staley, is designed to make it incredibly easy for artists to share their work online. This functionality is particularly useful for artists who enjoy showcasing their creations to others, a common desire within the art community. The integration of sharing capabilities directly within the software streamlines the process, eliminating the need for cumbersome manual uploads to external platforms.
The process begins within the Clip Studio app itself. From the main interface, users can access "Clip Studio Share" from the left-hand side menu. The next step involves choosing the method of uploading your work. For standard image files like JPG/PNG or for works intended for the vertical scrolling Webtoon format, the "Upload From Browser" option is recommended.
How to TRANSFER Your Clip Studio Paint SETTINGS or BACK THEM UP (brushes, keybinds etc)
Once you've initiated the upload, you will be prompted to select the reading direction for your content. If you are uploading a Webtoon, for instance, you would choose the vertical option. Clip Studio will then present a list of recent works from your program. After confirming the upload, a message will appear, and upon clicking "OK," Clip Studio Paint EX will guide you back to the page manager, indicating that data is being exported. This exported data is then uploaded to Clip Studio Share.
It's important to understand that your work will not be publicly visible on the platform until you explicitly choose to "Publish" it. After the export and upload processes are complete, you will be prompted to enter essential information about your work. This includes assigning a title and providing descriptive "About" information. If your original file contained cover page data, the thumbnail image for your shared work will be automatically generated from the front cover. Additionally, there is a dedicated space for a "thumbnail for sharing," which is the image that will appear when your work is shared on social media platforms. This can also be pulled from the cover page data or customized as needed.
Crafting Digital Books with Clip Studio Paint EX
For users of Clip Studio Paint EX, the software offers advanced capabilities for creating digital books, including the ability to generate an ebook file from a multi-page story file. This feature opens up exciting possibilities for self-publishing and distributing more comprehensive projects. When Clip Studio Share presents your work in a 3D "book" format, specific display sizes are available: A4, B5, and B6.
It is crucial for creators to be aware of these display sizes, especially if they plan to use the 3D book viewing format. As noted by Liz Staley, if the page sizes within your original file do not precisely match the 3D book format's dimensions, you may encounter white space on the top and bottom of your pages. This discrepancy arises because the software scales your artwork to fit the chosen book size. Therefore, if you intend to use the 3D book viewing format, it is advisable to plan your page dimensions accordingly to ensure an optimal visual presentation.
For artists who do not have Clip Studio Paint EX, the core sharing functionalities are still accessible, focusing on individual image or Webtoon uploads. The process of laying out pages for a project, such as having artwork on one side and accompanying information on the other, can be managed within the Clip Studio app before initiating the sharing process.
Customizing Your 3D Book Presentation
Clip Studio Share provides extensive options for customizing the presentation of your digital book, particularly when using the 3D Viewer. After setting up your work, you can configure various aspects of its digital appearance.
Book Size and Cover Options
The first choice is the book size, with options including A4, B5, and B6. Following this, you can select the "Cover stiffness," which dictates whether your 3D digital book appears as a paperback or a hardcover. This choice significantly impacts the perceived weight and quality of the digital representation.
Cover Texture and Paper Finish
Further customization extends to the "cover texture/finish." Users can choose between "coated paper," "gloss finish," and "no finish." The "coated paper" option imparts a subtle shine to the cover, while the "gloss" finish provides a more pronounced sheen. These options allow artists to mimic different printing and binding styles, adding a layer of realism to the digital book.
Interior Pages and Spine Design
The "Paper texture" setting influences the appearance of the interior pages, allowing for further refinement of the book's aesthetic. Additionally, there is an option to upload a custom image for the book's spine. This is a valuable feature for enhancing branding or adding unique visual elements that identify the work.
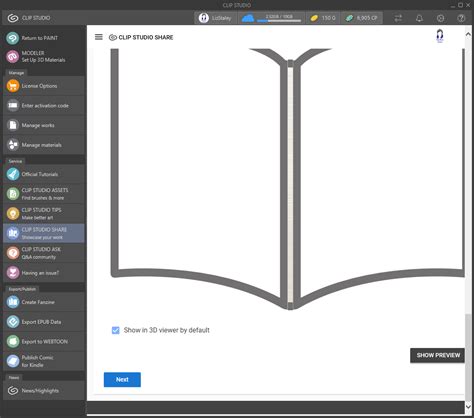
Once these settings are configured, a preview of your book will appear in your default browser window. This interactive preview allows you to "flip" through your book, simulating the experience of a reader on Clip Studio Share. It is essential to thoroughly check this preview to ensure that everything is in order before proceeding. If any changes are needed, you can close the preview and return to the options window to make adjustments. As previously mentioned, pay close attention to the paper size compatibility to avoid unintended white borders.
Publishing and Visibility Controls
The final stage of the sharing process involves setting the visibility of your work and publishing it. On the publishing screen, you can control who can see your creation. The visibility options range from "Public," making your work accessible to everyone, to "Lock with a secret phrase," which requires a password for access. This granular control is useful for sharing works with specific groups or for previewing content before a wider release.
For creators whose work may contain adult content, there is a dedicated checkbox to mark it as such. This helps in categorizing content appropriately and ensuring that users are aware of mature themes. For users in Japan, there is also an option to link their work to the Comiket Web Catalog, a significant platform for doujin (self-published) works in Japan.
When you are ready to make your work live, click the "Publish" button at the bottom of the screen. It is critically important to remember that once you have clicked "Publish," you will NOT be able to make any further edits to that specific work. This immutability underscores the importance of thoroughly reviewing all content and settings before finalizing the publication.
With these steps completed, your work is now available on Clip Studio Share. This platform serves as an accessible and user-friendly gateway for artists to share their creations not only with their social media followers but also with the entire Clip Studio community, fostering a more connected and interactive environment for digital artists worldwide.