Adobe Photoshop, a program that has been a cornerstone of digital art and design for over two decades, offers a vast array of features that empower users to transform images in myriad creative ways. Among these, the paint drip effect stands out as a popular artistic technique, capable of producing eye-catching and unique pieces of artwork. Whether aiming for realism or surrealism, this captivating effect can add a significant creative spin to any digital composition.
Understanding the Foundation: Photoshop's Versatility
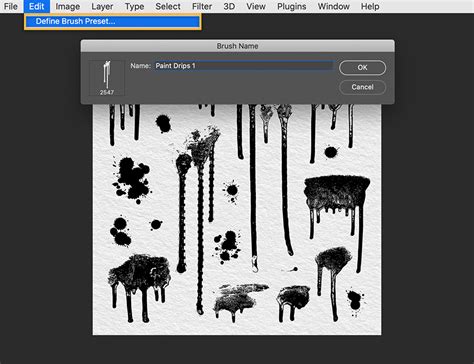
Photoshop's enduring popularity among visual artists and designers stems from its powerful tools and user-friendly interface, making it accessible to beginners while offering depth for seasoned professionals. Its origins trace back to the late 1980s, conceived by brothers John and Thomas Knoll with the vision of creating image-editing software for Hollywood films. Adobe's acquisition and subsequent release as "Photoshop 1.0" marked the beginning of its journey as an industry standard. The software's evolution has consistently introduced features like customizable brushes, sophisticated layer support, and a wide range of filters, all contributing to its unparalleled versatility.
The paint drip effect itself is a testament to Photoshop's capabilities, serving as a method to imbue any project with texture, depth, and dimension. It's a technique that can be applied in numerous ways to achieve stunning visual outcomes. The fundamental principle behind creating such an effect lies in understanding how to layer, manipulate, and blend elements to simulate the natural flow of paint.
Preparing Your Canvas: The Initial Setup
Before diving into the dripping mechanics, the initial step involves selecting an image that will serve as the foundation for your artistic intervention. To maximize the impact of the paint drip effect, it's advisable to choose an image with either a high degree of contrast or a compelling subject matter. These elements will naturally enhance the drama and visual interest when combined with the simulated dripping paint.
The process begins with establishing a suitable background. Open a new document in Adobe Photoshop, setting the canvas size according to your project's requirements. You have the flexibility to use any image or color gradient as your background layer. Crucially, it is highly recommended to set up your layers strategically. By assigning each element to its own editable layer, you can maintain flexibility throughout the editing process while preserving the integrity of your original design. This layered approach ensures that subsequent modifications can be made without compromising the overall composition.
Master Layers - Photoshop for Beginners | Lesson 2
Building the Drip: Texture and Color Manipulation
Once the background is established, the next phase involves adding dynamic effects, such as textures and color manipulations, across different layers. Texturing is paramount for adding depth and dimension, making the painted elements appear more realistic. To achieve this, access the Layer Styles window by double-clicking on the desired layer in your Layers tab. Within this window, you can adjust settings like "Pattern Overlay" and "Bevel & Emboss" to infuse your paint drips with tactile qualities.
The "Bevel & Emboss" option, in particular, can lend your paint drips a sense of three-dimensionality through the strategic use of shadowing and highlighting techniques. Experiment with these settings to achieve the desired aesthetic for your image, paying close attention to opacity levels to ensure the effect is impactful without becoming overwhelming.
Creating a convincing paint drip effect also necessitates the skillful blending of several colors. Begin by selecting the "Gradient Tool" from the toolbox. Choose a gradient style that complements your artwork, such as linear, radial, or diamond. Carefully adjust the opacity and flow settings to achieve the intended results. Use your mouse to drag across overlapping areas of blended color until a smooth transition between hues is achieved. Furthermore, you can fine-tune the hues and saturations for each color layer to produce unique blends and sophisticated effects within your paint drip design.
Advanced Techniques: Liquify and Layer Styles
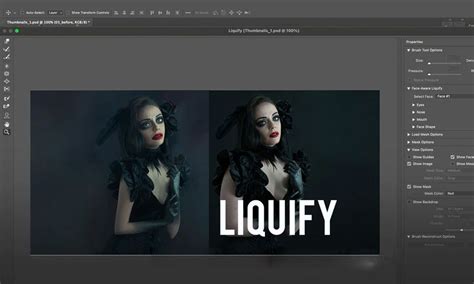
A more advanced, yet highly effective, method for creating a paint drip effect involves leveraging Photoshop's Liquify filter and precise layer styling. This approach allows for a greater degree of control and realism.
To initiate this process, create a new layer. Fill this layer with a color of your choice using the paint bucket tool. Subsequently, select the marquee tool and define the area of your image to which you wish to apply the drip effect. The blur amount should be adjusted based on the degree of distortion you aim for; higher values will introduce more texture, while lower settings will preserve clarity.
A refined workflow for achieving a realistic drip effect, particularly on a subject, involves several key steps:
- Subject Isolation: Begin by isolating your subject from the background using your preferred method. Copy the subject and paste it onto a new layer.
- Smart Object Conversion: Select the layer containing your subject cutout. Right-click on this layer and choose "Convert to Smart Object." This crucial step allows for non-destructive editing, meaning you can revisit and modify the applied effects later without permanently altering the original pixels.
- Background Gradient: Select the original background layer. Navigate to Layer > New Fill Layer > Gradient. Choose a gradient that suits your aesthetic, perhaps a radial style, and click "OK."
- Applying the Liquify Filter: With your subject's Smart Object layer selected, go to Filter > Liquify. Within the Liquify window, adjust the brush size, density, and pressure to achieve the desired fluidity. Use the "Forward Warp Tool" (W) to click and drag downwards from the top of your subject, simulating the natural flow of dripping paint. Experiment with extending the length of the drips by pushing parts of the image lower.
- Creating the "Back" Drip: Duplicate your subject's Smart Object layer. Rename this new layer "Subject Back." Ensure this duplicated layer is also converted to a Smart Object to preserve the liquifying effect.
- Flipping and Alignment: Select the "Subject Back" layer. Go to Edit > Transform > Flip Horizontal. This action creates a mirrored effect, essential for simulating the back of the drips and adding depth. Use the Move Tool (V) to align the bottom edges of both the "Subject Front" and "Subject Back" layers as closely as possible.
- Layer Masking: To refine the drips and remove any unwanted parts of the duplicated subject (like the head or arms), apply a layer mask. Select the "Subject Back" layer, go to Layer > Layer Mask > Reveal All. Select black as your foreground color. With the mask thumbnail selected, use a brush to paint over the areas you wish to hide, effectively shaping the drips.
- Adding Depth with Inner Glow: Select the "Subject Back" layer. Go to Layer > Layer Style > Inner Glow. Choose a "Multiply" blend mode with an opacity of around 50%. Set the color to black. Under "Elements," select "Softer Technique" and "Center" for the Source. Adjust "Choke" to 0 and "Size" to approximately 250px. Set "Range" to 50% for a more striking effect. This step adds a subtle shadow to the drips, enhancing their realism.
- Color Adjustments: To further refine the appearance of the drips, you can apply Hue/Saturation adjustments. Select the "Subject Back" layer. Go to Layer > New Adjustment Layer > Hue/Saturation. For a subtle darkening effect, set Lightness to -55. It's often best to leave Hue and Saturation sliders at their default values to maintain the original color integrity.
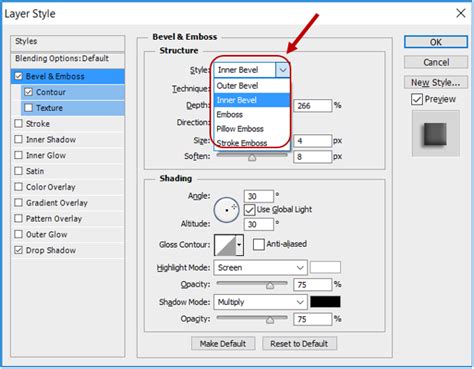
- Bevel and Emboss for Dimension: Finally, select the "Subject Front" layer. Go to Layer > Layer Style > Bevel & Emboss. In the Style menu, choose "Inner Bevel" and "Smooth" for the Technique. Adjust "Depth" to approximately 20% and ensure the direction is set to "Up." Set "Size" to around 90px and "Soften" to 10px. In the Shading section, set "Angle" to 90 degrees and "Altitude" to 30 degrees. For Highlight Mode, select "Screen" with white color and 20% opacity. For Shadow Mode, choose "Multiply" with black color and 100% opacity. This application of Bevel & Emboss adds a subtle sculpted quality to the drips.
Final Touches and Creative Exploration
Once the core drip effects have been applied, the final stages involve refining the image for a polished and professional finish. This includes adjusting the levels of each layer to achieve a better balance between highlights and shadows, utilizing tools like Levels or Curves. Adding further textures or custom brushes can introduce more depth and visual interest. Color correction is also a vital step, allowing you to enhance specific colors or make them appear more vibrant, thereby reinforcing the overall aesthetic.
Beyond manual creation, Photoshop offers powerful tools like custom brushes and actions that can significantly streamline the process of applying effects. The Liquify Tool, as demonstrated, is instrumental in warping shapes organically, mimicking the natural flow of liquids without the need for manual redrawing.
Exploring Beyond the Basics
The paint drip effect is a versatile technique that can be expanded upon. Consider how different brush types and settings can alter the texture and flow of the drips. Experiment with blending modes between layers to create unique color interactions. For instance, using watercolor actions or pre-made brush packs can offer a shortcut to achieving specific artistic styles, such as watercolor effects or intricate patterns, compatible with various Photoshop versions.
Creative Inspiration and Workflow
Graphic designers often emphasize looking beyond the obvious for inspiration. Exploring diverse sources across different industries or cultures can lead to unexpected solutions and unique styles. Taking breaks during the creative process is also essential for gaining perspective and overcoming creative blocks.
Photoshop's cloud documents feature further enhances workflow by allowing access to your work across multiple devices, ensuring continuity whether you're working on a desktop, laptop, or even an iPad. The mobile version of Photoshop for iPad supports large files, enabling complex compositions, advanced retouching, and the application of a wide range of effects on the go, with edits synchronized via the cloud.
The ability to install Photoshop on two devices with a licensed version provides flexibility for professionals. For those new to the software, a trial version of Photoshop, often available as part of the Creative Cloud package, allows exploration of its features before committing to a subscription.
Ultimately, mastering the paint drip effect in Photoshop is about understanding the interplay of its toolsâpaths, Bezier curves, masks, layer styles, and filtersâto translate a creative vision into a visually compelling reality. It's a testament to how powerful digital tools can be in the hands of an artist, allowing for the creation of simulated textures and organic forms with remarkable precision and artistic flair. Whether you're a seasoned professional or just beginning your digital art journey, exploring this effect will undoubtedly elevate your creative output.