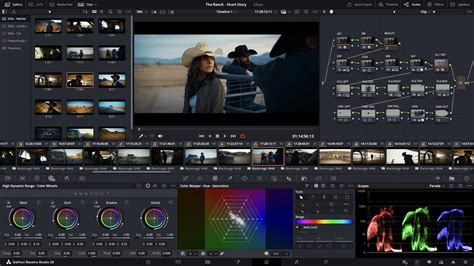
DaVinci Resolve, a powerhouse in video editing and color grading, offers a versatile array of tools designed to refine footage to perfection. Among these, the Clone Stamp Tool stands out as a crucial asset for post-production professionals. This guide delves into the intricacies of using the Clone Stamp Tool within DaVinci Resolve, from its fundamental purpose to advanced techniques for seamless object removal and data management.
Understanding the Clone Tool in DaVinci Resolve
At its core, the Clone Tool in DaVinci Resolve serves a dual purpose: it's a powerful utility for both image manipulation and media management. When discussing image manipulation, specifically within the Color page, the Clone Tool enables users to duplicate pixel values from one area of an image to another. This is invaluable for retouching, removing unwanted blemishes, or seamlessly extending backgrounds.
Beyond its creative applications, DaVinci Resolve also features a "Clone Tool" within its Media Management window. This particular function is designed for duplicating entire media files from one storage location to another. It's not merely a simple copy-paste operation; this tool is built for data integrity. It meticulously copies files and then verifies the data to ensure that the cloned files are exact replicas of the originals. This verification process significantly reduces the risk of data corruption or loss, a critical concern in professional workflows where large volumes of footage are handled. Furthermore, the Media Management Clone Tool preserves all the essential metadata associated with the original files, which is paramount for subsequent editing, color grading, and archival purposes. This makes it a robust solution for backing up footage and ensuring the continuity of project information.
Locating and Accessing the Clone Tool
The primary location for the image manipulation aspect of the Clone Tool is within the Color page of DaVinci Resolve. Here, it functions as a brush that samples pixels from a designated source area and paints them onto a target area.
For media file duplication, the Clone Tool is accessed through the Media Management section. To find it, navigate to the File menu and select Media Management. Within this window, the Clone Tool functionality becomes apparent, offering options for source and destination selection. This is the dedicated area for ensuring your raw footage is securely backed up or duplicated.
How to Use the Clone Tool for Image Retouching
Using the Clone Stamp Tool on the Color page involves a series of steps to precisely sample and paint pixels.
- Access the Color Page: Ensure you are on the Color page within DaVinci Resolve.
- Open the Clone Tool Panel: Look for the dedicated Clone Stamp Tool icon, often found in the toolbar alongside other retoucher tools. Clicking this will reveal the Clone Tool's specific settings.
- Set Brush Properties: Before sampling, adjust the brush size, hardness, and opacity to suit the area you intend to clone. A softer brush with lower opacity can help blend cloned areas more naturally.
- Define the Source Point: This is a critical step. Hold down the Alt key (Windows) or Option key (Mac) and click on the area of the image you want to sample pixels from. This is your "source point." The tool will now remember this location.
- Paint the Destination: Move your cursor to the area where you want to apply the cloned pixels - your "destination area." Click and drag to paint. As you paint, DaVinci Resolve will sample pixels from the source point and apply them to the destination. The source point will move relative to your brush strokes, allowing you to cover larger areas.
- Re-sample as Needed: For complex retouching, you will frequently need to re-define your source point by holding Alt/Option and clicking on a new area. This ensures you're always sampling appropriate pixels for the area you're painting.
- Utilize Tracking (Advanced): For moving objects or areas, the Clone Tool can be used in conjunction with DaVinci Resolve's powerful tracker. This allows the clone source or target to follow motion within the clip. When cloning with the aid of a tracker, you often require three points of reference: the initial tracking point, the clone source point, and the clone target area. To implement this, you would typically acquire tracking data. A common method involves creating a Null object and applying Expression Point Controls. You then perform an offset track, moving all tracking features to a central point. Subsequently, you adjust the Attach Point to define where the clone source should be. While you perform the track, you do not need to "Apply" the tracking data; a "Raw Track" is often ideally set up from the outset. When applying the Clone Tool, ensure the Timeline Indicator is positioned at the precise moment you want the cloning to commence. Set your brush and paint palettes to your desired settings. Remember to start with the first Clone Brush Stroke. You then create an Expression to link the brush stroke’s Clone Source position to the Attach Point of the tracking data. If you wish to use the Feature Center, you would create an Expression for the Clone Target property, which is located within the Timeline, under the Transform: Clone #number# area.
Using the Clone Tool for Media File Management
The Media Management Clone Tool in DaVinci Resolve is designed for robust data transfer and backup.
- Access Media Management: Go to the File menu and select Media Management.
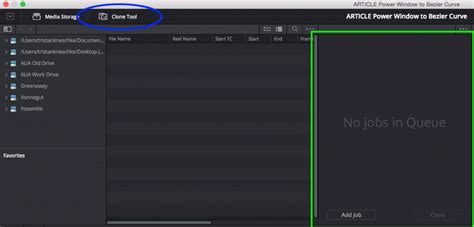
- Locate the Clone Tab: Within the Media Management window, find and select the Clone tab. This is typically located next to the media storage icon.
- Add a Job: Click on "Add Job" to initiate a new cloning operation.
- Select Source: Drag and drop the folder or files you wish to clone into the "Source" section.
- Select Destination(s): Drag and drop the desired destination folder(s) into the "Destination" section. You can add multiple destinations to create several backups simultaneously.
- Initiate Cloning: Once your source and destination(s) are set up, click the "Clone" button.
- Verification: DaVinci Resolve will begin the transfer and the checksum process. Upon successful completion, a green "Complete" icon will indicate that the data has been verified. If any errors occur during the checksum process, the tool will notify you. The verified checksum file can then be found within the destination folder, providing a record of the data's integrity.
COPY, RELINK and TRIM Your Media in DaVinci Resolve
Troubleshooting Common Clone Tool Issues
Encountering problems with the Clone Tool can disrupt your workflow. Here are some common issues and their solutions:
Clone Tool Not Working:
- Source and Destination Drives: Ensure both the source and destination drives are connected to the same system and are recognized by DaVinci Resolve. If either drive is disconnected or unrecognized, the tool will fail.
- File Format Support: While DaVinci Resolve supports a vast range of formats, the Clone Tool might have limitations. Verify that the file format you are attempting to clone is supported by the tool.
- Files in Use: Make sure the files you are trying to clone are not currently open or in use by another application. This can prevent the tool from accessing and copying them.
- Software Glitch: Sometimes, a simple restart of DaVinci Resolve can resolve temporary software glitches. Ensure you are also running the latest version of DaVinci Resolve, as updates often include bug fixes.
Difficulty Removing Multiple Objects (e.g., Sensor Dust):
- When dealing with numerous small imperfections like sensor dust spots across many frames, a frame-by-frame approach can become exceedingly time-consuming. While DaVinci Resolve's tracking capabilities are powerful for single objects, removing dozens of spots manually or tracking each one individually is often not a viable solution for efficiency.
- Alternative Workflow: A common approach for such issues involves using the Paint tool in Fusion, which includes a Clone brush. The idea is to paint out the spots in a single frame and then attempt to track that painted area to apply the correction across subsequent frames. However, users often get lost in the various tracking options (Tracker, Planar Tracker) and the numerous "Modify With" options within the stroke controls, leading to confusion.
- TimeSpeed Node and Paint Clone: For specific scenarios, such as removing spots from bokeh lights, a combination of the TimeSpeed node and the Paint Clone tool in Fusion can be effective. By creating an animated polygon mask around the affected area and setting the TimeSpeed to "0" for a specific duration, you can then use the Paint Clone tool to remove imperfections within that time-frozen segment. This technique can be applied to spots on glass or other image areas.
- Occlusion Challenges: A significant challenge arises when spots or objects move behind other elements in the frame (e.g., lights passing behind a lamp). In these cases, the standard clone stamp will incorrectly sample pixels from the occluding object. To overcome this, you might need to keyframe parameters like size or opacity to zero when the object is about to be occluded, and then revert them once it passes. This often necessitates general tracking for non-occluded elements and then individual tracking for each occluded scenario. While this is a potential solution, users often seek a more streamlined, automated method for such complex, multi-object removal tasks.
- Frame-by-Frame Consideration: If automated tracking proves too complex or ineffective for numerous, occluding elements, some frame-by-frame work in Fusion might be unavoidable, albeit time-consuming.
Creating Clone Effects and Transitions
Beyond simple removal, the Clone Stamp Tool, especially when combined with Fusion, can be used to create sophisticated visual effects and transitions.
- The "Smooth Clone Transition": This effect, often seen in music videos, involves isolating an object using masks, blurring the background, and then animating the background to create a "sliding" effect.
- Duplicate Layer: On the Edit page, duplicate your clip layer. The top layer will be masked to isolate your subject. The bottom layer will serve as the animated background.
- Fusion Tab: Move to the Fusion tab. Rename your nodes for clarity (e.g., using F2).
- Background Animation: Select the background node and add a Transform node (Shift+Spacebar, search "Transform"). Keyframe the "Center" parameter about halfway through your clip. On the first frame, adjust the "Edges" to "Mirror" and modify the "Center" to create movement. Use the Spline editor to smooth the animation between keyframes.
- Subject Isolation: Return to the Edit page, right-click the Fusion clip, and select "Open in Timeline." On the Color tab, use the Tracker to isolate your subject. Then, in the Mask tab, add an Alpha Output to ensure the subject is properly isolated.
- Stylization: Back in Fusion, you can add further stylization. For instance, adding a "Duplicate" node to the subject layer and adjusting "Copies," "Time Offset," and "Center" can create a ghosting or multiplied clone effect. Enabling "Motion Blur" in the Transform node adds to the fluidity.
- Adding Effects: You can integrate additional effects, such as "Scratches_light" from packs like CinePacks, between nodes to add texture or use white flashes within these effects as transitions.
- Multi-Directional Movement: Experiment by merging multiple Transform nodes with keyframed centers to create clone effects with movement from various directions.
The Importance of Checksum Verification
For critical client work and large-scale projects, ensuring the integrity of your footage is paramount. DaVinci Resolve's built-in checksum feature, accessible through the Media Management's Clone Tool, provides this essential security.
- What is a Checksum? A checksum is a sequence of numbers and letters generated from a data file. It acts as a unique digital fingerprint. When data is copied, a checksum is calculated for both the original and the copied file. If these checksums match, it confirms that the copied data is an exact replica of the original, with no errors or corruption introduced during the transfer.
- Why is it Important? On professional film sets or commercial shoots, DITs (Digital Image Technicians) or Data Wranglers use checksum software to verify that footage offloaded from camera cards or mags has been copied successfully and without error. This prevents the devastating loss of crucial footage.
- DaVinci Resolve's Advantage: While software like ShotPut Pro is an industry standard for offloading and checksumming, DaVinci Resolve offers this functionality natively in both its Free and Studio versions. This makes it an invaluable tool even for users who primarily use Resolve for editing or color grading, potentially saving the cost of dedicated offloading software. The ease of use means that even users new to Resolve can quickly implement secure data offloading practices.
The integration of the Clone Stamp Tool for creative retouching and the robust Clone Tool for data management, coupled with advanced Fusion techniques, makes DaVinci Resolve an exceptionally powerful and comprehensive platform for all aspects of video post-production.