Achieving the perfect color balance and tone in your images is a cornerstone of effective photo editing. Whether you're aiming for natural-looking portraits, vibrant product shots, or striking artistic compositions, Photoshop offers a powerful suite of tools to help you realize your vision. This guide delves into the most effective methods for color adjustment in Photoshop, emphasizing non-destructive workflows that preserve the integrity of your original image data.
The Power of Non-Destructive Editing
In digital image editing, the principle of non-destructive editing is paramount. This approach ensures that your original image information remains untouched, allowing for maximum flexibility and the ability to revisit and refine edits at any stage. Two primary non-destructive workflows in Photoshop for color and tonal adjustments are Adjustment Layers and Adobe Camera Raw.
Adjustment Layers: Layers of Creative Control
Adjustment layers are a fundamental tool in Photoshop for making color and tonal adjustments. They function by applying an edit on a separate layer above your original image (the background layer), leaving the original data intact. This means you can modify, reposition, or even delete an adjustment layer without affecting the underlying pixels.
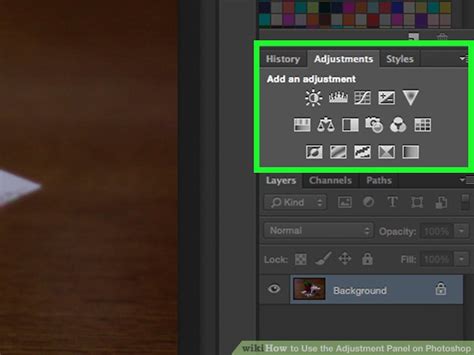
Accessing these powerful tools is straightforward. The easiest way to access the adjustment layer tools is by clicking an icon in the Adjustments panel. This panel provides a visual representation of various adjustment types, making it intuitive to select the effect you desire. For more complex image editing, you can add more than one adjustment layer, stacking them to build intricate corrections.
Furthermore, adjustment layers offer granular control through layer masks. A mask allows you to apply the adjustment to a specific part of the image, enabling selective color correction or enhancement. This is invaluable for tasks like isolating a subject's skin tones or altering the color of a particular element within a scene.
Adobe Camera Raw: A Dedicated Workflow
Adobe Camera Raw (ACR) is a Photoshop plug-in that serves as a powerful, dedicated environment for making color and tonal adjustments. Despite its name, ACR is not limited to raw camera files; it can effectively edit JPEGs and TIFFs as well.
The ACR editing window presents a large preview image, with adjustment tools logically laid out in an order that typically follows a standard editing workflow. This structured approach can be particularly beneficial for beginners, guiding them through the process of refining an image.
For critical image editing, especially when working with a wide dynamic range of tones and colors, it's highly recommended to work with images that are 16 bits per channel (16-bit image) rather than 8 bits per channel (8-bit image). Data is discarded when making tonal and color adjustments, and this loss of image information is significantly more critical in an 8-bit image compared to a 16-bit image.
Key Color Adjustment Techniques in Photoshop
Photoshop offers a diverse array of tools for color correction and enhancement. Understanding when and how to use them is key to achieving professional results.
Color Balance: Correcting and Creating
The Color Balance adjustment is a versatile tool for both correcting unwanted color casts and creating dramatic color effects.
Correcting Color Imperfections: When an image has a particular color cast, meaning an excessive amount of a specific color, Color Balance allows you to counteract it by adjusting the amount of its opposite color. For example, if an image has a red cast, you would add cyan (the opposite of red) to neutralize it. The sliders in the Color Balance adjustment layer allow you to move towards a color you want to add or away from a color you want to subtract. The values displayed above the sliders show the color changes for red, green, and blue channels, ranging from ‑100 to +100.
Creating Dramatic Effects: Beyond correction, Color Balance can be used creatively to alter the overall mixture of colors in a composite image, leading to unique and artistic looks.
Applying Color Balance:
- Select Layer > New Adjustment Layer > Color Balance.
- From the menu, select “Color Balance”.
- In the Properties panel, you will find sliders for Cyan/Red, Magenta/Green, and Yellow/Blue.
- Move the sliders to add or subtract colors. For instance, to add blue tones, drag the Yellow/Blue slider towards Blue.
- Pay close attention to how color casts affect the shadows on your subject’s face, aiming for natural-looking skin tones.
- Repeat these steps for Midtones and Shadows if needed, as color casts can manifest differently across the tonal range.
- To assess the effectiveness of your edits, the Layers panel provides a handy trick: click the eyeball icon next to the Color Balance Adjustment Layer to toggle its visibility on and off.
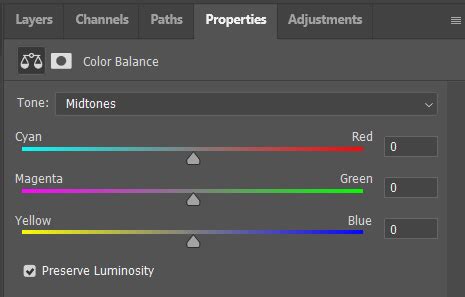
Photo Filter: Simulating Lens Effects
The Photo Filter adjustment is designed to simulate the effect of placing a colored filter in front of the camera lens. It allows you to apply a hue adjustment to your image.
Applying Photo Filter:
- Choose Layer > New Adjustment Layer > Photo Filter.
- In the Properties panel, select a filter preset from the dropdown menu, or choose "Color" for a custom filter.
- If you select a custom color, use the Color swatch to pick your desired hue.
- The Density slider controls the amount of color applied. You can also manually enter a percentage in the Density box.
- (Optional) Select Preserve Luminosity to prevent changing the luminosity values in the image while changing the color. This helps maintain the brightness and contrast of the image.
- Enable Preview to view your edits on your image in real-time.
Levels: Controlling Tonal Range
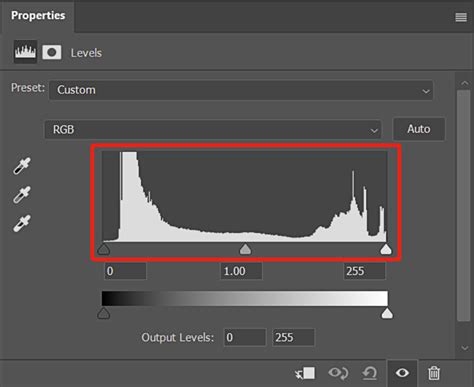
Levels Adjustment Layers offer precise control over the overall brightness and contrast of your image. Think of Levels as a histogram that visually represents the distribution of light and shadow pixels in your photo.
Setting Highlights and Shadows: A fundamental aspect of tonal correction is setting the highlights and shadows, also known as setting the white and black points. This process involves adjusting the values of the extreme highlight and shadow pixels to establish an overall tonal range for the image. This typically redistributes the midtone pixels appropriately.
Applying Levels:
- Select Layer > New Adjustment Layer > Levels.
- In the Properties panel, you'll see a histogram.
- Use the black eyedropper to set the black point, the white eyedropper to set the white point, and the gray eyedropper to set the midtone. Alternatively, you can manually drag the black, white, and gray sliders beneath the histogram.
- The Shadow/Highlight command (found under Image > Adjustments) can be used to adjust tonality specifically within shadow and highlight areas, offering a different approach to controlling these ranges.
Curves: Advanced Tonal and Color Control
The Curves adjustment is one of Photoshop's most powerful tools, offering sophisticated control over both tonal range and color. It allows you to create up to 14 control points for highlight, midtone, and shadow adjustments for individual channels.
Working with Channels: Curves can be applied to individual color channels (Red, Green, Blue) or to the composite RGB channel. By adjusting the curve in a specific color channel, you can alter the intensity of that color across the entire tonal range of the image. For example, lowering the curve in the Red channel will reduce red tones in the image.
Linear Color Space Adjustments: Exposure is primarily for use in HDR images and performs calculations in a linear color space, offering a different approach to tonal adjustments.
Selective Color: Fine-Tuning Specific Hues
The Selective Color adjustment allows you to modify the amount of process colors (Cyan, Magenta, Yellow, Black) in individual color components. This tool is invaluable for fine-tuning specific colors within an image.
Applying Selective Color:
- Select Layer > New Adjustment Layer > Selective Color.
- In the Properties panel, choose the color you want to adjust from the "Colors" menu.
- Use the Cyan, Magenta, Yellow, and Black sliders to add or subtract those colors from the selected hue. For example, if you select "Reds" and move the Cyan slider to the right, you will add cyan to the red areas of the image, effectively reducing the red.
- The adjustment can be made in absolute values or relative to the existing color mixture.
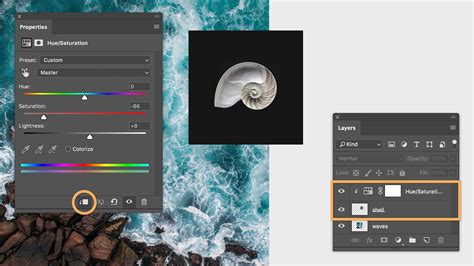
Hue/Saturation: Adjusting Color Intensity and Tone
The Hue/Saturation adjustment allows you to adjust the hue, saturation, and lightness values of the entire image or of individual color components.
Saturation Control: This adjustment is particularly useful for controlling color saturation, minimizing clipping (where colors become indistinguishable due to being too intense). You can also use it to change the overall mixture of colors in an image.
Match Color: Harmonizing Colors Across Images
The Match Color command is a powerful tool for harmonizing colors. It can match the color from one photo to another photo, from one layer to another layer, and even from a selection in an image to another selection in the same or a different image. This command also adjusts luminance and color range and neutralizes color casts.
Replace Color: Targeting Specific Color Replacements
The Replace Color command allows you to replace specified colors in an image with new color values. This is useful for changing the color of specific objects or areas within a photograph.
Workflow Essentials and Best Practices
Regardless of the specific tool used, several best practices will ensure optimal results in your Photoshop color adjustments.
Monitor Calibration
For critical image editing, calibration and profiling of your monitor are essential. A calibrated monitor displays colors accurately, ensuring that the adjustments you make in Photoshop translate correctly to other devices and print outputs. Without a properly calibrated monitor, your color corrections may appear inaccurate elsewhere.
Understanding Color Modes: RGB vs. CMYK
Photoshop operates in different color modes, primarily RGB (Red, Green, Blue) and CMYK (Cyan, Magenta, Yellow, Black).
- RGB Mode: This mode is used for digital displays (monitors, web). It has fewer channels and is generally preferred for most initial tonal and color corrections due to its wider gamut of displayable colors. You can edit an image in RGB mode in one window and view the same image in CMYK colors in another window by choosing Window > Arrange > New Window For (Filename).
- CMYK Mode: This mode is used for print output. It has a smaller gamut than RGB, meaning some colors that are visible on screen may not be reproducible in print. It's advisable to perform fine-tuning in CMYK mode after completing most of your RGB adjustments.
Gamut Warnings: Photoshop's Gamut Warning command (found in Preferences > Transparency & Gamut) can highlight out-of-gamut colors, which are colors that cannot be reproduced in CMYK. This helps you make necessary conversions or manual corrections before printing.
Presets and Saving Settings
Photoshop's Adjustments panel and individual adjustment dialog boxes offer a Presets menu. This menu contains pre-defined settings for various adjustments like Levels, Curves, Exposure, Hue/Saturation, Black & White, Channel Mixer, and Selective Color. You can apply these presets with a single click.
You can also save your own custom color adjustment settings as presets. Once saved, these presets can be accessed in the Preset menu in the Properties panel or loaded from an adjustment dialog box menu. This is incredibly useful for maintaining consistency across multiple images, especially in product or e-commerce photography.
To save a preset:
- In the relevant adjustment dialog box (e.g., Levels, Curves), choose Save Preset from the panel menu.
- Give your preset a descriptive name.
To load a preset:
- In an adjustment dialog box, click Load.
- Locate and load the saved adjustment file.
Selective Adjustments with Masks and Selections
As mentioned earlier, adjustment layers can be used with masks and selections to confine their effect to specific areas of an image. This is crucial for targeted color correction.
Using Masks: When you create an adjustment layer, a white mask is automatically generated. Painting with black on this mask will hide the adjustment, while painting with white will reveal it. Grays will partially reveal the adjustment.
Using Selections: You can create a selection of a specific area in your image before applying an adjustment layer. The adjustment will then only affect the selected area.
Smart Objects for Ultimate Flexibility
In addition to adjustment layers, Smart Objects provide another powerful method for non-destructive editing. When you convert a layer into a Smart Object, you can apply filters and adjustments to it, and these edits are stored as "Smart Filters" that remain editable. This offers a similar level of flexibility to adjustment layers, allowing you to modify edits at any time without degrading the original image data.
Advanced Color Correction Techniques
Beyond the standard adjustments, Photoshop offers more advanced techniques for sophisticated color correction.
The Threshold and Curves Method for Precise Tonal Mapping
A powerful technique for precise color correction involves using Threshold and Curves Adjustment Layers in conjunction with the Color Sampler tool. This method helps you accurately set the white, black, and midpoints of your image.
Steps:
- Open your image and create a Curves Adjustment Layer.
- Create a Threshold Adjustment Layer. Move its lever all the way to the right until everything is black, then slightly to the left until a bit of white appears.
- Use the Color Sampler tool (I) to click on the white area. This bookmarks the white point.
- Adjust the Threshold lever to reveal black areas, and click with the Color Sampler tool to bookmark the black point.
- Create a new layer between your image and the adjustment layers, fill it with 50% gray, and set its blending mode to Difference. Turn the Threshold layer back on and adjust its lever to reveal black, then use the Color Sampler tool to bookmark the midtone.
- Turn off the Threshold and Gray layers. Select the Curves layer and use the white eyedropper to click on the white point bookmark, the black eyedropper on the black point bookmark, and the gray eyedropper on the midtone bookmark.
- You can then adjust the opacity of the Curves layer and add a Vibrance Adjustment Layer to further enhance colors.
1-Minute Photoshop - Advanced Color Correction in Photoshop!
Color Correction by Finding the Opposite Color
A fundamental principle in color correction is understanding complementary colors. The opposite color of the color cast you want to remove will neutralize it.
Finding the Opposite Color:
- Create a new layer and fill it with the color you suspect is casting an unwanted hue (e.g., yellow).
- Press CTRL + I (or Cmd + I on Mac) to invert the color. This will give you the complementary color (e.g., blue).
- Use this complementary color in an adjustment layer (like Curves or Color Balance) to counteract the unwanted cast. For example, if you have a yellow cast, use the inverted color (blue) to correct it.
Conclusion: The Art and Science of Color
Mastering color adjustment in Photoshop is an ongoing journey that combines technical understanding with artistic intuition. By embracing non-destructive workflows, understanding the strengths of various adjustment tools, and adhering to best practices like monitor calibration, you can elevate your images from ordinary to extraordinary. Experimentation is key; remember that color correction is often subjective, and the "dream" image you envision is achievable with practice and a thorough grasp of Photoshop's powerful color manipulation capabilities.
tags: #color #adjustment #photoshop