Resizing an image in Photoshop is a fundamental skill that every digital artist, photographer, and graphic designer must master. Whether you're preparing an image for a website, a print project, or simply want to optimize its file size, understanding how to effectively resize objects and entire images without compromising quality is paramount. This tutorial will guide you through various methods, from simple transformations to advanced techniques, ensuring you can confidently manipulate your images to meet any requirement.
Understanding Image Dimensions and Resolution
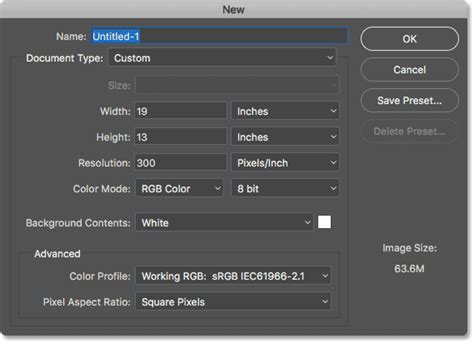
Before diving into the resizing process, it's essential to grasp key concepts like image size, dimensions, and resolution. Image size refers to the actual dimensions of an image in pixels, typically expressed as width and height. Resolution, measured in pixels per inch (PPI), dictates the level of detail an image contains. A higher resolution means more pixels packed into each inch, resulting in a sharper, more detailed image and a larger file size, as it's denser with data. Conversely, a lower resolution means fewer pixels per inch, leading to a smaller file size but potentially less detail, especially when printed.
For most web uses, a resolution of 72 PPI is generally sufficient. However, for high-quality printing, resolutions of 300 PPI or higher are often recommended. Understanding these differences is crucial because different use cases require different image resolutions.
The Image Size Dialog: Precise Control Over Dimensions
The Image Size dialog box in Photoshop is your primary tool for adjusting an image's pixel dimensions and resolution. To access it, navigate to Image › Image Size.
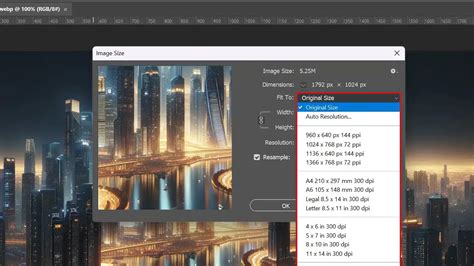
Here, you can precisely control the width and height of your image. You can also change your unit of measurement by clicking the drop-down menu next to Width or Height, allowing you to work in pixels, inches, centimeters, and more.
When you adjust the width and height, you are altering the pixel dimensions. If you keep the resample box checked, Photoshop will actively change the amount of pixel data within your image. This process, known as resampling, is critical when you want to change the overall size of the image.
Resampling: The Key to Changing Pixel Data
The resample checkbox in the Image Size dialog is a crucial feature. When selected, it tells Photoshop to add or remove pixels to match your desired dimensions.
- To shrink a file size without changing the image dimensions significantly: You can lower the resolution. This doesn't necessarily change the pixel dimensions but reduces the number of pixels per inch, thus decreasing file size.
- To resize pictures in Photoshop without losing quality: If you keep the resample box checked as you resize the image in Photoshop, the software will change the amount of pixel data inside of it. When resizing, Photoshop employs interpolation methods to specify how data is resampled. For enlarging images, methods like Bicubic Smoother or Preserve Details are often used to help maintain smooth edges and reduce pixelation. For downsizing, the Bicubic Sharper option often yields good results.
It's important to remember that resampling always affects image quality to some degree, especially when significantly enlarging an image.
Maintaining Proportions: The Chain Link Icon
The chain link icon next to the Width and Height fields in the Image Size dialog is your guardian against distorted images. When this icon is active (linked), it constrains proportions. This means that any adjustments you make to the width will automatically correspond to a proportional adjustment in the image's height, and vice versa. This ensures your image is resized proportionally, preventing it from looking stretched or squashed.
Free Transform: Flexible Object Manipulation
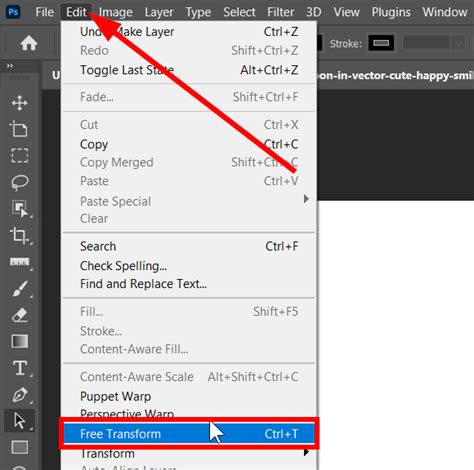
For resizing individual objects or elements within your image, the Free Transform tool is incredibly versatile. You can activate it by pressing Ctrl + T (on Windows) or Cmd + T (on Mac). A bounding box will appear around your selected object.
Basic Resizing with Free Transform
- Activate Transform: Press "Ctrl + T" (Windows) or "Cmd + T" (Mac) to activate the Transform tool.
- Drag Corners: To resize the image proportionally, simply drag any of the corner handles of the bounding box.
- Maintain Aspect Ratio: To absolutely ensure the original aspect ratio is maintained, hold down the Shift key while dragging a corner. This is a crucial step to avoid distortion.
- Precise Dimensions: For exact sizing, you can enter the desired dimensions directly into the width and height boxes in the options bar that appears at the top of the screen when Free Transform is active.
Advanced Transform Options
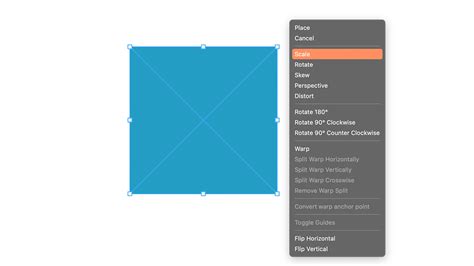
Right-clicking (or Control-clicking on Mac) inside the Free Transform bounding box reveals a sub-menu with powerful transformation options:
- Rotate: Rotates the image around a fixed reference point. Moving your pointer outside the bounding border turns it into a curved, two-sided arrow, allowing you to drag and rotate the image.
- Skew: Slants your object vertically and horizontally, creating an angled effect.
- Distort: Allows you to stretch your object in all directions, freely manipulating the corners of the bounding box.
- Perspective: Applies a one-point perspective to the chosen object, making it appear to recede in space. This is achieved by adjusting the bounding box handles until the desired effect is reached.
- Warp: Offers the most detailed manipulation, allowing you to use a "mesh" graph that appears over the image to bend and shape the object in intricate ways.
Working with Layers and Smart Objects
When dealing with multiple layers, resizing specific elements requires selecting the correct layer in the Layers panel.
Scaling Layer Styles
If your layer has layer styles (like drop shadows or bevels), you can scale these effects independently.
- Select the proper layer in the Layers panel.
- Choose Layer > Layer Style > Scale Effects.
- Alternatively, you can right-click the FX icon on the layer and choose Scale Effects.
- Enter the appropriate percentage or drag the slider to adjust the size of the applied effects.
The Power of Smart Objects
For maximum quality preservation, especially when performing multiple resizing operations or when you anticipate needing to revert to the original size, converting layers to Smart Objects is highly recommended.
- What are Smart Objects? They are special layers that contain image data from raster or vector files, preserving the original source content with all its characteristics.
- Non-Destructive Editing: Smart Objects allow for non-destructive editing. When you resize a Smart Object, Photoshop preserves the original image data. Instead of discarding pixel data like with regular layers, it resamples the original high-quality image data each time you make a change.
- Resizing Smart Objects: You can use the Free Transform tool (Ctrl+T / Cmd+T) on a Smart Object. Dragging the corner handles while holding Shift will scale it proportionally. Because it's a Smart Object, you can scale it up or down multiple times without significant quality degradation.
Photoshop Smart Objects Explained in 2 minutes
Batch Resizing with Image Processor
For workflows involving many images, manually resizing each one can be time-consuming. Photoshop offers a solution with the Image Processor script, which allows you to batch resize images.
- Go to File > Scripts > Image Processor.
- This script lets you process a series of images, applying resizing and other actions in one go. You can even specify the desired size for the output images and choose different file formats.
Saving and Exporting Your Resized Images
After resizing your image, proper saving and exporting are crucial to maintain quality and optimize for its intended use.
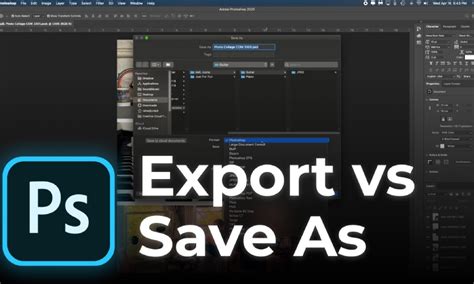
Save As vs. Export As
- File › Save As: This option allows you to create a new version of your photo before making permanent changes, preserving your original file.
- File › Export As: This is ideal for creating a new, smaller file while keeping the original size file intact. It offers more control over optimization settings for web use.
Saving for Web
When saving for web use, the File > Export > Save for Web (Legacy) option provides granular control over compression levels and file formats, helping you achieve the smallest possible file size without sacrificing too much visual quality. For web graphics, saving as a JPEG with a quality setting between 60-80% is often a good balance.
Optimizing After Resizing
If you notice pixelation or blurriness after resizing, especially when enlarging, you might consider applying a subtle Smart Sharpen filter (Filter > Sharpen > Smart Sharpen) to enhance details. Always double-check your image's dimensions and unit of measurement before finalizing your save.
Beyond Basic Resizing: Canvas Size
Sometimes, you might need to change the canvas size without altering the image content itself. This is useful for adding borders or creating space around your artwork.
- Go to Image > Canvas Size.
- You can specify new dimensions for your canvas.
- The anchor point determines where the existing image will be positioned on the new, larger or smaller canvas.
Conclusion: A Skill for Every Digital Creator
Mastering image resizing in Photoshop is not just about making an image smaller or larger; it's about understanding the interplay between dimensions, resolution, pixel data, and intended use. By leveraging tools like the Image Size dialog, Free Transform, Smart Objects, and the Image Processor, you gain the power to manipulate images with precision and maintain their visual integrity. Remember to always start with high-resolution images when possible and avoid drastic resizing operations that can degrade quality. By practicing these techniques, you'll be well-equipped to handle any image resizing task that comes your way.