Creating visually striking patterns and professional-grade step and repeat banners in Adobe Photoshop can seem like a daunting task, often involving tedious manual duplication and placement of elements. However, the "Step and Repeat" functionality within Photoshop offers a powerful and efficient solution, transforming a potentially time-consuming process into a streamlined workflow. This tutorial delves into the intricacies of utilizing this feature, from basic pattern creation to designing impressive banners for events and branding.
The Foundation: Understanding the Step and Repeat Mechanism
At its core, the Step and Repeat technique in Photoshop is about applying a transformation to an element and then repeatedly applying that same transformation. This allows for the automatic generation of patterns with perfect spacing and alignment.
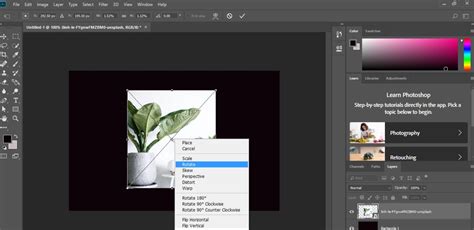
The process begins with a single element - this could be any shape, text, logo, or image you wish to duplicate. The first crucial step involves initiating a transformation. This is achieved by selecting your element and then pressing Option + Command + T (on Mac) or Alt + Control + T (on Windows). This shortcut activates the Transform tool, allowing you to move, scale, or rotate your element. Once you have performed your desired initial transformation - for instance, dragging the element a specific distance to the right - you confirm this transformation by pressing Enter or Return.
This initial transformation is the "Step." The "Repeat" is where the magic truly happens. By holding down Shift + Option + Command + T (Mac) or Shift + Alt + Control + T (Windows), you instruct Photoshop to reapply the exact same transformation you just performed. Each subsequent press of this key combination will create another instance of the element, perfectly spaced and aligned according to your initial "Step." This method is particularly useful as each new transformation typically creates a new layer, offering flexibility for further editing.
Applications of Step and Repeat: Beyond Basic Patterns
The Step and Repeat function is incredibly versatile and finds application in various design scenarios.
Creating Abstract Backdrops and Textures
For graphic designers, the ability to generate intricate patterns quickly is invaluable. A common application is the creation of abstract backdrops for portraits or graphic designs. For example, one could create a long horizontal selection using the Marquee Tool, fill it with a solid color like black, and then employ the Step and Repeat method to generate a series of perfectly spaced stripes. This technique can be used to create a wide array of textures, from subtle gradients to bold geometric designs.
Designing Step and Repeat Banners for Events and Branding
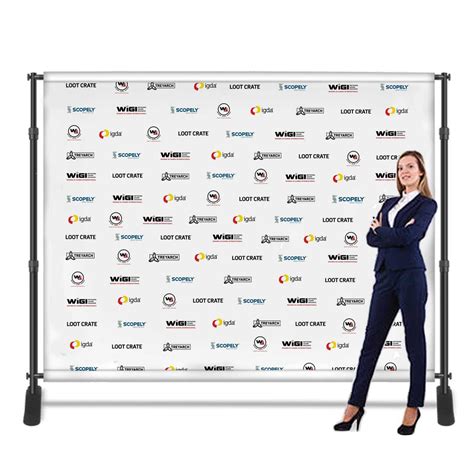
Perhaps the most well-known application of the Step and Repeat technique is in the creation of "Step and Repeat" banners. These banners, often seen at red carpet events like the Academy Awards or the Grammys, feature a repeating pattern of logos. They serve as a visually appealing backdrop for attendees and guests to pose for photographs, effectively doubling as a sophisticated form of advertising for the event, its sponsors, and participating businesses. The repetition of logos ensures prominent brand visibility and creates a professional, cohesive aesthetic.
Designing a Step and Repeat Banner in Photoshop: A Practical Guide
When embarking on the design of a step and repeat banner, several key considerations come into play, from software choice to file preparation.
Software and File Type Decisions
The initial decision involves selecting the appropriate software and file type. While Adobe Illustrator, with its robust alignment tools, is often favored for vector-based designs, Adobe Photoshop becomes the preferred choice when working with raster files that incorporate effects, filters, or complex layering.
Raster images are composed of pixels. The higher the quality of a raster file, the more pixels it contains, leading to greater detail. However, raster files are generally larger than vector files, which can impact saving times and storage space. Vector files, on the other hand, can be scaled to any size without loss of quality, making them ideal for logos that may need to be resized. Ultimately, both vector and raster files can be effectively utilized in banner design, often in conjunction with different software programs.
Banner Size and Logo Dimensions
The size of the banner is a critical factor, dictated by the event space and any potential restrictions. Common banner sizes include 8’ x 8’, 9’ x 8’, and 10’ x 8’, with wider formats accommodating larger groups for photos or covering extensive areas.
Equally important is the size of the logos themselves. Logos should be easily discernible, and the overall design should not appear cluttered. For square logos, a size of 5” to 7” is typically preferred, while longer logos might range from 8” to 12”. If you are working with a single, elongated logo or multiple logos of varying shapes and sizes, careful planning is required to determine their optimal dimensions and spacing to ensure they fit harmoniously within the banner.
As mentioned, if your logo is a vector, resizing is not an issue. For raster logos, however, you must pay close attention to the file quality at the intended print size. A minimum quality of 150 PPI (pixels per inch) is recommended at the final print dimensions.
Design and Color Considerations
The most common step and repeat banner design features a checkerboard pattern of logos, whether repeating a single logo or a selection of multiple logos. Typically, logos are evenly spaced and arranged in four or five rows, alternating across the banner.
When selecting colors, it's best to choose a background color that complements your logo(s). If you are working with a single logo, use a color derived from the company’s branding. For designs featuring multiple logos, a neutral background color that harmonizes with all of them is often the most effective choice.
Canvas Setup and Bleed
Your artboard or canvas in Photoshop should be set up at the full intended print size of the banner. This ensures that when you apply transformations and repeat elements, you are working at the correct scale. It is also crucial to include a bleed area. A bleed is an extra margin of design that extends beyond the trim edge of the printed piece. For a standard banner, a 0.5” bleed is common, with 0.25” added to each side. This ensures that no important design elements are cut off during the printing process.
In Photoshop, the resolution of your document should be set between 150 and 300 pixels/inch. For printing with services like Signs.com, 150 PPI is generally sufficient. Once your canvas is set up, you can add guides to the edges of your artboard to visually mark the bleed area. Then, adjust the canvas size to incorporate this bleed.
Spacing and Margins
Maintaining ample spacing around your logos and within the overall design is vital for readability and aesthetic appeal. You’ll want a margin around the entire design, as well as between each individual logo. Generally, a margin of two inches or more around the entire design is recommended, unless the pattern is intended to continue off the edges of the banner. The spacing between logos should allow each logo to stand out while still contributing to the overall pattern. A typical step and repeat backdrop design might feature four to five logos per line, but this number can vary based on logo size, banner dimensions, and desired visual impact.
Color Mode for Printing
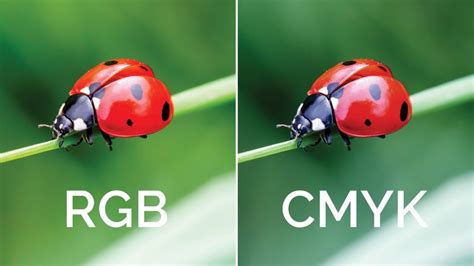
While most print files are ultimately converted to CMYK (Cyan, Magenta, Yellow, Black), it is best practice to design your file in RGB (Red, Green, Blue) mode. This mode generally offers a wider color gamut, allowing for more vibrant and accurate color representation during the design phase. Once your design is complete, you can then convert it to CMYK for printing. This approach helps prevent color distortion and ensures a smoother production process.
Saving and Uploading Your Design
Once your step and repeat banner design is finalized, the next step is to save it correctly and prepare it for printing.
File Type Selection
The choice of file type for saving depends on the nature of your artwork. If your logo is a vector graphic, it’s best to save your file with a vector file extension such as AI, EPS, SVG, or PDF. If your design is primarily raster-based, a high-resolution TIFF or PSD file is often recommended to preserve quality.
Uploading to a Print Provider
When you are ready to have your banner printed, you will typically upload your design to a chosen print provider's website. For instance, at Signs.com, you would navigate to their design upload section, select the "Step and Repeat Banner" type, and then choose the correct dimensions for your design. The platform will then guide you through the upload process. If you encounter any issues during the upload, most providers offer customer support or design services to assist you.
Understanding Print Production
Many print providers, like Signs.com, offer step and repeat banners made from durable materials such as 9 oz. polyester fabric. The dye sublimation printing process is commonly used on fabric, resulting in vibrant and highly visible images. These banners can often be customized with one or more logos, and alternating patterns can be incorporated for a more dynamic look. Experimenting with different logo arrangements and outlines in your design file can help create a cohesive and visually appealing final product.
Advanced Techniques and Troubleshooting
While the core Step and Repeat functionality is straightforward, there are advanced techniques and common issues to consider.
Creating Seamless Patterns
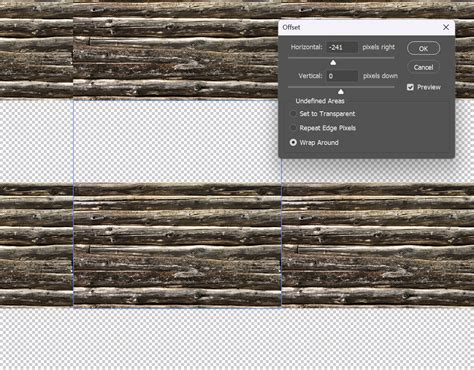
For creating truly seamless repeating patterns, especially for textures or backgrounds, a specific workflow is often employed. This involves setting up your document with specific dimensions (e.g., 1000x1000 pixels) and a high resolution (e.g., 300 pixels/centimeter). Using rulers to find the exact center of your document is crucial.
You then paste your chosen image or element onto this document and center it. The key to seamlessness lies in offsetting the image. By duplicating the layer and then using the Offset filter (Filter > Other > Offset), you can shift the image horizontally and vertically by half the document's dimensions (e.g., 500 pixels for a 1000x1000 document). Ensure the "Wrap Around" option is selected in the Offset filter. This process effectively brings the edges of your image to the center, allowing them to seamlessly connect when tiled.
Once you have achieved a seamless tile, you can define it as a pattern using "Edit > Define Pattern." This saved pattern can then be applied to any new document using the "Edit > Fill" command, selecting your custom pattern from the dropdown menu.
Automating Repetitive Tasks with Actions
For highly repetitive tasks, such as applying a pattern to a large area or creating complex banner layouts, recording an Action in Photoshop can be a significant time-saver. An Action is a series of recorded commands that can be played back to automate a workflow. You can record the steps involved in creating a step and repeat pattern, including canvas resizing, element placement, transformations, and pattern definition, and then play this action back on different documents or with different elements. This is particularly useful when working with large files or when consistency is paramount.
Working with Seamless Tiles on Non-Square Canvases
When you have a seamless tile (e.g., a 12"x12" diamond plate pattern) and need to apply it to a long, rectangular area like the bottom of a car (5ft long), you can employ a couple of strategies. One is to create an Action that includes enlarging the canvas to accommodate the new tile placement. Another approach is to directly make a pattern out of the diamond plate tile and then use the "Fill" command on a canvas sized to your desired dimensions. You can also use guides to meticulously place and duplicate the tile to achieve the desired coverage.
3 Photoshop Seamless Pattern Techniques I Wish I Knew Sooner
Conclusion: Unleashing Creative Potential
The Step and Repeat functionality in Photoshop is a powerful tool that empowers designers to create intricate patterns, eye-catching textures, and professional step and repeat banners with remarkable efficiency. By understanding the fundamental mechanics of transformation and repetition, and by considering the practical aspects of banner design such as size, spacing, and file preparation, users can unlock a new level of creative control. Whether you are designing for a high-profile event or simply exploring the possibilities of pattern generation, mastering the Step and Repeat technique will undoubtedly enhance your Photoshop workflow and elevate the quality of your designs.