Photoshop's Color Replacement Tool is a versatile and often underestimated feature that can significantly streamline your editing workflow. It offers a unique way to alter colors within an image while preserving the underlying texture, a crucial advantage over standard brush-based color application. This guide will delve into the intricacies of this tool, exploring its core functionality and demonstrating practical applications that can enhance your images with precision and ease.
Understanding the Color Replacement Tool
At its heart, the Color Replacement Tool operates on a simple principle: you sample a source color and then paint over a target area, effectively replacing the original color with the sampled one. The magic lies in its ability to intelligently blend the new color with the existing tones and textures. Unlike a direct brush stroke that might lay down a flat, opaque color, the Color Replacement Tool analyzes the luminosity and saturation of the pixels it's painting over. This allows it to maintain the detail and character of the original image, preventing a "painted-on" look.
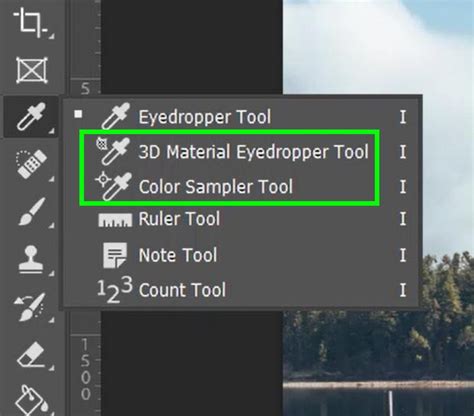
To activate the Color Replacement Tool, you can find it nestled within Photoshop's Brush Tool group. A quick way to access it is by pressing Shift+B until it's selected. Once active, you'll notice a set of options in the Photoshop toolbar that control its behavior. These include the Blending Mode, Opacity, and Flow, similar to other brush tools, but critically, also the crucial "Color" mode. This mode ensures that only the color information is replaced, leaving the luminosity and texture intact.
Sampling Your Target Color
The first step in utilizing the Color Replacement Tool effectively is to accurately sample the color you wish to introduce. This is done by holding down the Alt (Windows) or Option (Mac) key while the Color Replacement Tool is active. Your cursor will transform into an eyedropper, allowing you to click on any color within your image. This sampled color then becomes your foreground color, the one that will be painted onto your image. For optimal results, it's often best to sample from an area that already possesses the desired hue and saturation, ensuring a natural integration.
Painting with Precision: Brush Settings
The effectiveness of the Color Replacement Tool is also governed by the settings of the brush itself. The Size and Hardness of your brush will directly impact the transition between the old and new colors. A softer brush edge will create a more gradual blend, which is often desirable for natural-looking color changes, especially in areas like skin tones or gradients. Conversely, a harder brush will create a more defined edge, which might be useful for distinctly defined objects.
The Opacity and Flow settings also play a significant role. Lowering the Opacity or Flow allows for a more subtle application of the new color, enabling you to build up the color change gradually. This is particularly helpful when trying to achieve nuanced color shifts or when working with delicate areas of an image.
Practical Applications of the Color Replacement Tool
The Color Replacement Tool's ability to replace color while preserving texture opens up a wide array of creative and corrective possibilities. Here are some of the most common and effective ways to leverage this powerful tool:
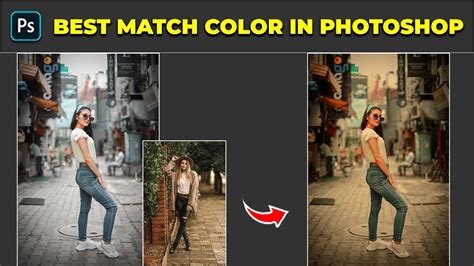
1. Matching and Adjusting Colors
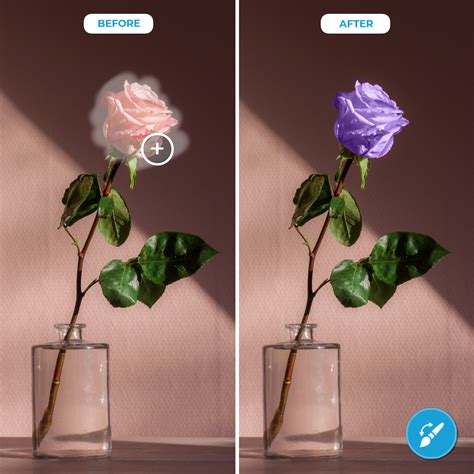
One of the most straightforward yet impactful uses of the Color Replacement Tool is to match or adjust colors that are slightly off. Imagine a photograph where a subject's accessory, like a bow or a piece of clothing, doesn't quite harmonize with the overall color palette of the image. Instead of resorting to more complex selection and adjustment methods, you can simply use the Color Replacement Tool.
Workflow:
- Sample the correct color: Use the eyedropper (Alt/Option key) to sample a color from a nearby area that has the desired hue and saturation. For instance, if a red bow needs to match a red dress, sample the color from the dress.
- Paint over the object: With the Color Replacement Tool selected and the sampled color as your foreground, carefully paint over the object that needs adjustment. The tool will replace the original color of the bow with the sampled color from the dress, creating a cohesive look.
This method is incredibly efficient for minor color tweaks and ensures that the texture of the fabric or object remains intact, contributing to a realistic outcome.
2. Correcting Color Casts and Skin Blemishes
Color casts, often caused by ambient lighting conditions during a shoot, can significantly alter the appearance of skin tones, making them look unnatural or unhealthy. Similarly, minor skin blemishes like acne or redness can detract from a portrait. The Color Replacement Tool offers a remarkably effective way to address these issues.
Workflow for Color Casts:
- Duplicate the background layer: This is a crucial step. Working on a duplicate layer allows you to adjust the opacity of the color replacement later, providing control over the intensity of the correction and preventing irreversible changes to your original image.
- Sample healthy skin tone: Using the eyedropper, sample a color from an area of the subject's skin that is free from the color cast and appears natural.
- Paint over affected areas: With the Color Replacement Tool, carefully paint over the areas of the skin that exhibit the color cast. The tool will replace the unwanted color with the sampled healthy skin tone.
- Adjust opacity: If the correction appears too strong or artificial, you can simply lower the opacity of the duplicate layer to blend the adjustment seamlessly with the original image.
Workflow for Skin Blemishes:
- Duplicate the background layer: As with color casts, working non-destructively is key.
- Sample clean skin: Use the eyedropper to sample a color from an area of clear, blemish-free skin on the same subject.
- Paint over blemishes: Gently paint over the acne, redness, or other blemishes with the Color Replacement Tool. The tool will replace the color of the blemish with the sampled healthy skin color, effectively making them disappear.
It's important to note that while this tool is excellent for color correction, for significant textural issues or deep blemishes, more advanced tools like the Healing Brush or Clone Stamp might be necessary. However, for quick and subtle color corrections on skin, the Color Replacement Tool excels.
Flawless 1-Min Skin Retouch Action in Photoshop!
3. Hiding Unwanted Objects Through Color Blending
This application of the Color Replacement Tool is a more creative and less destructive approach to object removal. Instead of outright cloning or healing an object out of existence, you can often make it "disappear" by altering its color to blend seamlessly with its surroundings. This technique is particularly effective for objects in the background that are distracting but not overly prominent.
The underlying principle here is similar to frequency separation, where color and texture are treated independently. By changing the color of an object to match its environment, you can trick the viewer's eye into overlooking it, even if the object's form remains.
Workflow:
- Identify the object and its surroundings: Determine which object you want to de-emphasize and what colors dominate the area around it.
- Sample the background color: Use the eyedropper to sample a representative color from the background immediately surrounding the unwanted object.
- Paint over the object: Using the Color Replacement Tool, carefully paint over the unwanted object. The tool will replace its original color with the sampled background color.
- Refine as needed: You might need to sample multiple background colors and paint in different areas of the object to achieve a convincing blend. Adjusting brush opacity and flow can also help in creating a natural transition.
This method is less about true removal and more about camouflage. It can be a time-saver when dealing with minor distractions, preserving the original image data more than aggressive cloning might.
Advanced Tips and Considerations
While the Color Replacement Tool is intuitive, a few advanced techniques can further enhance your results:
- Blending Modes: Experiment with different Blending Modes in the Photoshop options bar. While "Color" is the default and most common mode for this tool, exploring "Hue," "Saturation," "Luminosity," or "Lightness" can yield different artistic effects or corrections. "Hue" will only change the hue, "Saturation" will only change the saturation, and "Luminosity" will only change the brightness, leaving other attributes untouched.
- Brush Opacity and Flow: As mentioned, these are critical for subtle adjustments. Building up color gradually with low opacity and flow settings often leads to more natural-looking results, especially when dealing with complex textures or gradients.
- Tolerance and Limits: The Color Replacement Tool has settings for "Tolerance" and "Limits." Tolerance controls how similar a pixel's color must be to the sampled color to be affected. A higher tolerance will affect a wider range of colors. The "Limits" options (e.g., "Discontiguous," "Contiguous," "Find Edges") determine how the tool selects pixels to replace. "Discontiguous" will replace color anywhere on the image if it falls within the tolerance range, while "Contiguous" will only replace color on pixels that are touching the sampled color. "Find Edges" attempts to preserve edges while replacing color. Understanding these settings allows for greater control over where and how the color replacement occurs.
- Layer Masks: For more complex edits, consider using the Color Replacement Tool in conjunction with layer masks. Apply the color change on a separate layer, and then use a layer mask to selectively reveal or conceal the effect. This offers non-destructive editing and precise control over the application area.
By understanding these nuances and practicing the various applications, the Color Replacement Tool can become an indispensable part of your Photoshop editing arsenal, empowering you to make precise color adjustments with remarkable efficiency and preserving the integrity of your image's texture.
tags: #colour #replacement #in #photoshop