Clip Studio Paint (CSP), a program with roots tracing back to Manga Studio 4, offers artists a powerful suite of tools for digital creation. Among its most lauded features is the integration of 3D models, a capability that can significantly streamline and elevate the artwork process. This article delves into the multifaceted ways 3D models can be utilized within CSP, from importing and posing to integrating them seamlessly into your unique artistic style. Whether you're a seasoned professional or just beginning your digital art journey, understanding how to leverage these virtual assets can unlock new levels of efficiency and creative expression.
Importing and Accessing 3D Models
The journey into using 3D models in Clip Studio Paint begins with acquiring and importing them into your workspace. CSP supports several formats for 3D model import, offering flexibility for artists using assets created in other software.
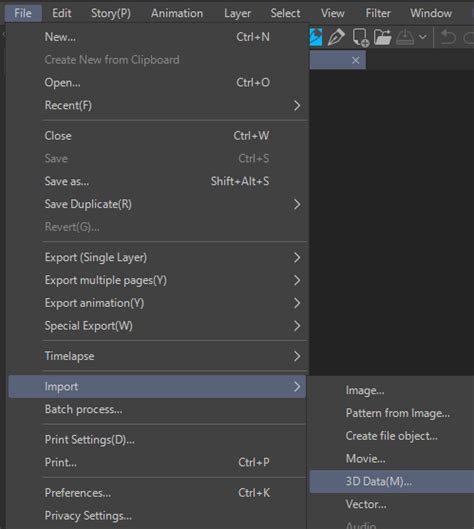
One of the most straightforward methods for PC and Mac users involves a simple drag-and-drop operation. To facilitate this, ensure your screen is set up to display both your Clip Studio Paint canvas and the folder containing your downloaded model. By dragging the model file directly into the canvas, you can quickly bring the 3D object into your project. Alternatively, you can navigate to File > Import > 3D data within the program to select and import your model.
However, a significant consideration arises when importing models not specifically designed for Clip Studio Paint. These external models may present limitations, particularly in their ability to have individual parts manipulated or posed. This is where the Clip Studio Assets site becomes an invaluable resource. The Assets marketplace is curated to offer 3D elements optimized for CSP, ensuring greater compatibility and functionality.
To access the Clip Studio Assets, open the Clip Studio App. Within the app, locate the search bar and tap the "Filter" button. From the filtering options, select one of the 3D categories to narrow down your search to 3D models. Once you discover a model that aligns with your artistic needs, clicking on its thumbnail will reveal more detailed information. For free assets, you'll find a "Download" button, while paid models will display a "Checkout now" button.
After a model has been successfully downloaded, return to Clip Studio Paint. Open the Material Library, typically found within the program's interface. Your newly downloaded model should appear at the top of the Material Library list, ready for use. Models sourced from Clip Studio Assets are often pre-configured with controls that allow for easy posing and manipulation directly within CSP, a feature that significantly enhances their utility.
Understanding 3D Model Controls and Posing
The true power of 3D models in Clip Studio Paint lies in their dynamic posing capabilities. While not all 3D models possess this feature, most character models, especially those found on Clip Studio Assets, are designed with intuitive controls for manipulation.
Once a compatible 3D model is imported into your canvas, you'll notice a set of tools, often located in the tool property panel or a dedicated sub-tool panel, that allow for extensive adjustments. For character models, these controls are crucial for achieving desired poses.

The available controls typically enable you to:
- Rotate the Camera: This function allows you to freely orbit around the 3D model, viewing it from any angle. This is essential for establishing the correct perspective for your artwork.
- Adjust Model Position: Tools are provided to move the character up and down, or slide them back and forth. This helps in framing the character within your composition.
- Manipulate Individual Body Parts: More advanced models offer controls to pose specific limbs, joints, and even facial expressions. This level of detail allows for highly customized and natural-looking poses.
- Apply Pre-set Poses: Many character models come with a library of pre-defined poses. These can be applied with a single click, offering a rapid way to experiment with different stances and actions. The "3D pose information" feature can quickly change the model's posture.
Beyond posing, the tool properties panel often provides further customization options. These can include adjustments to:
- Lighting: You can modify the direction and intensity of light sources to simulate different environmental conditions and enhance the mood of your scene. This is often done by clicking and dragging on a sphere in the tool property panel.
- Perspective: Some models allow for the simulation of "manga perspective," which can be particularly useful for creating dynamic comic panels.
- Body Sliders: For character models, you might find sliders to adjust proportions, such as body height, head-to-body ratio, and even specific muscle groups.
- Outlines: Options to adjust the thickness of outlines can help integrate the 3D model more cohesively with your 2D linework.
When using a model downloaded from the asset store, it's important to remember that poses and models are sometimes available for download separately. If you import a pose without a compatible 3D model, CSP might default to a basic male model, potentially leading to an unexpected or humorous outcome if the pose was intended for a different character type. Always ensure you have the correct 3D model selected before applying a pose.
Clip Studio Modeler: Crafting Your Own 3D Assets
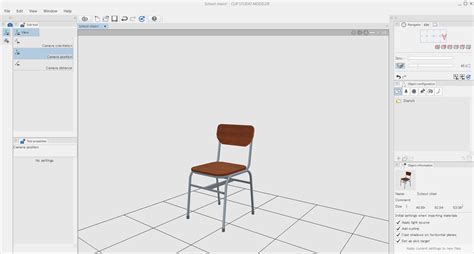
For artists seeking ultimate control over their 3D assets or wishing to import models from external software, Clip Studio Modeler presents a powerful, free solution. This dedicated tool allows users to configure 3D data created in other applications into materials that can be seamlessly integrated into Clip Studio Paint.
Clip Studio Modeler empowers you to:
- Import General 3D Data: You can import various 3D file formats from other modeling software.
- Create 3D Object Materials: This includes crafting materials for everyday objects such as chairs, cups, musical instruments, and even intricate backgrounds.
- Set Up 3D Characters: The tool facilitates the creation of customizable 3D character models, allowing for detailed configuration of their appearance and rigging.
It is important to note a version compatibility caveat: 3D object materials created with Clip Studio Modeler version 1.8.0 or later cannot be imported into earlier versions of Clip Studio Paint or Clip Studio Modeler. When installing Clip Studio Modeler, follow the on-screen instructions carefully. During the installation process, you will be prompted to select your preferred language, with English being a readily available option. The installation files for Windows are typically named something like CSM_11013w_setup.exe, while Mac users will find CSM_1110m_app.pkg.
By utilizing Clip Studio Modeler, artists can overcome the limitations of imported models and create a bespoke library of 3D assets perfectly tailored to their workflow and artistic vision.
Integrating 3D Models into Your Artistic Workflow
The incorporation of 3D models into your illustration process can serve multiple purposes, significantly boosting efficiency and aiding in complex compositional challenges.
Poses and Anatomy
One of the most common and effective uses of 3D models is for establishing accurate and dynamic character poses. Instead of relying solely on imagination or static reference images, you can pose a 3D model to match the exact action or emotion you intend to convey. This is particularly beneficial for complex or unusual stances that are difficult to visualize or find reference for.
The ULTIMATE Guide To 3D Models | In Clip Studio Paint
When using a 3D model as a base for your illustration, it's crucial to avoid a direct, unedited trace that can result in artwork that appears stiff or overly mechanical. The goal is to use the 3D model as a guide, not a rigid template.
- Start with Basic Shapes: Begin by tracing the fundamental body shapes and proportions of the 3D model. This helps in quickly establishing the overall form and perspective.
- Inspect and Refine: As you trace, pay close attention to areas where the 3D model might appear anatomically unusual or stylistically inconsistent with your desired outcome. Make immediate edits to these parts during the tracing process.
- Stylistic Adjustments: Once the initial sketch is laid down, actively make stylistic adjustments. Alter the body and stance to make it less stiff, adding your unique artistic flair. This might involve softening joints, adjusting muscle flow, or exaggerating certain features to align with your personal style.
- Use as Reference: After the initial sketch is complete, you can move the 3D model to the side or hide it entirely, using it purely as a reference for further refinement and detailing.
This approach ensures that your final artwork retains your individual artistic voice while benefiting from the structural accuracy and dynamic possibilities offered by the 3D model.
Composition and Backgrounds
3D models are not limited to character posing; they are equally powerful tools for establishing composition and creating backgrounds.
- Scene Composition: A 3D model can be used to roughly visualize how elements within a scene will interact. This allows you to experiment with different camera angles, character placement, and object arrangements before committing to detailed 2D work. This foresight can prevent costly and time-consuming mistakes down the line.
- Backgrounds and Environments: When depicting characters within complex environments, such as intricate buildings or detailed cityscapes, 3D models can serve as an invaluable base. You can import or create 3D models of buildings, furniture, or entire architectural structures and use them as a foundation for your background drawings. This significantly reduces the workload and ensures accurate perspective and scale.
- Prop Placement: Similar to backgrounds, 3D models of propsâwhether it's a weapon, a piece of furniture, or a vehicleâcan be placed within your scene to ensure they are correctly scaled and integrated into the composition.
Combining 3D Models with AI
The advent of AI in art generation opens up new avenues for utilizing 3D models. By combining the precise control of 3D models with the generative capabilities of AI, artists can achieve even more sophisticated results.
One method involves using a 3D model to generate a base image, which is then fed into an AI image-to-image function. For instance, you might use Clip Studio Paint to paint over a 3D model, creating a stylized rendering. This rendered image can then be uploaded to an AI platform like NovelAI, where it can be used to generate variations, explore different artistic styles, or refine the composition further.
Additionally, AI can be employed to generate posture and composition ideas that can then be translated into 3D models or directly used as references alongside 3D models within your workflow. This synergistic approach allows artists to rapidly explore a wide range of creative possibilities, blending the structured nature of 3D modeling with the emergent creativity of AI.
Considerations for High-Quality Results
While 3D models offer substantial benefits, achieving excellent results requires mindful application.
- Model Quality: The quality of the 3D model itself is paramount. Using high-quality models with good topology and detail is essential. Low-quality models or poorly executed poses can lead to wasted time and effort, ultimately hindering your workflow rather than enhancing it.
- Artistic Proficiency: It's important to remember that 3D models are tools, not replacements for artistic skill. A strong understanding of basic posing, anatomy, and composition is still necessary to effectively utilize and interpret 3D references.
- Stylization: When tracing or using 3D models as a base, the key is to adapt and stylize the output. Directly replicating a 3D model can make your artwork appear generic. Injecting your personal style, adjusting proportions, and refining details are crucial steps to creating unique and compelling pieces.
By approaching the use of 3D models with these considerations in mind, artists can fully harness their potential to speed up their workflow, improve accuracy, and explore new creative directions in their artwork. The integration of 3D models into Clip Studio Paint represents a significant advancement in digital art tools, offering a versatile and powerful resource for artists across all disciplines.