Adobe InDesign serves as a powerful tool for the design and layout of multi-page documents, offering sophisticated features to streamline the creation of complex publications. Among its most valuable functionalities is the automatic generation of a Table of Contents (TOC), a feature that significantly reduces manual effort, especially for lengthy documents like magazines, catalogues, and books. This tutorial delves into the intricacies of creating, formatting, and updating a TOC in InDesign, ensuring your readers can navigate your content with ease.
The Foundation: Understanding InDesign's TOC Generation
At its core, InDesign's TOC generation relies on a fundamental principle: the intelligent use of Paragraph Styles. These styles act as formatting templates for text, allowing InDesign to identify and categorize different elements within your document, such as chapter titles, section headings, and sub-headings. By applying specific paragraph styles to these elements, you provide InDesign with the necessary information to build an accurate and structured table of contents.
For shorter documents, manually typing out section titles and their corresponding page numbers might seem feasible. However, as publications grow in complexity and length, this manual approach becomes not only time-consuming but also prone to errors. InDesign's automated TOC feature elegantly addresses this challenge, offering efficiency and precision.
Essential Preparations for TOC Creation
Before you can leverage InDesign's automated TOC function, two primary requirements must be met:
Document Unity: All content intended for inclusion in the table of contents must reside within the same InDesign document. If you have a 60-page article, for instance, your InDesign project must encompass all 60 pages. This ensures InDesign can access and cross-reference all necessary text elements.
Rigorous Formatting: The text content must be meticulously formatted using distinct paragraph styles. This means that each type of content you wish to include in your TOC - be it chapter titles, section headings, or sub-sections - must have its own dedicated paragraph style applied. For example, all chapter titles should share a "Chapter Title" paragraph style, and all sub-section headings should have a "Sub-Section Heading" style. This systematic application of styles is the bedrock upon which InDesign builds the TOC.
Step-by-Step Guide to Creating Your Table of Contents
The process of generating a table of contents in InDesign can be broken down into three main stages: applying paragraph styles, specifying TOC content and formatting, and finally, generating and updating the TOC.
Stage 1: Defining and Applying Paragraph Styles
The first crucial step involves creating and applying the paragraph styles that will serve as the basis for your TOC.
- Identify TOC Elements: Begin by determining which paragraphs should be included in your table of contents. This typically includes chapter titles, major section headings, and potentially sub-section headings.
- Create Paragraph Styles: For each of these identified elements, create a unique paragraph style within InDesign. You can do this by selecting a sample of the text you want to style, then navigating to the Paragraph Styles panel (Window > Type & Tables > Paragraph Styles). Click the Create New Style button (the '+' icon) and name your style descriptively, for example, "Chapter Title," "Section Heading," or "Sub-Section."
- Apply Styles Consistently: Once your paragraph styles are defined, apply them rigorously to all corresponding text throughout your document. For instance, select all your chapter titles and apply the "Chapter Title" paragraph style to them. Similarly, apply the "Section Heading" style to all section headings. This consistent application ensures InDesign can accurately identify these elements later.
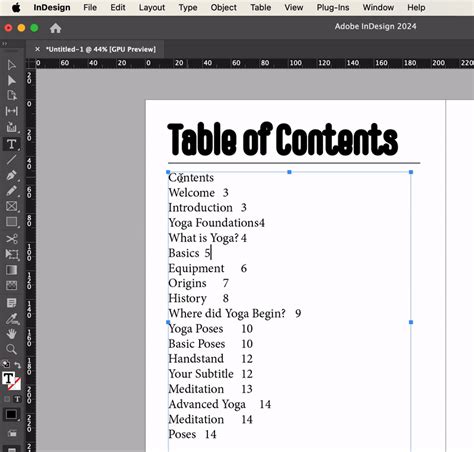
An example of this process involves selecting a section title and then clicking the plus icon in the Text Style section of the Properties panel to create a new Paragraph Style. Subsequently, other section titles in the document can be selected, and the newly created ‘Section Title’ paragraph style can be applied from the Paragraph Styles menu. When a Paragraph Style has text applied to it, a ‘+’ sign will appear next to the style name, indicating it has been modified. Applying the ‘Section Title’ Paragraph Style to all section titles ensures they are all formatted identically, and more importantly, that InDesign recognizes them as a distinct category of text.
Stage 2: Configuring the Table of Contents Settings
With your paragraph styles in place, you can now instruct InDesign on how to build the TOC.
- Access the Table of Contents Dialog: Navigate to the top menu bar and select
Layout > Table of Contents. This action will open the Table of Contents dialog box. - Specify TOC Title: In the
Titlebox, you can enter a title for your table of contents. This title will appear at the very top of the generated TOC. By default, it is often set to "Contents," but you can customize this or leave it blank if you've already included a "Table of Contents" heading on your layout page. - Include Paragraph Styles: This is the core of the configuration. In the
Other Styleslist, you will see all the paragraph styles defined in your document. Select the paragraph styles you wish to include in your TOC (e.g., "Chapter Title," "Section Heading") and click theAddbutton to move them to theInclude Paragraph Styleslist. The order in which you add them here will generally determine their hierarchical order in the TOC. - Define Entry Styles: For each paragraph style listed in
Include Paragraph Styles, you can specify how its corresponding entries should be formatted within the TOC. This is done through theEntry Styledropdown menu. You can choose an existing paragraph style to format the TOC entries, or you can create a new one on the fly. This allows for distinct styling of TOC entries versus their original appearance in the document. For instance, you might want TOC entries to be smaller or have a different font weight. - Control Page Numbering: Within the
Entry Stylesettings, you can also control the placement and formatting of page numbers. Options exist to display the page number before or after the entry text, or to omit it entirely (No Page Number). - Manage Spacing Between Entry and Page Number: The
Between Entry And Numberfield dictates what character appears between the text of a TOC entry and its corresponding page number. By default, this is often set to^t, which inserts a tab character. You can modify this to include other characters or, more powerfully, use a tab with a leader. - Alphabetical Sorting: For certain types of lists, such as a list of advertisers, alphabetical sorting is desirable. The
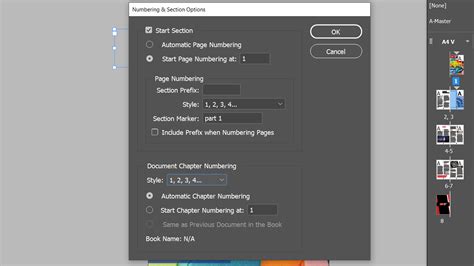
Sort Orderoption in theTable of Contentsdialog box allows you to specify alphabetical sorting for selected styles. The sort order is typically determined by the document’s default language setting. - Prefix and Chapter Numbering: For longer documents, especially those structured as books, you might want to incorporate chapter numbers. InDesign allows you to assign chapter numbers to individual documents within a book. You can also define section prefixes, which can be used to label section pages automatically (e.g., "A-16" or "Chapter 1: Section A-16"). The
Numbering & Section Optionsdialog box (accessible viaLayout > Numbering & Section Options) is where these settings are managed. You can choose a chapter numbering style and specify the starting number.
Stage 3: Generating and Placing the Table of Contents
Once your settings are configured, you can generate the TOC.
- Generate the TOC: With the
Table of Contentsdialog box still open, clickOK. Your mouse cursor will transform into a loaded text icon, indicating that the TOC is ready to be placed. - Place the TOC: Click anywhere within your InDesign document where you wish the table of contents to appear. InDesign will create a new text frame and populate it with the generated TOC based on your specified styles and inclusion rules.
- Styling the TOC Entries Manually (if needed): While InDesign creates the TOC, you can further refine its appearance. If you didn't specify custom
Entry Stylesduring configuration, the TOC entries will initially appear with their original formatting. You can then manually adjust the formatting of the TOC text frame, or create specific paragraph styles for the TOC itself. For instance, you might want to adjust leading (line spacing) for better readability or ensure page numbers align perfectly.
How to Create a Table of Contents in InDesign
Advanced Formatting and Refinements
Achieving a professional-looking table of contents often involves fine-tuning specific formatting aspects.
Formatting with Tab Leaders and Right Alignment
A common convention for TOCs is to have the text aligned to the left, the page numbers aligned to the right, and a series of dots (leader dots) connecting them.
- Using Tabs: If you manually created your TOC or need to adjust the auto-generated one, you can use InDesign's tab controls. Delete any space between your section title and page number and press the
Tabkey. - Accessing the Tabs Panel: Highlight the text frame containing your TOC. Navigate to
Type > Tabs(or use the shortcutCommand + Shift + Ton Mac,Control + Shift + Ton Windows). A ruler and tab panel will appear. - Setting Right-Aligned Tabs: In the Tabs panel, select the right-justified tab icon (the one with the arrow pointing to the right). Click on the ruler above the text box to set a tab stop. Drag this tab stop to align with the right edge of your text frame.
- Adding Dot Leaders: In the
Leaderbox within the Tabs panel, type a period (.) and pressEnter. InDesign will automatically insert dot leaders in the space defined by the tab. - Right Indent Tab and Leaders: Alternatively, within the
Table of Contentsdialog box, underBetween Entry And Number, you can delete the default^tand selectRight Indent Tabfrom the dropdown. This ensures the page number is right-aligned. You can then specify leaders in theLeaderbox.
Indenting Sub-Sections
To visually hierarchy your TOC, it's good practice to indent sub-section titles and perhaps use a slightly smaller or lighter font. This can be achieved by creating a new paragraph style specifically for indented TOC entries and applying it via the Entry Style option in the Table of Contents dialog. Within this new style, you would define a left indent using the Indents and Spacing tab.
Hiding Page Numbers for Specific Entries
In some cases, you might not want a page number to appear next to a particular TOC entry, such as for a main chapter title. You can achieve this within the Table of Contents dialog by selecting the relevant paragraph style in the Include Paragraph Styles list and then choosing No Page Number from the Page Number dropdown menu within the Entry Style settings.
Creating TOC Styles for Reusability
For documents that require multiple types of TOCs (e.g., a main TOC and a list of figures), or if you frequently create TOCs, you can save your TOC settings as a TOC style. This allows you to quickly apply a predefined set of rules and formatting to future TOCs. In the Table of Contents dialog, after configuring your settings, you can click Save Style to store it for later use.
Managing Page Numbering and Sections
InDesign offers granular control over document and section numbering, which is crucial for accurate TOC generation, especially in books.
- Page Numbering Styles: You can determine the numbering scheme for your document or book. For long documents, assigning chapter numbers is common, with each document in a book receiving a single chapter number. However, InDesign allows for more complex numbering by defining sections.
- Defining Sections: Sections enable you to apply different numbering schemes within a single InDesign document. For example, the front matter (like the title page and TOC) might be numbered using Roman numerals (i, ii, iii), while the main body of the document starts with Arabic numerals (1, 2, 3). To define a section, you select a page, go to
Layout > Numbering & Section Options, and choose to start a new section. Here, you can specify the starting page number, a section prefix (like "A-" or "Chapter 1:"), and the page numbering style (Arabic, Roman, etc.). - Consecutive Numbering: For books where page numbers must flow consecutively across multiple InDesign documents, ensure that the
Continue from previous sectionoption is selected in theNumbering & Section Optionsdialog for each subsequent document.
Equitable Language Considerations
Adobe is committed to inclusivity. In InDesign, starting from version 17.0 (2022), non-inclusive language has been replaced to reflect core Adobe values. This commitment extends to professional design practices, encouraging the use of clear and respectful terminology throughout your documents.
Updating Your Table of Contents
One of the most significant advantages of InDesign's automated TOC feature is its ability to update. If you make changes to your document after generating the TOC - such as adding or deleting text, moving sections, or changing heading text - the TOC will not automatically reflect these changes.
- Manual Update: To refresh your TOC, select the text frame containing the table of contents. Then, navigate to
Layout > Update Table of Contents. InDesign will re-scan your document based on the applied paragraph styles and update the TOC accordingly. - Updating TOC Styles: If you have saved TOC styles, you can edit them to reflect changes in your document structure or desired formatting.
Conclusion: Streamlining Navigation with InDesign
Mastering the creation of tables of contents in Adobe InDesign is an essential skill for anyone producing multi-page documents. By understanding and effectively utilizing paragraph styles, section numbering, and the dedicated TOC generation tools, you can create professional, accurate, and easily navigable publications. This automated process not only saves considerable time and effort but also significantly reduces the likelihood of errors, ensuring a polished final product for your readers. The flexibility of InDesign allows for extensive customization, from simple dot leaders to complex hierarchical structures, empowering designers to tailor their TOCs to the specific needs of any project.