Masking in Adobe InDesign is a powerful technique that allows you to selectively reveal or hide portions of an image or artwork. By creating clipping paths or using shapes as frames, you can precisely control the visible areas of your graphics, transforming them into compelling visual elements for your designs. This guide delves into various InDesign masking techniques, from straightforward frame-based cropping to intricate text-based effects, empowering designers to achieve professional-looking results entirely within InDesign.
Understanding the Fundamentals of Clipping Paths
At its core, a clipping path is a vector path that defines which parts of an object will be visible. Anything outside this path is hidden, effectively cropping the artwork to the shape of the path. This concept is central to how masking operates in InDesign. While clipping paths can be created automatically using programs like Adobe Photoshop, InDesign offers a more integrated approach, often leveraging its frame-based structure.
The Role of Frames in InDesign Masking
In InDesign, most objects, especially images, are placed within frames. These frames, whether rectangular, elliptical, or custom-shaped, inherently act as masks. By default, an image placed within a frame is contained by that frame's boundaries. You can then manipulate the image within the frame using InDesign's fitting options or by directly adjusting the frame's shape.
Consider a simple scenario: you place an image into a rectangular frame. The frame acts as the initial mask, showing only the portion of the image that fits within its borders. You can then use the Selection Tool to move the image within the frame, revealing different parts of it. To achieve a non-rectangular mask, you can change the shape of the frame itself using InDesign's built-in shape tools or by converting existing shapes into frames.
Creating Basic Clipping Masks with Shapes
InDesign simplifies the process of creating clipping masks by allowing you to use shapes as containers for your images. The fundamental workflow involves having a shape and an image, and then combining them so the image appears within the confines of the shape.
Step-by-Step: Masking an Image with a Shape
Create Your Shape: Begin by drawing the desired shape using InDesign's shape tools (Rectangle, Ellipse, Polygon) or the Pen Tool for custom contours. This shape will serve as your masking frame.
Place or Paste the Image:
- If the image is not yet in InDesign: Select the shape you just created. Then, go to
File > Placeand choose the image you want to use. The image will be automatically placed inside the selected shape. - If the image is already placed in InDesign: Cut the image (
Edit > Cut). Select the shape you drew. Right-click within the shape and choosePaste Into. The image will now be contained within the shape.
- If the image is not yet in InDesign: Select the shape you just created. Then, go to
This direct method ensures that the image is cropped to the precise boundaries of your chosen shape, creating a clean and effective clipping mask. It’s important to ensure that both the shape and the image reside on the same layer for seamless integration.
Advanced Masking with Compound Paths
When you need to create a more complex masking shape composed of multiple individual shapes, InDesign’s Compound Path functionality becomes invaluable. A compound path allows you to combine several vector shapes into a single, unified path.
Creating a Clipping Mask with a Group of Shapes
Design Your Shapes: Create all the individual shapes that will form your composite mask. These can be overlapping or separate.
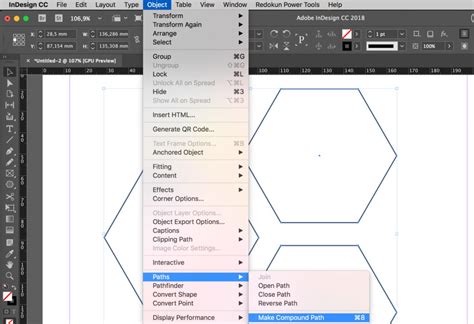
Make a Compound Path: Select all the shapes you want to combine. Navigate to
Object > Paths > Make Compound Path. This action merges them into a single path object.Mask the Image: Once you have your compound path, you can mask an image within it using the same methods described earlier:
- Select the compound path and use
File > Placeto import your image. - Alternatively, cut an existing image and use
Paste Intowith the compound path selected.
- Select the compound path and use
This technique is particularly useful for creating intricate silhouettes or combining geometric elements into a unique frame for your artwork.
Text as a Masking Element: The Power of Outlines
One of the most visually striking masking techniques involves using text itself as the frame for an image. This "text mask" effect is highly popular in graphic design for creating bold headlines and eye-catching visuals. InDesign makes this process remarkably straightforward.
Transforming Text into a Mask
The key to using text as a mask is to convert the text into editable vector outlines. This process turns each character into a series of paths that can then act as a container for an image.
Method 1: Direct Placement
Type Your Text: Use the Type Tool (T) to create your desired headline. For maximum impact, choose a bold, heavy font like Futura Extra Bold or Impact, as these fonts have substantial letterforms that showcase images effectively. Adjust the size and spacing to your preference.
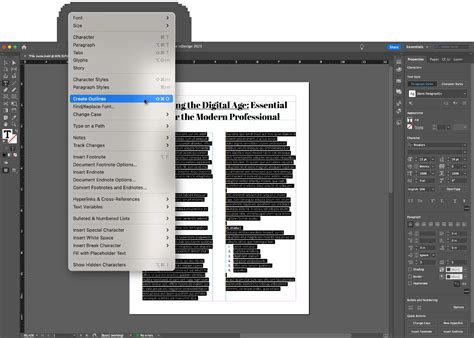
Convert Text to Outlines: With the text selected, go to
Type > Create Outlines(or use the shortcutShift + Command/Ctrl + O). This crucial step converts the live text into vector shapes.Place the Image: Select the outlined text frame. Go to
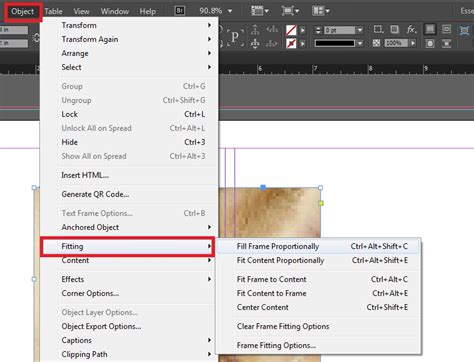
File > Placeand select the image you wish to use. Click inside the outlined text; the image will now appear within the contours of your letters.Adjust the Image: You can reposition or resize the image within the text by double-clicking it and using the Selection Tool or Direct Selection Tool. To ensure the image fits proportionally within the text, right-click on the text and select
Fitting > Fit Frame Proportionally(or use the shortcutShift + Option/Alt + Command/Ctrl + C).
Method 2: Paste Into
Type and Outline Text: Follow steps 1 and 2 above to create and outline your text.
Cut the Image: If the image is already placed in your document, cut it (
Edit > Cut).Paste Into Text: Select the outlined text object. Right-click and choose
Paste Into. The image will now fill the text outlines.Adjust Fitting: Use the
Fittingoptions as described above to ensure the image is positioned and scaled correctly within the text.
Creating Dynamic Text Mask Effects
For more complex and dynamic text mask effects, often seen in professional advertisements, you can employ a technique involving duplicating and cropping the image within the outlined text.
Achieving Advanced Text Mask Effects
Set Up and Outline Text: Follow the initial steps to type your headline and convert it to outlines.
Place and Position Image: Place your chosen image into the outlined text. Adjust its position and scale as needed.
Copy and Paste in Place: With the image selected within the text frame, copy it (
Edit > Copy). Then, useEdit > Paste in Place(or the shortcutShift + Option/Alt + Command/Ctrl + V). This pastes an identical copy of the image directly on top of the original.Crop and Refine: Now, you can crop the top layer of the image. Select the frame containing the duplicated image and adjust its boundaries to reveal specific parts of the image. You might want to mask out certain areas to create a layered or fragmented look.
Repeat for Depth: Repeat the copy, paste in place, and crop process multiple times. Each duplication and cropping step allows you to fine-tune which parts of the image are visible, building up a sophisticated layered effect within the text. This iterative process allows for precise control over the visual outcome, creating a truly eye-catching mask.
How to Make a Clipping Mask in InDesign
Utilizing the Pen Tool for Custom Masks
While InDesign’s frame tools are excellent for standard shapes, the Pen Tool offers unparalleled flexibility for creating highly customized, complex clipping paths. This is essential when you need a mask that doesn't conform to basic geometric forms.
Crafting Masks with the Pen Tool
Draw Your Path: Select the Pen Tool (P). Click to create anchor points and drag to create curves, meticulously drawing the outline of your desired mask. Close the path by clicking on the starting point.
Prepare the Image: Select the image you want to mask. Cut it (
Edit > Cut).Paste into the Path: Select the path you just created with the Pen Tool. Right-click and choose
Paste Into. The image will now be confined to the custom shape you drew.Edit the Mask and Image: You can further refine the shape of your mask by using the Direct Selection Tool to modify anchor points and curves. Similarly, you can adjust the image within the mask using the Selection Tool and fitting options. If your custom path has an unwanted stroke, you can easily remove it by setting the stroke color to "None" in the Stroke panel.
This method provides complete creative freedom, allowing you to mask images with organic shapes, intricate designs, or any custom form imaginable.
Masking with Alpha Channels (Photoshop Integration)
While InDesign excels at creating masks directly, it can also utilize alpha channels saved from external applications like Adobe Photoshop. An alpha channel is essentially a saved selection or mask within an image file that InDesign can interpret.
Leveraging Alpha Channels for Masking
Create Alpha Channel in Photoshop: In Photoshop, create a precise selection of the area you want to be visible. Then, go to the Channels panel, click the "Save channel as a selection" icon (a dotted circle at the bottom of the panel), and name your alpha channel. Save the image (e.g., as a PSD or TIFF) with the alpha channel intact.
Place in InDesign: In InDesign, go to
File > Placeand select the image file that contains the alpha channel.Select Alpha Channel: In the
Placedialog box, check the "Show Import Options" box. In the subsequent dialog, navigate to the "Alpha Channel" dropdown menu and select the channel you created in Photoshop.Clipping Path Dialog: Alternatively, after placing the image, go to
Window > Output > Clipping Path. Here, you can select the desired alpha channel from the "Type" dropdown menu. You can also adjust settings like "Threshold" and "Tolerance" to fine-tune how InDesign interprets the channel, which can be useful for creating masks based on color values or transparency.
This integrated workflow allows you to leverage the advanced selection tools in Photoshop to create complex masks that are then seamlessly applied within your InDesign layout.
Understanding Threshold and Tolerance in Masking
When working with clipping paths, particularly those derived from alpha channels or created using automated methods, the concepts of "Threshold" and "Tolerance" become relevant. These settings help define the precision with which InDesign interprets variations in pixel values to form the mask.
Threshold and Tolerance Explained
Threshold: This value determines the range of pixel shades that will be included in the mask. For example, a lower Threshold value might only select pure white areas, while a higher value will include lighter grays as well. This is particularly useful when creating masks from grayscale images or alpha channels where you want to isolate specific tonal ranges.
Tolerance: This setting controls how much variation from the selected color or tonal value is allowed. A higher tolerance means that pixels with values closer to the initial selection will also be included, leading to a broader mask. Conversely, a lower tolerance will result in a mask that adheres more strictly to the exact values.
These parameters are crucial when InDesign attempts to automatically generate a clipping path, for instance, by analyzing the colors within an image. By adjusting the Threshold and Tolerance values in the Clipping Path dialog box, you can refine the generated path to accurately capture the desired areas and exclude unwanted elements, effectively creating "holes" or defining the precise boundaries of what must be visible.
The Versatility of InDesign Masking
The ability to mask images and artwork in InDesign extends far beyond simple cropping. It's a fundamental tool for visual storytelling, allowing designers to:
- Isolate Subjects: Clearly define and highlight the main focus of an image.
- Create Vignettes: Softly fade images into the background.
- Integrate Graphics: Seamlessly blend images with text and other design elements.
- Develop Complex Compositions: Layer images and shapes to build sophisticated visual narratives.
- Achieve Professional Aesthetics: Produce clean, polished layouts that meet high design standards.
Whether you are using the inherent masking capabilities of frames, the precision of the Pen Tool, the transformative power of text outlines, or integrating with external tools like Photoshop, InDesign provides a robust and intuitive environment for mastering masking techniques. By understanding and applying these methods, designers can elevate their work, creating visually compelling and precisely controlled graphic compositions.