Photoshop, a cornerstone of digital design, offers a robust platform for creating custom patterns that can elevate any project. While the software comes equipped with a plethora of stock patterns and a vast online repository of downloadable designs, the true creative power lies in the ability to generate your own unique motifs. This tutorial delves into the process of creating both basic and seamless repeating patterns in Photoshop, transforming your artistic visions into infinitely tileable designs.
The Foundation: Understanding Pattern Creation in Photoshop
At its core, a pattern in Photoshop is a design element, such as a dot or an icon, that can be repeated equally and evenly distributed across a canvas. Photoshop patterns are inherently raster-based, meaning they are composed of pixels and will retain their resolution based on the original image used to create them. This is a crucial distinction to remember, as Photoshop is not a vector program.
To begin crafting your own pattern, the first step involves defining your design. This design needs to be conceived in a way that allows for seamless, infinite repetition. Whether you're starting with a simple icon, a digital drawing, a scan of a traditional artwork (like pastel or watercolor), or even text, the principle remains the same: the design must be capable of tiling without visible breaks or jarring transitions.
Setting Up Your Workspace: The Canvas
The journey to creating a custom pattern begins with setting up your digital workspace. This involves creating a new file with specific dimensions. The most critical aspect of this setup is ensuring that the width and height of your canvas are identical, resulting in a square document. This square canvas will serve as your fundamental "pattern tile." While the exact size can vary, choosing dimensions that are not excessively large is advisable for manageability, especially when you're starting out. A common and effective starting point is a canvas of 256 pixels by 256 pixels, or for more detailed patterns, a 1000px by 1000px square document is also frequently recommended. For those aiming for high-resolution patterns suitable for large-scale applications, a canvas size of 12,000 x 12,000 pixels offers significant flexibility.
When creating your new document, it's often beneficial to set the "Background Contents" to "Transparent." This allows you to separate your main design elements from the background, offering greater flexibility for individual adjustments later on.
Designing Your Pattern Motif
With your canvas prepared, the next stage is to introduce the graphic motif that will form the basis of your pattern. This could be anything from a single, precisely placed dot to a complex arrangement of icons, drawings, or text. If you're working with existing artwork, such as a scan of a drawing, it's essential to "clean up" the image. This involves isolating the desired objects and ensuring the background is a uniform color. This background color can be chosen to complement your design, or you can opt for a transparent background for maximum versatility.
If you're starting with multiple elements, whether they are icons from a library like The Noun Project or individual graphical elements, it's often best to place them at the center of your canvas initially. For a streamlined workflow, especially if your motif consists of several components, it's highly recommended to merge these layers into a single layer. This is achieved by selecting all the relevant layers (holding down Shift while clicking) and then right-clicking to select "Merge Layers."

Achieving Seamlessness: The Offset Filter and Pattern Preview
The key to a truly effective repeating pattern lies in its ability to tile seamlessly, meaning there are no visible edges or interruptions when repeated infinitely. This is where Photoshop's tools for creating repeating designs become indispensable.
The Offset Filter Method
A traditional and effective method for ensuring seamless repetition involves the "Offset" filter. This command allows you to translate the image horizontally and/or vertically. The process works by automatically cutting the canvas's contents in half and shifting them. To make the edges of your basic pattern model coincide correctly, it's essential to move the image by a measure equivalent to half the width and half the height of your canvas.
For instance, on a 1000px square canvas, you would go to Filter > Other > Offset. For a horizontal offset, you would input 500px (half of 1000px) into the Horizontal field and 0px into the Vertical field, ensuring "Wrap Around" is selected. This action will shift the pattern, revealing where the edges meet. You will then need to fill in any gaps or adjust elements that are now bisected by the canvas edges. After making these adjustments, you'll repeat the offset process, this time with a vertical offset of 500px and a horizontal offset of 0px, again ensuring "Wrap Around" is active. This iterative process helps to create a design where the edges align perfectly when tiled.
The Pattern Preview Tool
A more modern and intuitive approach is to utilize Photoshop's "Pattern Preview" feature. This tool is a game-changer for pattern creation, allowing you to see your pattern repeat in real-time as you design. To activate it, navigate to View > Pattern Preview. Once enabled, your canvas will display a repeating preview of your design, extending infinitely across the screen.
With Pattern Preview active, you can start arranging your motifs. The beauty of this tool is that as you move an element to one edge of the canvas, its counterpart will automatically appear on the opposite edge, demonstrating how the pattern will tile. This allows for a much more fluid and immediate design process. You can duplicate, resize, rotate, and flip elements, observing their effect on the overall repeat instantly.
How to Create a Polka Dot Pattern with Photoshop Pattern Preview Mode
When arranging elements with Pattern Preview, a good strategy is to start with the largest motifs, then incorporate medium-sized ones, and finally fill in the smaller details in the remaining spaces. The goal is to create a fluid composition where the repetition is not obvious, and the overall image appears cohesive and balanced. If you notice gaps or areas that feel too sparse, you can duplicate existing elements (Cmd + J on Mac, Ctrl + J on Windows) and reposition them.
Defining and Saving Your Pattern
Once you are satisfied with your design and have ensured its seamlessness, the next step is to define it as a pattern within Photoshop.
Using the "Define Pattern" Command
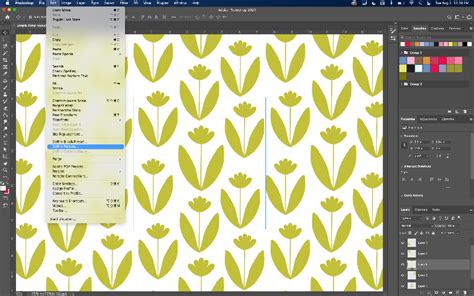
To save your creation, navigate to Edit > Define Pattern. A dialog box will appear, prompting you to name your pattern. Choose a descriptive name that will help you identify it later. Clicking "OK" saves your pattern to Photoshop's pattern library.
Managing Your Patterns
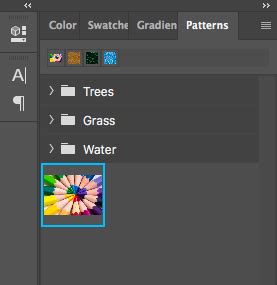
Your newly created pattern will now appear in the Patterns menu (which can be accessed via Window > Patterns). You can apply it to new documents or existing layers.
- Applying a Pattern:
- Edit > Fill: Go to
Edit > Fill, select "Pattern" from the "Contents" dropdown, and choose your custom pattern. - Layer Style: Double-click on a layer to open the Layer Style options, then select "Pattern Overlay." Your pattern will be available in the dropdown menu.
- Paint Bucket Tool: Select the Paint Bucket tool, choose "Pattern" from the mode dropdown in the top options bar, and then select your custom pattern.
- Pattern Stamp Tool: This tool, found under the Clone Stamp tool in the sidebar, allows you to paint with your defined pattern.
- Edit > Fill: Go to
Renaming Patterns: If you wish to change the name of a pattern you've already saved, locate it in the Patterns menu, right-click on it, and select "Rename."
Organizing Patterns: To keep your pattern library organized, you can create new groups or subfolders. In the Patterns menu, click the folder icon at the bottom left and give your new group a name. You can then drag and drop your patterns into these folders.
Deleting Patterns: If you decide you no longer need a particular pattern, you can select it in the Patterns menu and click the trash can icon at the bottom.
Installing Third-Party Patterns: The "Define Pattern" feature can also be used to load patterns created by others. You can download pattern files (often with a .pat extension) and load them into Photoshop using the Preset Manager.
The Preset Manager
For more advanced pattern management, including loading and saving pattern libraries, the Preset Manager is invaluable. Navigate to Edit > Presets > Preset Manager. Select "Patterns" from the "Set" dropdown menu. From here, you can load new pattern sets (using the "Load" button), save your current set of patterns (using the "Save Set" button), or delete individual patterns.
Advanced Techniques and Considerations
Flattening vs. Non-Destructive Editing
When defining a pattern, Photoshop essentially captures a snapshot of your canvas. If your design involves multiple layers, you must flatten the image before using Edit > Define Pattern to ensure all elements are included. However, flattening is a destructive process. For more flexibility, especially when using the Pattern Preview tool, your elements remain on separate layers, and the tool generates the seamless preview dynamically. When you then "Define Pattern," Photoshop creates a new, flattened pattern based on the current view.
Resizing and Transforming Patterns
Once a pattern is applied, you can adjust its scale and rotation. When using a Pattern Fill layer (Layer > New Fill Layer > Pattern), a dialogue box appears allowing you to adjust the "Scale" (effectively zooming in or out of the pattern) and "Angle." If you need to adjust the pattern itself, rather than the object it's applied to, you can select the pattern layer, go to Edit > Transform > Scale, and ensure "Transform Pattern" is checked while "Transform Object" is unchecked.
Working with Vector Elements
While Photoshop patterns are raster, you can incorporate vector elements from Adobe Illustrator into your Photoshop workflow. In Illustrator, you can create patterns using the Object > Pattern > Make command. These patterns can then be saved and loaded into Photoshop's Preset Manager. This approach leverages the scalability of vector graphics before they are rasterized for use in Photoshop.
Alternative Pattern Creation Tools
Beyond Photoshop, other tools offer excellent pattern creation capabilities:
- Adobe Illustrator: Its dedicated Pattern Tool (
Object > Pattern > Make) provides robust vector-based pattern design. - Procreate (iPad): Offers a straightforward canvas tiling feature for repeating designs.
- Online Tools: Platforms like Patterninja and PatternPad provide intuitive interfaces for creating complex patterns without extensive software knowledge. Adobe Capture also allows for pattern creation from photos.
The Creative Potential of Custom Patterns
Understanding how to create your own patterns in Photoshop opens up a world of creative possibilities. Whether you're a graphic designer looking to add unique textures to branding, a digital artist aiming to create intricate backgrounds, or a real estate photographer seeking to visually enhance property presentations with elements like floor designs or architectural details, custom patterns are an invaluable asset. They can be applied to objects, fabrics, mockups, and much more, adding a professional and artistic touch to your work. The process, while requiring attention to detail, is ultimately a straightforward and rewarding one that can significantly enhance your design repertoire.