Have you ever seen an old CRT television? If not, you might have missed out on the grainy, low-resolution images that were common before HDTV. Sometimes, you could even see vertical lines in rows when you paused a scene. This same effect can be seen in old photocopiers and printers, leaving behind a low-quality trace of lines that are often associated with vintage aesthetics. This is called a scan line effect, and it can be used to add a gritty, low-resolution look to your photos for a vintage feel in Adobe Photoshop.
This tutorial will guide you through several methods for achieving the scan line effect, utilizing both Photoshop's built-in tools and powerful third-party plugins. Whether you're aiming for a subtle vintage touch or a pronounced retro aesthetic, these techniques will help you achieve the desired look.
Understanding the Scan Line Effect
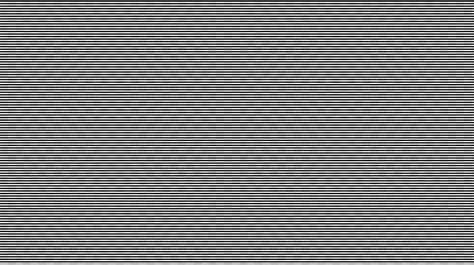
The scan line effect mimics the way older display technologies, such as CRT (Cathode Ray Tube) televisions, computer monitors, and early photocopiers, rendered images. These devices worked by scanning an electron beam across the screen in horizontal lines. Due to the physical limitations of the technology, these lines were often visible, especially on lower-resolution displays or when pausing a moving image. This characteristic gave vintage media its distinct visual texture. Recreating this effect in modern digital images can evoke nostalgia and add a unique, retro charm to your work.
Method 1: Creating Scan Lines with a Custom Photoshop Pattern
This method involves crafting a simple pattern within Photoshop and then applying it to your images. It’s a fundamental technique that relies entirely on Photoshop's core functionalities.
Step 1: Create a New Document for Your Pattern
Begin by creating a new document for your pattern. Navigate to File > New. For optimal results, set the dimensions to 1-pixel width and 2-pixel height. Click Create. This will result in a new document that is incredibly small, likely appearing as a single, unseeable dot. Utilize the magnifying glass tool to zoom in significantly until the two pixels are large enough to work with.
Step 2: Design the Scan Line Pattern
With your zoomed-in canvas, select the pencil tool. Your goal is to create a simple alternating pattern of black and white (or transparent) pixels. Paint the top pixel black and leave the bottom pixel white or transparent. Alternatively, you can use the square selection tool to select the bottom pixel and then use the paint bucket tool to fill it with black. The key is to have a distinct line of black followed by a line of white or transparency.
Once your simple two-pixel pattern is designed, you need to define it as a custom pattern. Select the entire image using the selection tool or by pressing CTRL/CMD + A. Then, go to Edit > Define Pattern.
A dialog box will appear, prompting you to name your pattern. Choose a name that you will easily recognize, such as "scan lines," "horizontal lines," or "CRT lines." Click OK. Your newly created pattern is now saved in Photoshop's pattern library and can be accessed for future projects. You can repeat this process to create various patterns with different line thicknesses or color combinations for more variety.
Step 3: Import Your Photo into Photoshop
To apply your scan line pattern, you first need to open the image you wish to edit. Go to File > Open and select the desired photograph from your computer.
Step 4: Applying the Scan Lines Pattern
With your photo open, the next step is to incorporate the custom pattern. Create a new layer above your current image layer. If you don't see the Layers panel, go to Window > Layers to enable it. From the main menu, select Layer > New > Layer.
Now, with the new, empty layer selected, go to the Edit menu and choose Fill. In the Fill window, click on the Contents dropdown menu and select Pattern. This will reveal further options, allowing you to choose from your saved custom patterns. Open the dropdown menu that appears, locate the "scan lines" pattern you created in Step 2, and click OK.
This action will fill the new layer with your chosen pattern. Initially, it might appear as a solid-colored layer, but remember that the pattern itself is only 1x2 pixels. If you zoom in closely on this layer, you will observe the small repeating pattern of black and white (or transparent) lines. Our objective is to make these lines visible on your photograph, so we need to blend this layer effectively.
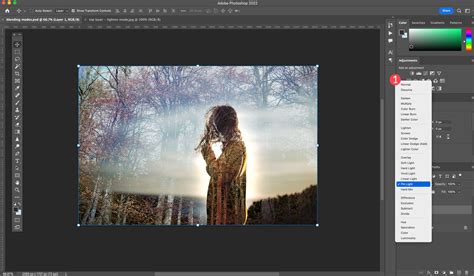
Step 5: Blending the Pattern with Your Image
To integrate the scan line pattern with your photograph, you need to adjust the blending mode of the pattern layer. Experiment with different blending modes to see which one yields the best results for your specific image. Modes like Overlay and Soft Light often work well for this effect, providing a subtle yet noticeable scan line appearance. However, feel free to explore all available blending modes and preview their impact. Once you find a suitable mode, you can further refine the effect by adjusting the opacity of the pattern layer. Lowering the opacity will make the scan lines less intense, while increasing it will make them more prominent.
Step 6: Refining the Pattern Overlay
If you find that the scan lines are too thin or not prominent enough, you can increase their size without having to recreate the pattern. With the pattern fill layer selected, go to Edit > Free Transform. In the Transform options, you can adjust the width and height percentages. Increasing these values will scale up the pattern, making the scan lines appear thicker and more noticeable on your image.
You can also add further effects to enhance the scan line appearance. For instance, applying a slight blur to the pattern layer can help to soften the lines, making them appear more naturally integrated into the image rather than starkly imposed. This can be achieved through Filter > Blur.
Step 7: Utilizing Layer Masks for Precision
To gain finer control over where the scan line effect is applied, or to selectively soften or remove it from certain areas, you can use layer masks. Add a layer mask to your pattern fill layer by clicking the "Add layer mask" icon at the bottom of the Layers panel.
With the layer mask selected, you can use the brush tool to paint on the mask. Painting with black on the mask will hide the pattern layer in those areas, effectively removing the scan lines. Painting with white will reveal the pattern. Using shades of gray will create semi-transparent effects. This allows you to, for example, reduce the intensity of the scan lines on faces or other important elements of your image, ensuring they don't detract from the main subject. You can also use the brush tool to apply effects like blur more selectively by painting on the mask of a blurred adjustment layer.
Method 2: Scan Lines with Boris FX Optics
Boris FX offers a suite of powerful plugins that can significantly enhance your creative workflow. For achieving scan line effects, their Optics plugin provides a quick and professional solution, offering numerous presets and customizable controls.
Step 1: Import Your Image and Create a Smart Object Layer
Begin by opening your photograph in Photoshop. To ensure that you can make non-destructive edits, it's highly recommended to convert your image layer into a Smart Object. To do this, right-click on your image layer in the Layers panel and select Convert to Smart Object. This allows you to apply filters and adjustments that can be modified later without permanently altering the original pixel data.
Step 2: Apply the Boris FX Optics Effect
With your layer converted to a Smart Object, navigate to the main menu and select Filter > Boris FX > Optics. This action will launch the Optics interface, which will automatically import your selected layer.
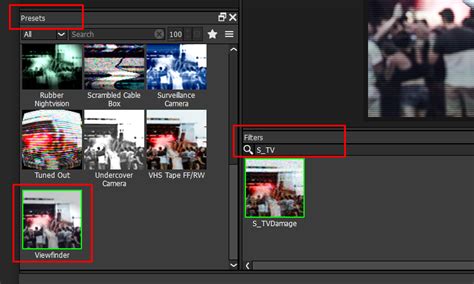
Step 3: Utilize Filters and Presets within Optics
Optics provides a vast library of filters and presets. For creating scan lines, the S_TVDamage filter, found within the Stylize category, is particularly effective. Select this filter to apply it as a new layer above your image within the Optics interface.
Within the Optics interface, you'll find a panel for presets. The Viewfinder preset often delivers a good starting point for scan lines, but don't hesitate to explore other presets within the S_TVDamage filter or even other filters in the Stylize category.
Once you select a preset, its adjustable parameters will be displayed on the right side of the interface. Here, you can fine-tune various aspects of the scan line effect. Key settings include:
- Mode: Choose between color or grayscale output.
- Bars Brightness and Sharpness: Control the intensity and definition of the scan lines.
- Scan Lines Frequency: Adjust the density or spacing of the lines.
- Blur: Add a subtle blur to soften the lines if desired.
For a quick effect, you can often rely on the default settings of a suitable preset. However, to tailor the look precisely, focus on the settings within the Scanline section, which allow you to adjust the thickness and frequency of the lines.
Once you are satisfied with the appearance of the scan lines, click OK to apply the effect and return to Photoshop. You can then continue to refine your image with other Photoshop tools or additional Boris FX plugins.
Method 3: Scan Lines with Boris FX Sapphire
Sapphire is another flagship plugin from Boris FX, renowned for its extensive collection of high-quality visual effects. Its seamless integration with Adobe Photoshop allows for sophisticated image manipulation, including the creation of realistic scan line effects.
Step 1: Apply the Sapphire Plug-in
After importing your photo and converting it to a Smart Object (as described in Method 2, Step 1), you can apply the Sapphire plugin. Go to Filter > Boris FX > Sapphire. This will launch Sapphire's Effect Builder directly within Photoshop.
Step 2: Navigating Sapphire's Effect Builder
The Sapphire Effect Builder provides a powerful nodal interface for creating and combining effects. On the left side of the interface, you'll find a search bar and a list of available effects.
Search for the ScanLines effect, which is typically located under the Stylize category. Double-click on the ScanLines effect to add it as a node to your effect chain and preview its application on your image.
On the right side of the interface, you'll find a comprehensive set of parameters to customize the scan line effect. These include:
- Line Frequency: Controls the density and spacing of the scan lines.
- Sharpness: Adjusts the clarity and definition of the lines.
- Brightness and Contrast: Modifies the overall intensity and contrast of the lines.
- Color: Allows you to set the color of the scan lines, enabling you to match specific vintage display aesthetics.
- Line Angle: If you wish to introduce a slight tilt to the scan lines, this parameter can be adjusted.
Sapphire's nodal system allows you to create sophisticated presets by combining multiple effects. You can modify existing presets or build your own from scratch to achieve a unique scan line pattern.
When you have finished fine-tuning the scan line effect, click OK to apply the changes and return to Photoshop. From here, you can add further effects, filters, or adjustments to achieve a polished, professional result.
EASY CRT Monitor Effect (Photoshop Tutorial)
Advanced Techniques and Considerations
Fine-Tuning with Advanced Blending Options
For even greater control over the scan line effect, especially when using the custom pattern method, you can delve into Photoshop's advanced blending options. After applying your pattern fill layer and setting its blending mode, you can access these options by double-clicking on the layer in the Layers panel (but not on the layer thumbnail or name) or by going to Layer > Layer Style > Blending Options.
Within the Blending Options dialog, under the Blend If section, you can use the sliders to control how the pattern layer interacts with the underlying layers based on their brightness values. Specifically, sliding the White slider to the left can help to hide the scan line effect in the brighter areas (highlights) of your image, making it more prominent in the darker areas (shadows).
To create a smoother transition and avoid harsh edges, you can hold down the Alt/Option key while dragging one half of the Blend If slider. This will split the slider, allowing you to feather the transition and create a more subtle and integrated effect. This technique is particularly useful for protecting facial features or other critical details from being obscured by the scan lines.
Creating Variations for High-Resolution Images
When working with high-resolution images, a simple 1x2 pixel pattern might appear too small and insignificant. In such cases, it's beneficial to create larger patterns or adjust the scaling of the pattern fill layer more aggressively.
Consider creating patterns with dimensions like 1x3 pixels or even larger, depending on the desired line thickness. For instance, a 1x3 pixel document could have the pattern: black, white, black. When defined and applied, this would result in thicker lines.
Furthermore, as mentioned in Method 1, Step 6, you can use Edit > Free Transform to scale the pattern fill layer. Experiment with scaling percentages to find the right balance between line prominence and image detail. For very high-resolution images, you might need to scale the pattern by 200%, 300%, or even more.
Emulating Pixel Art CRT Effects
The scan line effect can also be applied to pixel art to give it a vintage video game aesthetic. For pixel art, the approach might involve creating patterns that mimic the color limitations and artifacts of older displays.
One approach involves creating a new document, perhaps 1x3 pixels, to establish alternating patterns for individual color channels (Red, Green, Blue) and a general pattern for all channels. This can lead to a very bright and sometimes blown-out appearance, which can then be controlled with adjustments like Gaussian Blur applied judiciously.
The concept of a "kernel" pattern, described as a white center that gradually fades outwards, is also relevant here. This kernel can be defined as a pattern and then applied using a layer mask to an untouched original image layer. The subsequent steps often involve "fudging and messing about," highlighting the iterative and experimental nature of achieving specific artistic effects.
The Role of Experimentation and Personal Taste
It is crucial to remember that achieving the perfect scan line effect often comes down to experimentation and personal taste. The provided methods offer a solid foundation, but the best results are usually obtained by tweaking parameters, trying different blending modes, and combining techniques.
Don't be afraid to:
- Create a variety of custom patterns.
- Experiment with different blending modes and opacity levels.
- Utilize layer masks to isolate the effect.
- Adjust transform scaling for pattern layers.
- Explore the diverse filter options within plugins like Boris FX Optics and Sapphire.
The goal is to find a balance that enhances your image without overwhelming it, evoking the desired vintage or retro feel. Whether you are aiming for a subtle texture or a pronounced CRT simulation, the tools and techniques discussed here provide a comprehensive toolkit for your creative endeavors.